Friday, November 30, 2018

Can I Get A Whoop Whoop? It's Beginning to Look a Lot Like...

Hi, all!

Another week has just whizzed by!  Doesn't it seem like they go faster the closer we get to Christmas?  I'm still trying to avoid seeing exactly how close it is, but it IS the last day of November - EEK!  I know we are close to the point where we won't be able to share easily (because secrets!) but I hope you'll still have something to share, even if it's not a finish!  So let's get started whooping it up!

*&*&*&*&*&*

There wasn't too much time for quilting or sewing this week, although I did manage to quilt and bind a quilt for the ministry...


When I wasn't sewing, I was finishing up the kitchen remodel...


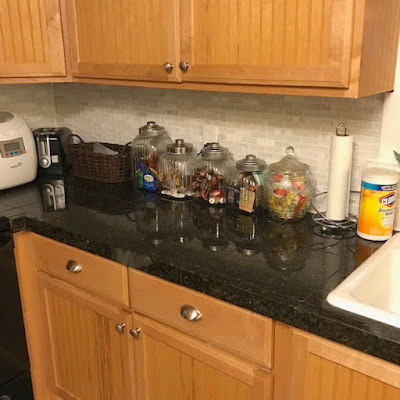
Here it is, in all it's messy countertop glory!  It's nice to have this job finished, and I love the way the new backsplash looks.

I also hung the pictures back in the freshly painted foyer, and started doing a little Christmas decorating...


We went to a really nice tree farm last weekend and got the pretty wreath (a weird place to hang it, but I like it there!) and the little live trees on this furniture piece.  After Christmas, I'll give the trees to my daughter to plant in her new back yard.  My yard has more than enough trees!!


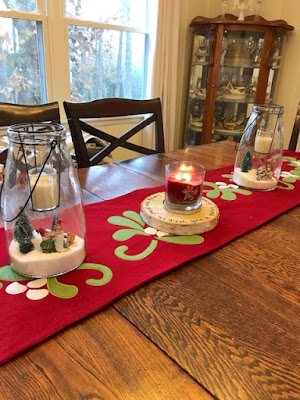
And this morning, I got out my Kate Spain table runner and decorated the dining room table!  I love those candle holders - they are fun to fill with seasonal stuff!  


I filled the bottom of the jar with kosher salt (a trick I learned from a caterer - it looks like snow), and added the cute little bottlebrush trees I found in the Target Dollar Spot.  It still looked a little empty until I added the elf figurines I bought years ago for my daughter.  She left them at home when she moved out, and they've found a new purpose now!

And one other thing happened this week that's worth a whoop whoop....


Our quilt ministry Christmas party!  We had a fun time - lots of good food and then a Dirty Santa battle exchange!  I love these ladies - we have so much fun together, AND do so much good!


And last of all, we had a family photo shoot with the grands - our first!  Isn't this a wonderful pic?  And there are lots more (although I won't bore you with them all at the same time!)

So - - - can I get a whoop whoop?

*&*&*&*&*&*&*

And now it's your turn!

What's got you whooping it up this week?


What's making you do a little happy dance?

Share!  We want to dance right along with you,

And it's always more fun to dance with friends!

The party will stay open until Sunday midnight.

Hope to see you there!

Hugs!

Sarah

Wednesday, November 28, 2018

I May Have A Scrap Problem... Your Daily Dose of Inspiration!


Hi, all!

Well, if you saw my post from Monday, you know that I haven't had much sewing time in the past week!  But I have had a little bit of time to haunt Instagram and find some new inspiration for us - so that's what we've got today!  Take a look at these beauties...


I am SO in love with Wendy's mid-century modern piece - I really want to dig in my solid scraps and see what I can find to make one like it!  


And aren't these bowls amazing?  I couldn't find a pattern or tutorial, but I think I could figure this out with a little trial and error.


The sheer scrappiness of this quilt makes my heart happy!  I love the repeating elements of the star and the hourglass block.


Wouldn't this make a beautiful Christmas quilt?  I may start making red and white nine-patches in anticipation of next year...


And this one pleases my soul on so many levels!  I love the colors, the arrows, the movement of it, and yes, of course, the scrappiness!

*&*&*&*&*&*&*

I hope you've found something to inspire yourself in one of these beauties.  I'll try to do better by next week and get back to sewing - I really miss it.  My poor sewing machine doesn't recognize me!

Hugs!

Sarah

Monday, November 26, 2018

Make-A-List Monday - Getting Older is NOT for Sissies!

Hi, all!

Monday!  How did that happen?  Such a busy week last week, and then the weekend just flew by - - - but as usual, Monday brings a fresh start and a clean slate! 

I learned an important lesson last week, which I'll share in a minute - but first, let's look at last week's list.

1.  Put up a tile backsplash in the kitchen.  (My husband is taking vacation time this week so I will be assisting in the process while he takes the lead.)
Done!!  I absolutely love the way this totally changed the look of my kitchen.  Here's the before shot:


And here are the finished shots:


2.  Hang pictures in the foyer.
Didn't get to this one..

3.  Quilt at least two quilts for the quilt ministry.
...or this one...

4.  Make backs for all three of the grandkids' annual quilts.
I did, however, get two of these made! I must have had a brain fart when I was figuring out how much I needed for the backs, though, because I had more than I needed for Nathanael's, and too little for both Emmy's and Lilli's!  Both the backs for the younger kids' quilts are finished, and I bought a piece of 108" wide for Lilli's, so I guess (in a way) it's finished too!

5.  Cook lots of yummy things to take to my daughter's house for Thanksgiving dinner.
Done!  We had a great time, with so. much. food!

6.  Start decorating the house for Christmas (after Thanksgiving, of course!)
I did find some tiny live trees and a pretty wreath at a friend's Christmas tree farm, and I've picked up some greenery for the house, but I haven't dragged anything out of the attic yet.  

7.  Take care of any quilt ministry needs that come up.
We only had one request this week, a quilt for a man who just started chemotherapy today.


And now I'll share the lesson I learned - getting older is NOT for sissies!  Home renovations almost kicked my butt, and DID kick my husband's!  We only worked a half day on Monday and Tuesday, but were so sore and tired afterwards that I couldn't summon any energy to sew!  And my husband went to Physical therapy on Wednesday morning and the therapist told him that his home reno days were over for this week, at least.  Fortunately, by Wednesday we had finished the part that would have been hardest for me - getting the old ThermoTile off, and putting up the backing board.  After that was done, it really was just a one-person job anyway - but getting into that small space under the counter is tough work!  It's done now, though, and I love it!

And we did spend some fun time with the kids on Sunday, taking family pictures...


...and then today, we received a huge fabric donation!  I spent several hours at church getting this gigantic pile stashed away...


Beautiful fabric, and so appreciated!  There's lots of comfort hiding in those stacks!

So that was my week.  It went totally off track, but sometimes that's a good thing.  But it means that I've got to buckle down this week, for sure - because there's only thirty more days until Christmas!  EEK!!!!!  So here's my list for the week...

1.  Tie up some loose ends in the kitchen.

2.  Hang pictures in the foyer.

3.  Decorate the house for Christmas.

4.  Bind three ministry quilts.

5.  Quilt two ministry quilts.

6.  Quilt at least one of the annual quilts.

7.  Keep up with any quilt ministry needs that come up.

Hopefully I'll do better getting through this list than I did last week!  I sure hope so, anyway.  Otherwise I'll be behind, and I hate feeling like that.  Wish me luck!

And now, the question is - - - what are YOU working on this week?

Hugs!

Sarah

Friday, November 23, 2018

Can I Get A Whoop Whoop? Another Use For Quilting Tools...

Hi, all!

Are you still in a turkey coma?  As I sit here writing this post on Thursday night, I'm struggling to stay awake - because of a busy week and a huge Thanksgiving dinner at my daughter's house, oh, and a very comfortable chair!  But the fact remains that it's Friday, and that means it's time for us to get our whoop whoop on - so let's get started!

*&*&*&*&*&*&*

As I said, it's been a busy week, and I've been using my quilting tools - but not for quilting!  


These all came in very handy as my husband and I worked on finishing up the remodel of our kitchen and dining room - the backsplash!


Here's what it looked like before we started - a dark ThermoTile backsplash over dark granite tile counters.  As you can see, behind the ThermoTile was more knotty pine paneling.  My husband (bless him) ripped off all the ThermoTile, then we went to work scraping off the old glue.


Next up was putting up a nice flat backer board for the new tile to be installed on.  Old houses are so exciting to work with - the distance between counter and upper cabinet is not consistent anywhere!  But caulk is my friend.  Here you can see the tile we'll be installing.


Great product recommendation - we used Musselbound Adhesive Tile Mat to put up our tile instead of thinset.  I pressed it up over the backer board, then peeled off the liner and pressed the tile right into it.  Works like a charm, and so much easier and neater than thinset!  


See how nice this looks!  And once we found the right tool to cut tiles, filling in those little empty areas went quickly too!


And here it is, with all the new tile!  I still need to grout it (I've learned that getting old means crouching down to install backsplash is REALLY hard on your body!) but that's probably what I'll be working on today.  I'd rather do that than brave the Black Friday crowds any day!!  It's such a change - much brighter and more cheerful.  It will be nice to finish and get the kitchen put back together, although having to go out to dinner most of the time isn't so bad.

So - - - can I get a whoop whoop?

*&*&*&*&*&*&*

And now it's your turn!

What's making you whoop it up this week?


What's making you do a little happy dance?

Share!  We want to dance right along with you,

And it's always more fun to dance with friends!

The party will stay open until Sunday midnight.

Hope to see you there!

Hugs!

Sarah


Wednesday, November 21, 2018

I May Have A Scrap Problem... Holiday Makings!

Hi, all!

Scraps!  We've all got them, and no matter how hard we work at it, they never seem to go away, do they?  Well, today I'm going to share something a little different, but it's a technique you can use to use up those scraps, too, so it's all good!

I love the Target Dollar Spot. Every time the season changes, they put out new two packs of kitchen towels.  For $3, you can get some really cute stuff - usually one towel with a saying on it, and one in a coordinating print.  I love this kind of towel, but I hate actually using them and getting them dirty, so I use them to make pillow covers on the cheap - and I'm going to share a tutorial here today.


I started with a two-pack of towels.  These are made of cotton toweling, a nice weight.


They were each barely 16" wide as I bought them, so I took a few minutes to take out the hems and sides and press the heck out of them.  Spritzing with water or spray starch will help make them nice and flat.  Sometimes you may need to do this just to get straight edges and square corners!


On the back, I wanted to retain the cute fringe trim on the coordinating towel, so I took the hems out of the sides, but not the top and bottom of the towel.  I did have to release the hem stitching on the sides a little bit to unroll the side hemstitching, but it was easily stitched back.


Next I cut two pieces for the back from the coordinating towel.  When I'm using a 16" pillow form, I like to make my pieces 16" wide also.  That way my pillow is nice and over-stuffed, rather than loose. If you prefer yours looser, you might want to make your pieces a little wider.  This pillow will have an envelope closure, so divide the finished size by 2, and add 2" to that total.  For a 16" pillow, I need two pieces 16" x 10" (16" / 2 + 2").  I cut one from each end of the towel, so I have two pieces with one finished edge each.


Normally I would just cut a 16" square from the other towel that incorporates the design, but on this particular towel, the design was printed very close to the bottom.  Luckily I had a piece left from the coordinating towel, so I sewed it to the bottom of the printed towel.


I then cut a 16" square from my printed towel piece.   Here you can see the three pieces that will make up the pillow cover.


Lay your pillow front face down and top of the design to the top.  Lay one of your backing pieces face up, finished edge towards the top of the pillow, and corners aligned with the bottom corners.  Pin the bottom in place.  Then lay the other backing piece (this would be the one with any edge finish like fringe) with the finished edge towards the bottom of the pillow, overlapping the lower piece, and corners aligned with the top corners.  Pin the top in place, then pin the sides, carefully pinning the overlaps.


If you do have a decorative fringe, Clover clips are great for pinning them out of the way so you don't sew one in the side seam by mistake (don't ask me how I know this...)


Next you'll need binding.  I like to use french fold binding, cut 2.25" wide and pressed in half.  Attach the binding to the BACK of the pillow pieces, stitching through all layers.


Trim the corners of the pillow cover materials (not the binding) so the corners will turn nicely.


Turn the binding to the front and stitch it down, mitering the corners.


Voila!  You have finished a beautiful pillow cover!  Now it's time to put in that pillow form.  Fold the top piece of the back over the front (basically turning the top inside out) and tuck the pillow in the bottom pocket.  Push the stuffing into the bottom corners.  Now fold the top piece back over the top and stuff the top of the pillow form into it, working it well into the corners.  It will be tight, but it just takes a little perseverance.  And now you're done!


First I'll show off the back - isn't it cute with those little tassels?

And now the big reveal...


A beautiful and quick pillow to bring in the season!

And yes, I have plans for Christmas pillows - here are the towels I picked up just a week or so ago at Target!


These pillow covers make wonderful hostess gifts, too - so grab a few packs of towels to keep on hand!  And if you're really lucky, you can find a great sale on pillow forms...


So now I can hand out pillows EVERYWHERE!!

*&*&*&*&*&*&*

I hope you enjoy this tutorial and it's something you can use!  I really need to get on the ball and make my Christmas pillows - but these are quick and easy, so maybe I can get some made this week before I decorate.  An instant way to bring some Christmas cheer!

Hugs!

Sarah