Hi, all!
I’d like to thank you for joining me for the first day of the For Pinks Sakes blog hop! When Anna, who blogs at Life Sew Crafty, first contacted me about a blog hop that would spread awareness of breast cancer and, more specifically, help out her mother-in-law who is batting this disease, I was happy and excited to join in. As you know, this is a cause near and dear to my heart. Here, in her own words, is her story...
“My mother-in-law, Tina, was diagnosed with breast cancer in December 2012. She’s been through radiation, chemo, and several surgeries since then. All of this has resulted in enormous amounts of medical bills, despite decent insurance. She’s such an amazing woman, smiling through all of the treatments and staying upbeat. She is a medical technician and gives back to her patients when her medical issues don’t keep her out of work.”
She has asked each of the participants in this blog hop to create a pink block and share the tutorial for the block. The blocks that are made by the participants will be sent to Anna. She will take them and make a quilt that she plans to donate to the Lemmen-Holton Cancer Pavilion in Grand Rapids, MI, where Tina has had all of her treatments. By the way, you too can join in the creation of the donation quilt - if you want to send her a block to be included in the quilt, check out Anna's post here for the specifics!
And if you’d like to help out with Tina’s medical expenses, you can make a donation by clicking on this link (www.gofundme.com/85ao94) No amount is too small - I hope you’ll take a few minutes to visit the site and help her.
*&*&*&*&*&*&*
Did you know that although deaths cause by breast cancer increased slowly from 1975 to 1990, since 1990 breast cancer deaths have decreased by 34%! This decline is due to improved breast cancer treatment and early detection.
And now, here are the blocks I created for the hop! I tried to limit it to one, but all three of these kept coming up in my drawings and wouldn’t go away! After I played around with them a bit in EQ7, I realized that they worked well together, so I’ll be sharing some of those quilt designs after I show you the blocks.
The first two are pretty simple - just scrappy patchwork blocks with various size patches.
Block #1
Here’s the blow-out of the block, showing how it’s assembled.
The center is made of 1.5” squares, the next ring is 2.5” squares, and the outer ring is 3.5” squares. The finished block should measure 12.5” square.
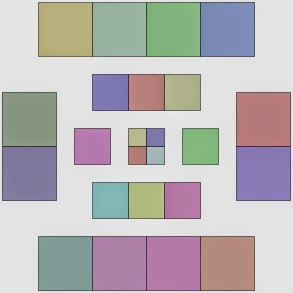
Block #2
Here’s the blowout of this block, showing how it's assembled.
In this block, the center is made of 3.5” squares, the next ring of 2.5” squares, and the outer ring is made of 1.5” squares. The finished block should measure 12.5” square.
Block #3 is a bit more complicated. Here’s the blowout of the block. In this block, the center is made of 1.5” squares.
Now take a 3.25” square and cut it diagonally in both directions to create 4 triangles.
Sew two of the triangles to opposing sides of the four patch unit. Press. Sew the remaining two triangles to the other two sides. Press. Trim the block to 3.25”, or square up by trimming the block to leave a 1/4 inch seam allowance beyond each of the points of the center 4-patch.
Using your 1 7/8” squares, sew together two strips of 3 squares. Sew one 1 7/8” square to opposing sides of the center four-patchpiece you created in the previous step. Press. Sew the 3-piece strips to the remaining two sides.
Now take two 5” squares and cut them diagonally in one direction to create four triangles (two from each square).
Sew two of the triangles to opposing sides of the four patch unit. Press. Sew the remaining two triangles to the other two sides. Press. Trim the block to 8 3/8”, or square up by trimming the block to leave a 1/4 inch seam allowance beyond each of the corners of the 1 7/8” square strips.
Using your 2.5” squares, sew together two strips of four squares and two strips of six squares. Sew a four-square strip to each of two opposing sides. Press. Sew a six-square strip to each of the other two sides. Press. Your block is finished!
And here are some quilts you can create using one or more of these blocks.
 |
| Using Blocks #1 and #2 |
 |
| Blocks #1 and #2 on point |
 |
| Block #2 on point |
 |
| Blocks #1 and #3 on point |
 |
| Block #1 and #3 |
 |
| Block #1 and #3 on point |
 |
| Block #3 on point |
And then there's my personal favorites, the chevrons!
 |
| Block #1 |
 |
| Block #3 |
 |
| Block #2 |
Can you tell I really enjoy playing with EQ7?
Be sure to check out the other stops on the blog hop!
May 24
June 7
June 21
July 5
July 19
And remember, if you'd like to contribute a block to Anna's efforts, you can find the block specs and mailing info here. She's having a giveaway on 8/2 to celebrate the blog hop, and each block sent in earns one entry. There are also entries for donations to her mother-in-law's fund. You can read more about the giveaway here.
*&*&*&*&*&*&*
Thanks for stopping by - I hope you enjoy the blocks! I really appreciate your patience, too, as I learn to use some diagramming programs to create tutorials. It's quite a learning curve!
Be sure to stop by tomorrow, too - Karrie Lyne of Freckled Whimsy will be our guest blogger as part of the Hands2Help Charity Quilt Challenge. I cannot wait to see what she's come up with - she has such great quilt designs!
Hugs!
Sarah