Showing posts with label tutorial. Show all posts

Sunday, March 3, 2024

Fat Quarter Frenzy Is Woven Today!


Hi, all!

We are back this week with another Fat Quarter Frenzy quilt tutorial!  We've been discovering new ways to utilize fat quarters in quilts, and if you're like me and have way too many, a way to use up some of the stash!  So far, we've used 48 fat quarters (!) - 16 in Meet Me in St. Louis, 14 in Kaleidoscope, and most recently 18 in a new version of Supernova.  But I'm still overflowing with fat quarters, so today we will be exploring a new tutorial, this time for a quilt I call Woven.  Let's go!

*&*&*&*&*&*&*


Woven

A Fat Quarter Friendly Quilt


FABRIC REQUIREMENTS:


Fat Quarters (FQ) in three different contrasting color groups

Color A - 7

Color B - 5

Color C - 4


CUTTING:


From Color A FQs, cut:


26 4.5” x 12.5”

30 4.5” x 4.5”


To achieve this, and assuming your FQ have 17” x 20” of useable fabric, cut your first six FQ in this manner:


This will give you 24 long strips and 24 squares.


Take your remaining FQ and cut in this manner:


This will give you your remaining 2 long strips and 6 squares.


From Color B FQs, cut:


13 4.5” x 12.5”

30 4.5” x 4.5”


To achieve this, cut the first 3 FQ in this manner:


This will give you 12 long strips and 12 squares.


Take another FQ and cut four 4.5” x 17” strips.  From one strip, cut one 4.5” x 12.5” strip and one 4.5” square.  Cut the remaining strips into 9 squares.  This will give you one more long strip and 10 more squares, for a total of 13 long strips and 22 squares.

Take the final FQ and cut three more 4.5” strips, then crosscut into 8 4.5” squares, giving you a total of 13 long strips and 30 squares.


From Color C FQs, cut:


48 4.5” s 4.5”


To achieve this, cut four 4.5” x 17” strips from each of the four FQ, then cross cut them into 12 4.5” squares for a total of 48 4.5” squares.


ASSEMBLY


This quilt is made up of three separate blocks, shown as follows:


Block 1:  Make 13


Block 2:  Make 6


Block 3:  Make 6


LAYOUT:


While it may look complicated to lay out, it’s really quite simple.  First of all, take Block 1 and lay it out in a checkerboard design, with 3 blocks in the 1st, 3rd and 5th rows with the stripes running horizontally, and 2 blocks in the 2nd and 4th rows with the stripes running vertically.


Take Block 2 and place them between the horizontal stripe blocks in rows 1, 3, and 5. 


Now take Block 3 and place them between the vertical stripe blocks in rows 2 and 4.


Assemble and quilt as desired!


*&*&*&*&*&*&*


I hope you enjoy this quilt pattern, and that it helps you use up some random fat quarters in your stash!  See you next Sunday with another Fat Quarter Frenzy quilt!


Hugs!


Sarah

Sunday, February 18, 2024

Fat Quarter Frenzy Rediscovers Supernova!


Hi, all!

I. Am. Late.  So sorry!  And I will totally blame this on the state of my studio - it's a flipping mess, with about twelve quilt tops waiting to be quilted, a customer quilt just off the frame, a t-shirt quilt in progress, and now a new quilt started for a wedding shower gift.  My brain feels like my studio looks, and I just completely forgot what day it was yesterday when I should have been writing this post.

That being said, welcome back to Fat Quarter Frenzy, where we are exploring simple quilt designs made from fat quarters.  If you're like me, you've got a lot of fat quarters sitting around, and hopefully this will help you find a good quilt-y home for some of them!  So far I've used 30 fat quarters, 16 with Meet Me In St. Louis, and another 14 with Kaleidoscope.  

Today we're going to re-visit one of the most popular tutorials on my blog, Supernova.  I first posted this in 2017, as part of the Stunning Stars series, and it's been requested as a PDF hundreds (thousands?) of times since then.  But I'm always up for a new interpretation of this quilt, so here it is in mixed prints!

*&*&*&*&*&*&*


Land, Sea and Sky

A Fat Quarter Friendly Quilt


This is a very simple one-block quilt; its secret lies in the layout.

Finished size:  approximately 60” x 60”


Materials:


18 Fat Quarters - 9 each in two different color groups

For the purposes of this tutorial, choose one that you will 

        designate as the “background” fabric.  Dark fabrics tend 

        to pop, so you may find that the lighter of your two 

        fabrics works best as background.


CUTTING DIRECTIONS:


From each fat quarter, cut six 7” squares.  Once finished, you should have 54 each in two different color groups.  


Choose four foreground squares in the same print that will become your focal star.


MAKING THE BLOCKS:


Take the squares you have designated as background squares and draw a line from one corner diagonally across the square on the back of the fabric. This can be done with pencil, chalk, or my personal favorite, Hera marker, which just leaves a visible crease on the fabric.


Pair one background square with one foreground square, right sides together.


Stitch a scant 1/4” from each side of the diagonal line you drew on the background square.  Cut on the diagonal line.  Press seam to one side (it doesn’t matter which side, just be consistent.)   You will have 54 sets of two matching half square triangles (HSTs).  Trim your HSTs to 6.5” square.  Don’t skip this step - it will make your quilt go together faster and look better!


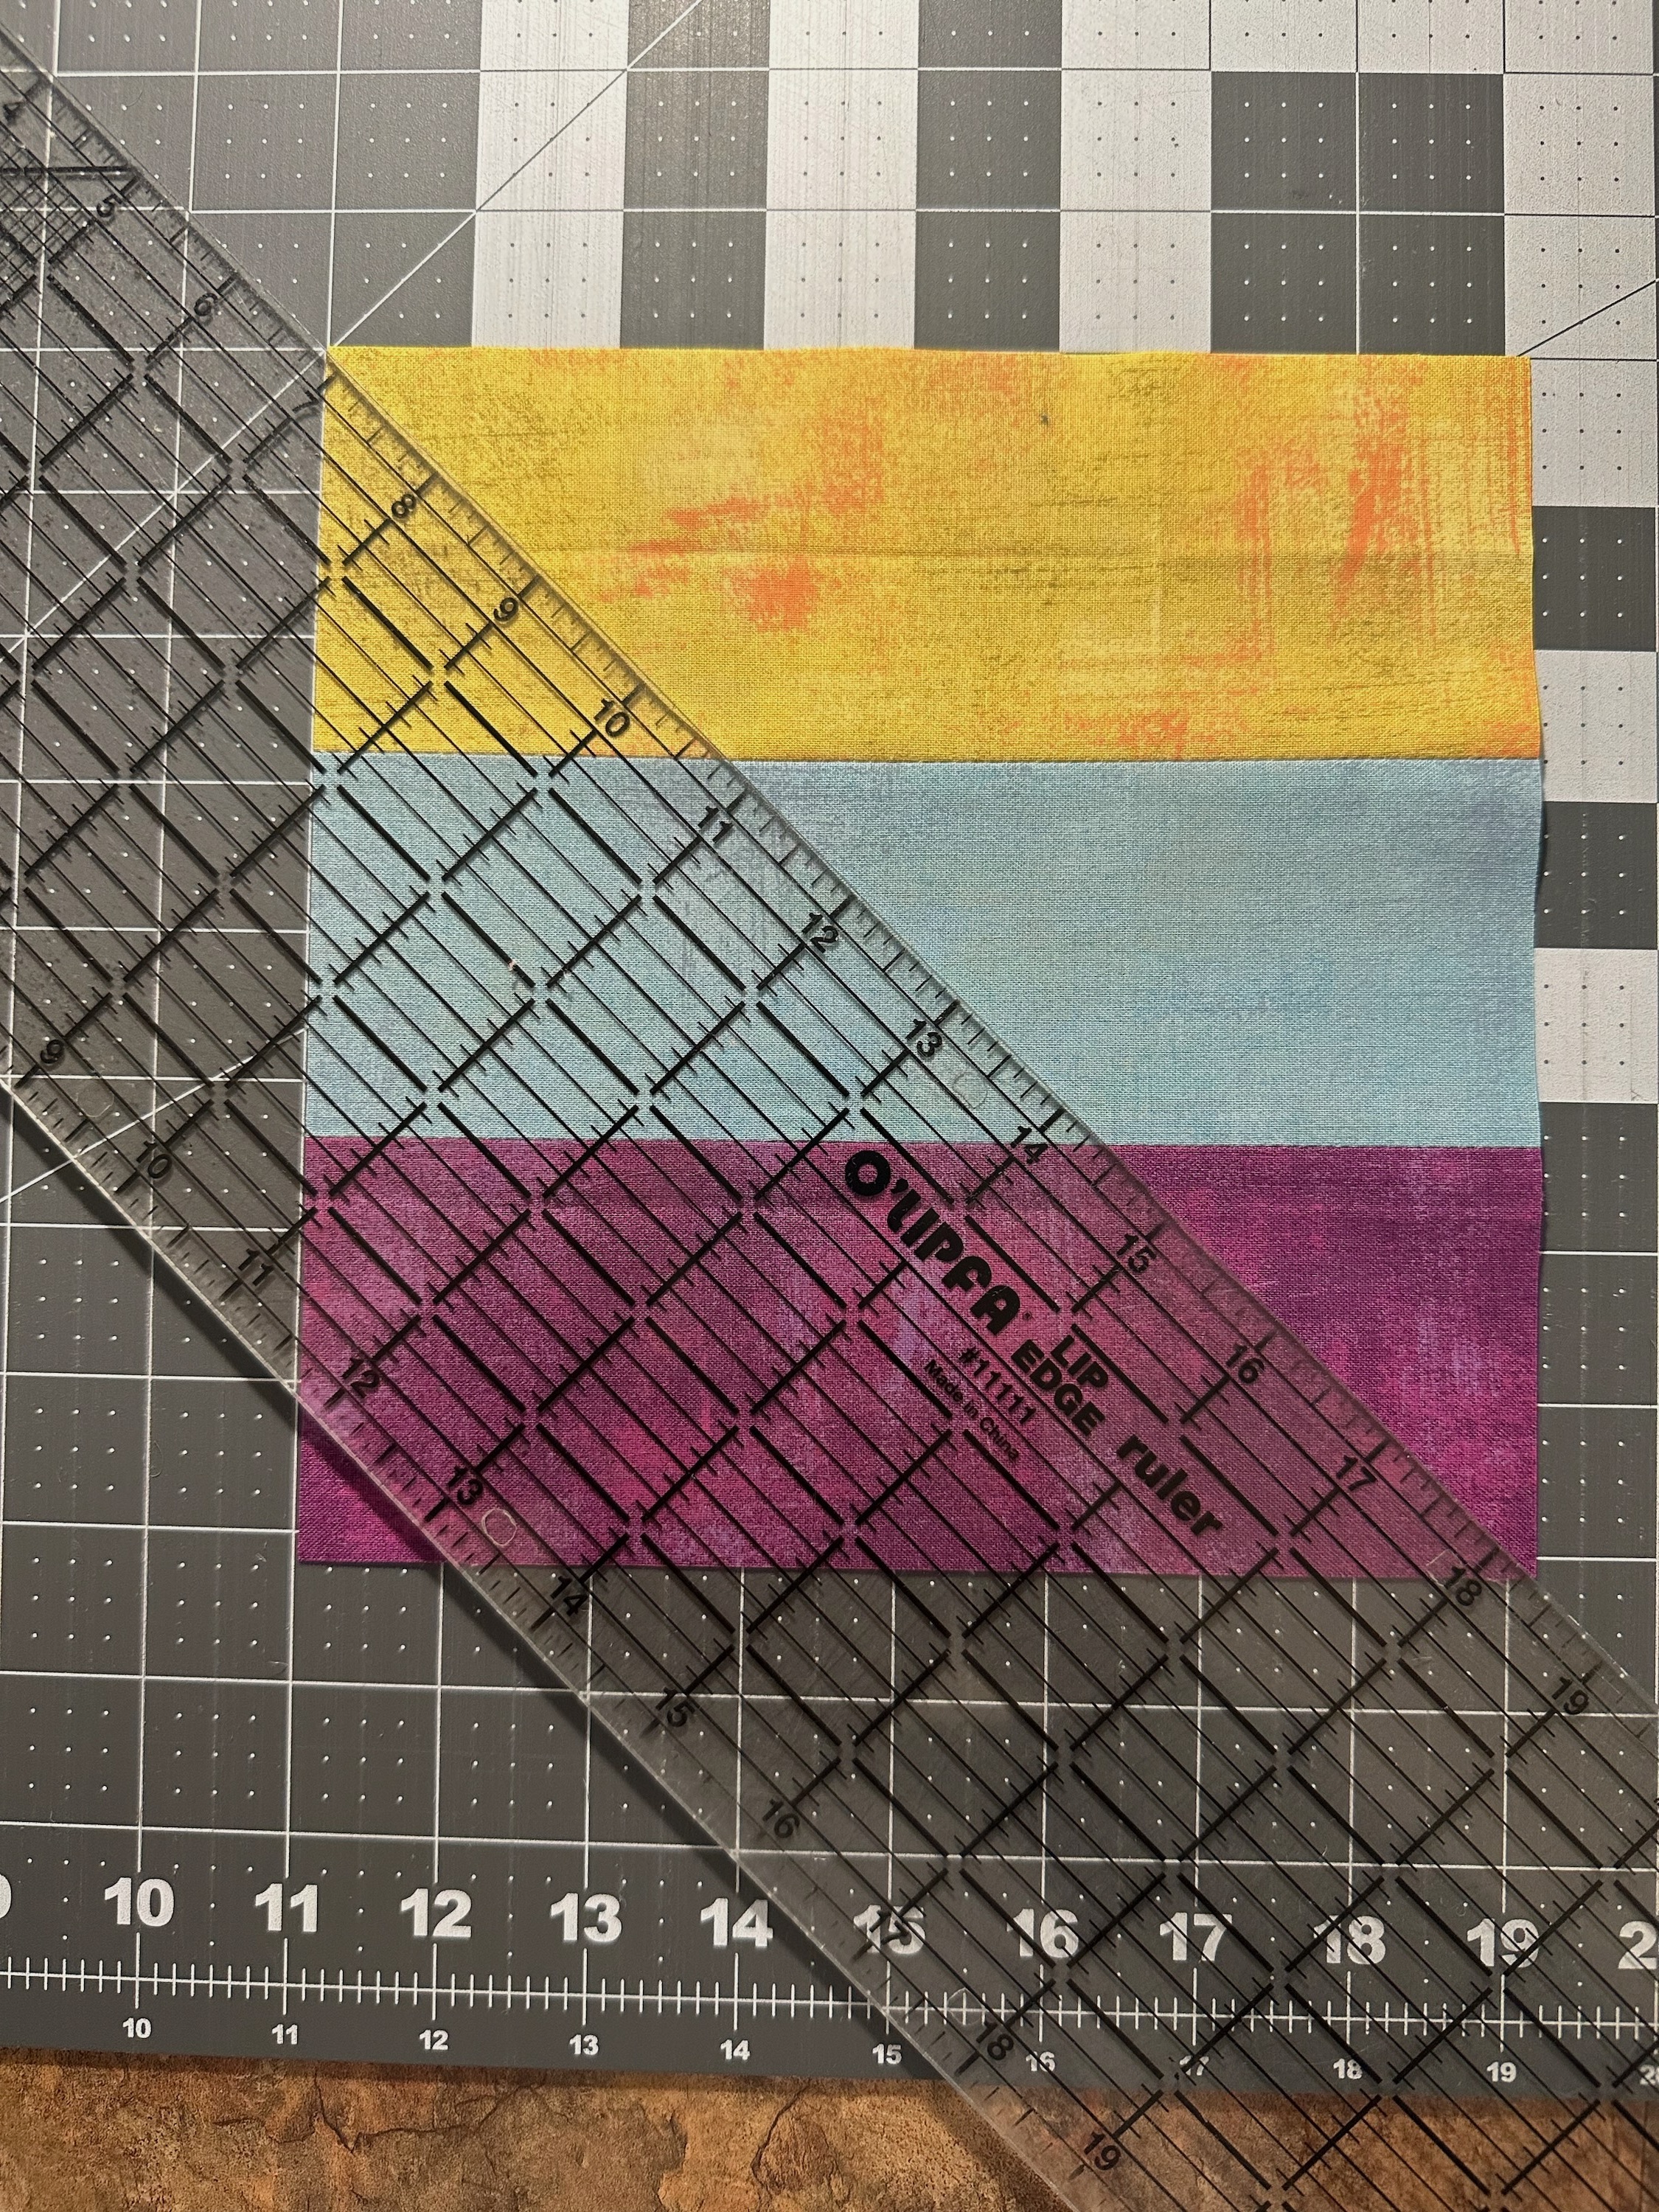
 I love using a Bloc-Loc ruler for this step - it makes everything go fast and easy.  However, if you don’t have one, a regular square ruler with a diagonal line will work!  And just look at how pretty all those trimmings are!


Locate your eight focal star HSTs to start your layout.


LAYOUT:


Use this diagram to lay out your blocks.  Start with the focal point star in the lower left quadrant, (the shadowed area) and work out from the star.  (The shadowed area and the dark lines are to help you see how the blocks lay.)  Step back often and check to see that your diamonds are going the right direction!  Fill in the gaps at the upper right and lower left edges with half diamonds, splitting up some of your pairs for the purpose.  


TIP:  If you have a design wall, or use a “design floor”, take a photo of your layout (before assembly) and look at it on your phone.  The distance this provides you visually makes it easier to see errors and places where you may wish to switch some blocks.  It usually takes four or five photos before I’m happy with the layout.  


Assemble the quilt top.  Quilt as desired!

*&*&*&*&*&*&* 

And that's it for today's tutorial!  I'm another 18 fat quarters down in my stash after making this quilt, and it's barely made a dent!  But I'm having fun and finding all kinds of inspiration for making more quilts and diminishing that stash.  See you next week!

Hugs!

Sarah

Sunday, February 11, 2024

Fat Quarter Frenzy Is Back, With Kaleidoscope!


Hi, all!

Time snuck up on me this week, and I almost forgot to write this week's Fat Quarter Frenzy post, but here I am!  If this is your first time stopping by, we've just started a series of tutorials for simple, quick quilts that can be made with fat quarters.  Last week we made a St. Louis 16-patch that used up sixteen fat quarters from my rather voluminous stash of them.  This week, we're moving from square to triangles as we create a beautiful top that reminds me of a kaleidoscope image.  Let's go!

*&*&*&*&*&*&*&*

Kaleidoscope

A Fat Quarter Frenzy Quilt


Materials:


14 Fat Quarters (FQ) measuring a minimum of 17” x 20” after squaring up.  

There should be a wide range of colors in your FQs to achieve a good effect.


Cutting:


From each squared up FQ, cut 7 strips 3” wide x 17”.  When finished, you should have 98 strips.


Assembly:


Sort the strips into 32 sets of three contrasting strips.  (You will have two left over)


Sew the strip sets together, always starting your seams from the same end of the set.


Once all your strip sets are sewn together, press the seams.  (I chose to press mine open so that they would be easier to match)


More Cutting:


Now you will crosscut your strip sets into two blocks.  Measure your strip sets and see how wide they are.  Mine were 8.25” wide, so I cut my blocks 8.25” square.  After cutting your strip sets, you will have 64 strip blocks.


Now pair up the blocks that will be in each large block.  You will need two sets of two identical strip blocks for each  block. (16 sets total) 


Choose one of the sets you just prepared, and take the first identical set of strip blocks and lay them on your cutting mat with the stripes going horizontally.  (BE SURE the blocks are laid with the same color at the top!)  Cut these two on the diagonal from upper left to lower right.


Take the second identical set of strip blocks and lay them on your cutting mat with the stripes going horizontally.  (BE SURE the blocks are laid with the same color at the top!) Cut these two on the diagonal from upper right to lower left.  Keep all of these triangle sets (2 sets of four triangles) together to be assembled into one large block.


Repeat for all 16 block sets.


Back to Sewing:


I chose to use two different block designs in my quilt, because I liked the secondary patterns it created.  If you prefer, you can assemble all of your blocks using just one or the other of the designs.


 For each of the two blocks, you will assemble the same basic component block.  Do this by taking one triangle of each color set and sewing them together along the long diagonal, matching the seams.  Take care not to stretch this seam as you sew - it is cut on the bias.  Press the seam open.


Repeat until all 64 component blocks are assembled.  You should have two sets of two identical component blocks for each large block.


 Square up those blocks so that they are all the same size, using a ruler that allows you to place a diagonal line along the diagonal seam of the block.  You may not trim off much, but believe me, but will make your quilt look much nicer in the end!


Now on to assembly of the blocks.


 Block #1:


Block #1 reminds me of the old TV test patterns!  It’s easy to assemble.  Take two sets of two identical blocks and place two identical blocks in the upper right and lower left corners, with the small triangles in the center.  Take the other two and place them in the upper left and lower right corners, with the small triangles in the center.  Assemble, pressing the seams open.  


If you are making the quilt as shown, make 8 of these blocks.  If you are using only this block, make 16.


Block #2:       


To assemble this block, lay your component blocks in a pinwheel formation, with the same color strips on the outside of the block.  Having all the same colored sides in the center is what creates the hooked pinwheel.  This block is a good one for the guideline “Look Twice, Sew Once”.  Be sure it is properly laid out before you sew it, and you will save yourself a good bit of time with our little friend Jack (the Ripper)!


If you are making the quilt as shown, make 8 of these blocks.  If you are using only this block, make 16.


 Once you have completed all sixteen blocks, arrange them in your preferred layout.  I laid mine out in a checkerboard pattern alternating Block #1 and Block #2 to achieve the secondary pattern shown.


Assemble your quilt top, and quilt as desired!


*&*&*&*&*&*&*

Now, I know some of you are looking at this design and thinking that it's a lot of seam matching - but while I agree there are a lot of seams to match, I didn't have any trouble achieving neat intersections.  I don't know if that's because I pressed my seams open, but being able to pin through the seams (over the threads) seemed to help make them match neatly.  And don't skip the squaring-up step - it's the most important part of making a half-square triangle quilt, and I guarantee you will be happier with your finished quilt if you do!

See you next week with another simple quilt!

Hugs!

Sarah

Sunday, February 4, 2024

Fat Quarter Frenzy Begins with Meet Me In St. Louis!


Hi, all!

Welcome to this year's tutorial series, Fat Quarter Frenzy!  Born from the inspiration of my oldest granddaughter, who so kindly pointed out that I had a "butt-load of fat quarters", I'll be sharing six simple quilt tutorials, all using fat quarters as their source of fabric.  Of course, you can use yardage or scraps if you choose, but the tutorials are written using fat quarters.

If you're like me, you love to buy fat quarter bundles because they are such a fun way to get your hands on a full fabric line.  All those beautiful fabrics just waiting to be turned into quilts - but sometimes they just languish away on the shelf, looking pretty but not much else. So let's use them!

A word here about fat quarters!  As I've been prepping my own for use in these tutorials, I have found serious discrepancies in the sizes of fat quarters.  By definition, a fat quarter should be 18" x 20-22", but I have found many of my bundled fat quarters to be only approximately 17" wide when squared up.  So for purposes of these tutorials, I am assuming that fat quarters are 17" x 20".  Yours may be larger than that, and I trust that you will find good use for any scraps that are left over!

With that being said, let's get started with our first quilt tutorial, which I call "Meet Me In St. Louis" in honor of its classic block, the St. Louis 16-patch.  I was not familiar with this block before, but it certainly lends itself to fat quarters, as you will see that there is very little waste.


Meet Me In St. Louis

A Fat Quarter Friendly Quilt


Materials:


16 Fat Quarters (FQ) measuring (squared up) a minimum of 17” x 20”:

8 light (L) FQ, 8 dark (D) FQ *or two contrasting colors can be used*


Cutting:


Square up your FQ, using the selvage edge as your constant straight.  Line it up on the straight of your cutting mat, then trim the right and left edges to straight.


Leaving the FQ in place on the mat, cut four strips 4.25” wide by 20”+ long.  


Repeat for all 16 FQs.  You should now have 32 llght strips and 32 dark strips.


Assembly: 


Divide your strips into 16 sets, pairing two identical light (L) strips with two identical dark (D)  strips. 


Assemble strip sets, alternating the strips in a LDLD pattern.   I recommend starting sewing from the selvage ends so the sets are basically straight on that end for economy’s sake.


Press seams towards the dark strips.  (If you are using contrasting colors, press toward the same color on all strip sets)


Crosscut the strip sets in the following manner:  laying your strip set with the strips running horizontal on the mat, line up the straight bottom with the straight on your mat.  Cut off the selvage edges.  


Then cut the strip set into 4 4.25” wide block strips.  Repeat for all strip sets, being sure to keep the block strips from each strip set together.


Take the four block strips and arrange them in a checkerboard 16-patch pattern.  Your seams should nest into each other.  Assemble the block.  Repeat for all 16 blocks.


 Arrange your 16-patch blocks and  assemble your quilt!


Yields one approximately 60” square quilt.

*&*&*&*&*&*&*

And there you have it - the first of six tutorials for this year's series, Fat Quarter Frenzy!  I hope you'll enjoy making these quilts as much as I have.  Most are quick and simple, perfect for comfort quilts to give away - and hopefully they'll help you use up some stray fat quarters if you also have a "butt-load" of them!

See you next Sunday with another fun quilt tutorial!

Hugs!

Sarah

Tuesday, July 25, 2023

Day Twelve of the Twelve Days of Christmas in July!


Hi, all!

It's finally arrived - the last day of this year's 12 Days of Christmas in July blog hop!  I hope, like me, you've been wonderfully inspired with great ideas.  Maybe, like me, you've also had a chance to walk down memory lane in your Pinterest or blog feed! I will confess - I even found pictures of an annual quilt I made for Lilli that I had completely forgotten about!  

Today we have a chance to hop over to Karrin's blog, Karrin's Crazy World, as she shares some of the gifts she has been making - there should be lots of inspiration there!  And we've reached the end of our quilt-along and it's time to assemble those blocks - finally!!  

Let's go!

*&*&*&*&*&*&*


It's time to put this baby together!  Are you ready?  If you haven't already laid out your blocks, it's time to do that.  

Stitch the blocks together, and you're done!  I know everyone has their own way of assembling a quilt - some do it in rows, some in columns, some in block sections.  I usually take two side-by-side columns, stacking the blocks on top of each other from top to bottom, then take the two stacks to my sewing machine. I will chain piece the pairs together, then sew the cross seams.  Off to the ironing board to press the seams and it goes back up on the wall.  Then it's on to the next pair!  This quilt has an odd number of columns, so I will just sew those blocks together in a strip.  Then I go back and sew the columns together, matching the seams as needed.  To me this feels faster than sewing together one row after another - maybe it's a mental thing, but it works for me!


Your top is now ready for quilting as you desire.  Don't put off that binding, either, unless you've got elves to do it for you!

I can also see this quilt done as a holiday themed quilt for other special days with the chain and/or background in different colors with an appropriately themed design in the center.  For example, imagine it with a heart in the center for Valentine's Day, or a flag or star for 4th of July.  The possibilities are endless!

*&*&*&*&*&*&*

I hope you've enjoyed this blog hop quilt-along, and gotten a good jump on this year's Christmas plans! Many, many thanks to everyone who helped this year!!

And if ideas are just running rampant in your head, consider being part of next year's 12 Days of Christmas in July Blog Hop!  I'll be glad to put you on the list and you'll have a whole year to plan (plus you can buy your seasonal supplies after Christmas, when they go on sale!)

Hugs!

Sarah

Monday, July 24, 2023

Day Eleven of the Twelve Days of Christmas in July!


Hi, all!

Welcome to the 11th day of the Twelve Days of Christmas in July Blog Hop!   I really fell down a rabbit hole while writing this post - I couldn't for the life of me remember what the eleventh day gift was, so I went to look it up.  (Just FYI, it's eleven pipers piping!)  But I also found out that if you received all the gifts listed in the song (and they accumulate - each day repeats all the gifts to date) you'll have 364 separate items by the end of the 12th day!  And since 1984, the cumulative costs of the items mentioned in the song have been used as a tongue-in-cheek economic indicator.  Two pricing charts are created, the Christmas Price Index (the index of the current costs of one set of each of the gifts given) and the True Cost of Christmas (the cumulative cost of all the gifts with the repetition listed in the song).  The people mentioned in the song were hired, not purchased.  In 2015, the total cost of all goods and services in the Index was $34,130.99.  The True Cost of Christmas was $155,407.18 for all 364 items!!  All I have to say is that was one dedicated true love!

Now that I've dug my way out of that rabbit hole, let's get down to today's business!  I've got some cute trees to share with you, along with some guidelines for how to know what you need to decorate your Christmas tree.  Because this is the year of the Christmas tree, after all!  Then we'll have some more instruction on the quilt top.

Let's get started!

*&*&*&*&*&*&*

You'd never guess it, but around my house, we love Christmas and all things Christmas-y!  This is the tree that stands in our front entry area - we usually put up a fresh tree here, and it is decorated more formally than the family tree in the den.  I try to get one large enough to have a real presence in the tall entry, so it's usually 8-9 feet tall.  Luckily, we have a friend who runs a tree farm at Christmas time, so we know just where to get one!

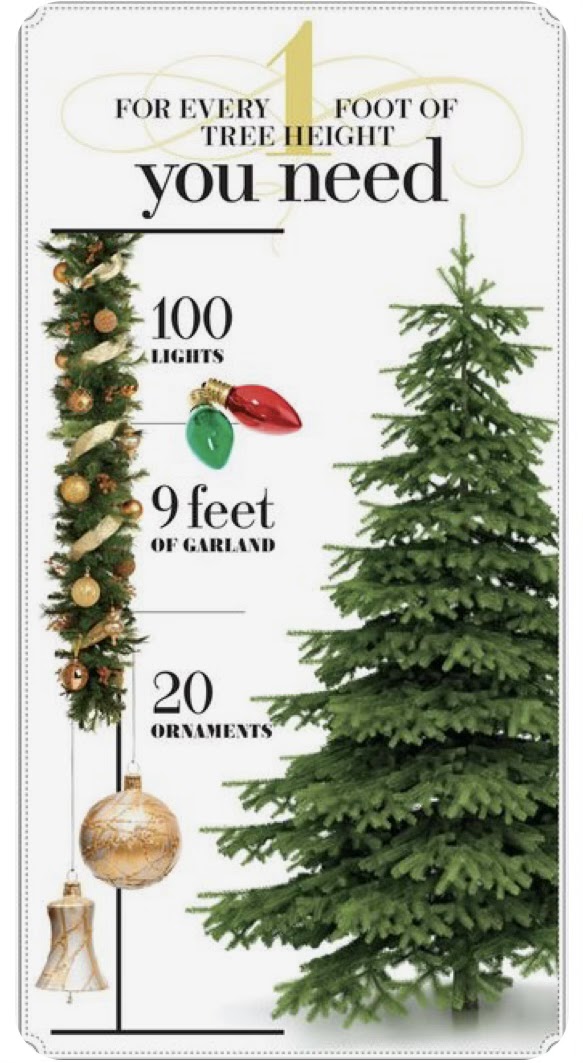
If you're like me, you never know quite how much stuff to drag out to decorate a really big tree.  But I stumbled across a chart on the internet that is absolute genius!


With this chart in hand, I know that for an eight foot tree, I should have 800 lights, 72 feet of garland, and 160 ornaments.  And thankfully, with all the Christmas stuff I've accumulated over the years, that's totally do-able!  It really makes it easier, particularly with lights, to know how much to put on before I start.  

But enough about big trees - how about small ones?  I spent a fun afternoon cutting out these cuties, all from free printables available from Hattifant.  You can click HERE to find out how to get your own!


One tip - I did find that it was easier to open these trees out using a small plastic stick I had on hand.  It's about the size of a pencil or a chopstick, either of which would work well too.  I would also print them out on slightly heavier paper, I think - but they were fun to make and would be easy for kids, too!


Then I stepped back into the world of origami and made this cute little tree!


My husband says that this picture is deceptive, and makes the tree look bigger than it really is.  I just like the fact that it echoes the tree in the center of the quilt waiting on the long arm!  


Maybe this will give you a better idea of the scale, though. This is inside a hurricane lamp, paired up with some kosher salt (the snow) and a tiny elf statue.  

This was super simple to make, although I will admit that folding down the tiny points took a bit of practice!  Click HERE for a very quick video that shows how it is made.  I have no doubt I will be making more of these, and may branch out into different sizes if I can find the right origami paper!

*&*&*&*&*&*&*


Your task today on the quilt is to finish making your 20 double nine-patch blocks.  Once those are done, you are ready to lay out and assemble your quilt.  


The quilt is laid out in a 7x7 grid, with double 9-patch blocks in each of the corners.  The top two rows are a simple checkerboard design, alternating the double 9-patch blocks and white squares.  Lay those out on your design wall or floor.  Now take the 9 blocks that you made for the Christmas tree center and arrange them as shown under the center three blocks. Continue your checkerboard to the right and left of the tree center.  The bottom two rows are also a simple checkerboard.

Tomorrow we'll assemble the quilt top (unless you just. can't. wait!)

Hugs!

Sarah