Showing posts with label solids. Show all posts

Wednesday, February 27, 2019

I May Have A Scrap Problem... A Disappearing Act!

Hi, all!

As you probably already know, I was fortunate enough to attend QuiltCon last week.  I signed up for a class called Dynamic Quilts with Solids, taught by Nydia Kehnle.  Considering how many solid scraps I have, you can guess that I was really excited!  We were instructed to bring about 125 7.5" squares, in at least 25 different colors.  Well, I went nuts, pulled everything I could cut a 7.5" square out of, without rhyme or reason, and showed up to class.


This is the class instructor, Nydia Kehnle, and one of her fabulous quilts!  We spent the morning making a bajillion half square triangles, then worked on laying them out with her guidance.  Alas, I had too many colors with no connection between them to work well.  I learned that I should have spent more time researching the type of quilts she made to get a better idea of what colors I needed to bring!

But that meant that I had a lot of HSTs to use up and no plan for them.  I tried laying them out as HSTs at home, but found the they really didn't "flow" like I wanted them to.  So I tried them as hourglass blocks, and that was ok, but no "pop".  What to do?


After staring at this for a while, I decided to do something drastic - I cut it up!  After all, somebody had to take the plunge to make the first disappearing nine-patch, right?  So here goes...


I cut on either side of the diagonal centers, breaking the block into nine patches.


Then I rotated the center a quarter turn clockwise.  Next, I took the top left corner and the bottom right corners and switched their positions, and did the same with the other two corners.
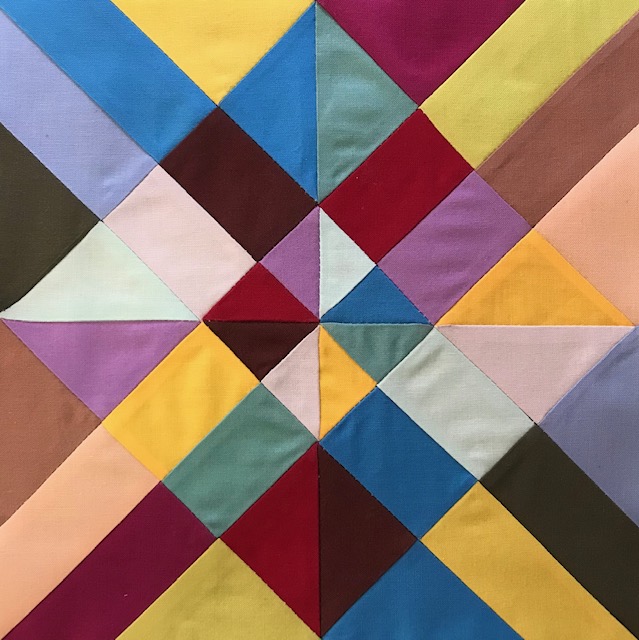

Once it was sewn back together and trimmed, this is the result!  I posted a picture on Instagram, and got some really good feedback, so I'm going to provide a more specific tutorial below.  For the tutorial, I used 10" squares - a layer cake that was gifted to me a while ago, so I'm happy to be giving it a chance at quilt-y life!

The first step is to make your HSTs.  I would suggest pairing up your pieces to give good contrast for this block.  Once completed, press the seams to the dark side.  Pair them up to make the hourglass blocks, being sure to use four different colors in each one.


Lay the two HSTs right sides together, with the two seams nesting into each other.  Place your ruler from one corner to the other, crossing the seam line.  


Line up one of the inch markers with the seam line as shown above to ensure that your ruler is perpendicular to the seam.  Make a line from one corner to the other.  


Pin across the seam in the center to hold the seam in place, then stitch 1/4" from the line on both sides. Cut on the line, then press the seams, spinning the centers, on both hourglass blocks.  Each pair of HSTs will yield two very similar hourglass blocks. 


Once you have made and pressed all your hourglass blocks, turn them over so you can see the back sides. Each pair of near-identical blocks will "spin" in a different directions.  Make two piles, one spinning clockwise and one spinning counter-clockwise.  


Now it's time to square up those blocks!  Starting with 10" squares, I found that these hourglass blocks squared up to 9".  Depending on what size you begin with, yours may square up smaller or larger.


Being sure to use blocks that all spin the same direction, choose four to put together into a four-patch hourglass block.  Assemble the block.  Press it carefully, spinning the seams around the center.  
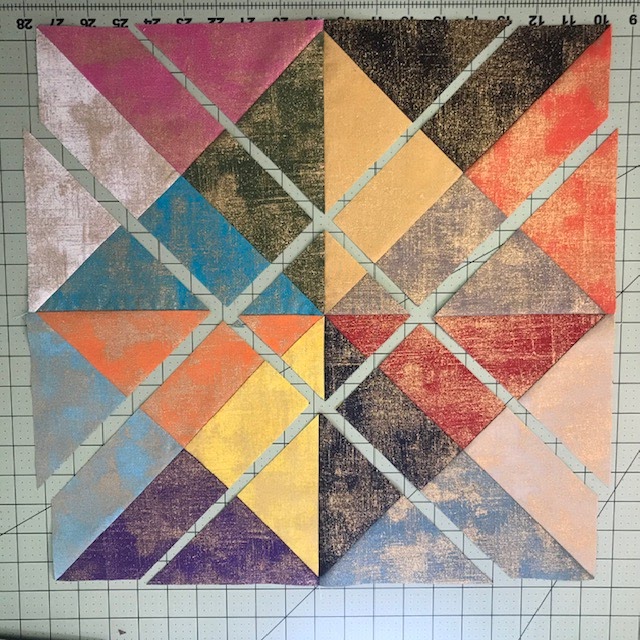

Now it's time to cut it up.  Be careful!  For this size block, I chose to measure 2" from the center diagonals.  How far you cut is up to you!  Rotate the center 1/4 turn clockwise, swap the upper right and lower left corners, and swap the upper left and lower right corners.  NOTE:  If you aren't happy with the way the colors align, feel free to move things around until you are pleased with the layout.  I had to do that on one of my smaller blocks, and it worked out just fine!


Sew the rows together on the diagonal, carefully matching the seams.  The corners will be longer than the sides - don't worry, it will be trimmed later!  Sew the three rows together, once again carefully matching the seams.  Square the block up, cutting off the corners that extend beyond the top, bottom and side seams.  This particular block, which began from 10" squares, squared up at 16".


And there's your finished block - a disappearing hourglass block!  I really wanted to know what it would look like when placed with others like it - what secondary patterns would appear.


Here you can see the one larger block, next to four of the smaller ones made from my class HSTs.  In the on-point layout, the crosses are more visible, and in the horizontal layout below, the squares seem to show up better.


It's going to be fun to play with this block!  I'm also interested to see what it looks like in prints - but that's for another day, as I have some quilting I must get to now.  

Let me know if you give this a try (particularly if you don't understand something or find a better way to do something!) I'd love to see what you come up with!

Hugs!

Sarah

Wednesday, January 30, 2019

I May Have a Scrap Problem... What a Month!

Hi, all!

We are in the final days of January, and so it's time to review the month, scrap-wise.  Even though my scraps still seem to be replicating themselves while I sleep, I did make some progress this month.  

At the beginning of January, I decided to work on my "String Hamper of Shame" and also to work with my solids scraps to cut 7.5" squares for a QuiltCon class.  


This tub is full of 8.5" wide pieces of strings, which I created after pressing a bunch of strings from my hamper.  And no, it didn't empty the hamper - and I swear the hamper gets fuller every day!  But it's a start.  Then I took those 8.5" pieces and made a quilt top!


Isn't it pretty?  This will be part of the Rockin' Rectangles tutorial series running right now - probably close to the end - so start cutting up your strings and join in!  


I also did a lot of sewing out of my stash, with an eye to designs that could be made scrappy as well.  The tutorial for the quilt above appeared last Sunday, and the quilt below will be featured this coming Sunday.  


I also did manage to cut a few 7.5" squares from solid scraps, but not nearly enough...


...which means that this project will carry over into the first few weeks of February.  After all, QuiltCon is this month!!!!!!  (Can you tell I'm excited?)

So all in all, I think January went rather well in the scrap- and stash-sewing area.  In February, I will be working on reducing this mess...


....a collection of batting remnants from the last couple of years!   I think I need to spend a day or two making "frankenbattings" so they will be easier to use - and sorting out the pieces that are just too narrow to use for anything but wiping up oil spills or dusting.  If I can use these up, I'll have three empty cubbies on one of my storage shelves, which I can use to organize something else - wouldn't that be nice?

And while I'm cutting up those 7.5" solid squares for QuiltCon, I may cut pieces for this beautiful quilt...


Isn't that wonderful?  And just imagine how many solid scraps it would use up.....

So that's my plan for February.  What are you hoping to do with your little scrap monster this month?  Link up below and share, or just tell us in the comments.  After all, we're all in this together!


Hugs!

Sarah


Wednesday, October 25, 2017

I May Have A Scrap Problem... Binding Wars!

Hi, all!

I have to confess that Wednesday snuck up on me this week - I was so proud of having an honest-to-God scrappy sewing success, I completely forgot to make my Gypsy Wife blocks this week!  Of course, working on Emmy's annual quilt was distracting me too, but I'm usually better at remembering than this.  Oh well - I'll try to get them done before Friday, and that will give me something to post about then!

In the meantime, I really did have a scrappy sewing success this week!  I quilted a vintage quilt top for a friend, and decided to finish it off with a scrappy binding.  I may have mentioned before that I store my binding leftovers in a plastic shoebox, after measuring each one, rolling it up and pinning it with a post-it note with the length on it.  Everything is placed in nice neat rows in the shoebox, and it is very easy to pull enough for a binding by adding up the lengths on each one until I have enough.


This system really works for me - I went from having an unusable pile of bindings all tangled up together to having easily accessible and useful items.  But this time when I looked at the box, it was really full - even after I pulled enough to find that vintage quilt!  So I decided to pull out all the solids and make a jelly roll style quilt.


To make this quilt, I added squares of the chinese red, a color that didn't appear anywhere in my pile of solid binding scraps.  I gathered my binding strips and cut any that were more than 30" long or so into multiple pieces, just to get a wide variety.  I had a lot of black, so I placed it every third strip.  Then I started sewing the strips together, with a red square between each one.  And I pressed - between every step - and trimmed threads as I went.  (I find that these quilts are remarkably good at having threads peek out from the seams!)

Now I have a question for you - should I add a border to this?  I have enough black to add a 5" border all around which will bring it to about 58"x70", or leave it as is?  I'm undecided.  I have enough of the deep red left to bind the quilt, and I think that will tie the red blocks in nicely.

FYI, I used this technique in the past to diminish my solid binding leftovers - here's how that one turned out...


It always amazes me how "artful" these quilts look, even though they are completely random.   And it really makes a dent in the binding stash!

So that's my scrappy victory for the week!   Have you been working through your scraps this week?  I'd love to hear what you've been doing!

Hugs!

Sarah

PS Do you realize that Christmas is two months from today?? EEK!!!