Showing posts with label string quilt. Show all posts

Sunday, February 26, 2023

Something Old, Something New - Pulling My Heart Strings!


Hi, all!

Have I ever mentioned that we have some great scrap quilters here in Tennessee?  And one of my favorites is Tracy of Tracy's Bits N Pieces.  We met several years ago at a Jen Kingwell trunk show in Nashville, and I've followed her on Instagram (@tracysbitsnpieces) ever since.  Her feed is a constant source of inspiration!  So when I saw this quilt pop up....


...I was (a) immediately enchanted, and (b) messaging Tracy to see if she minded if I created my own version for this tutorial series!  She graciously agreed, and suggested that I check out the quilt she made with the pieces she cut off of her string blocks while making the hearts.  Check this out!

Does anyone besides me remember the Certs commercials - "two, two, two mints in one"? I love when you can get two quilts from one!

And if you are like me, you are drowning in strings!  I have a hard time throwing any fabric away, and strings seem to be common, and also easy to store.  I have mine sorted by color in this wonderful set of storage drawers given to me by a friend.  It took Lilli and me a while to do the pressing and sorting, but now they are all ready for use - so let's use them!

Although Tracy used red and cream for her hearts, I would think you could use any color combination you prefer.  So see what you have a lot of in your strings storage and drag them out!

And I'm going to make a confession right here, right now - my nickname could be "Short Attention Span Sallie"!  So my version won't have as many string blocks as Tracy's does.  I get bored easily!

So here's the way to make my version of Pulling My Heart Strings...


Step 1 - take sheets of paper, as thin as you can find (phone books are ideal but a lot harder to find these days!) and cut 28 5.5" x 8.5" pieces.  Yes, that's half of a piece of copier paper.  Makes it easy, doesn't it?  I used an old pad of tracing paper I found in a drawer.

Step 2 - Set your sewing machine stitch fairly short, dip into those strings and start sewing them to the paper in the direction of the long edge.  String blocks are low stress - it doesn't matter if your seam allowances are perfect or your seams exactly straight, as long as you completely cover the paper.  

I start with a strip in the center, then sew another strip to each side because I also recommend pressing after you add each piece, so your block is nice, flat and square when you finish pulling the paper off. Starting in the center means you can sew two seams before pressing!  

Make 28 of these.  

Flip the blocks over, tear away the foundation paper, then trim them to 5.5" x 8.5".

Step 3 - From your light colored background fabric, cut 6 5.5" squares and 12 2" squares.  From your dark-colored background fabric, cut 22 5.5" squares and 44 2" squares.

Step 4 - The Left Side of The Heart - lay the 5.5" square on the lower left corner of the block, matching the left and lower edges.  Stitch diagonally from corner to corner.  You may find it easier to mark the stitching line, with a pencil or Hera marker, prior to stitching.  Now, if you plan to use your bonus triangles in another quilt, stitch about 3/8-1/2" away from that stitching line (closer to the outer corner).  This way you can just cut between the two lines of stitching and your HST block all sewn together and ready for trimming!  Take the 2" squares and lay them on the right and left upper corners, lining up the edges of the squares with the block.  Stitch diagonally from corner to corner.  (These "bonus" blocks would be so tiny that I don't usually save them.)  Cut 1/4" from the stitching line on the corner side of the stitching line. Press the background triangles out, being careful not to distort the block.  Make three of these blocks with light backgrounds and 11 with dark backgrounds.

Step 5 - The Right Side of the Heart -  lay the 5.5" square on the lower right corner of the block, matching the right and lower edges.  Stitch diagonally from corner to corner.  Now, if you plan to use your bonus triangles in another quilt, stitch about 3/8-1/2" away from that stitching line (closer to the outer corner).  Trim either between the stitching lines or about 1/4" from your line of stitching.  Now take the 2" squares and lay them on the right and left upper corners, lining up the edges of the squares with the block.  Stitch diagonally from corner to corner.   Cut 1/4" from the stitching line on the corner side of the stitching line. Press the background triangles out, being careful not to distort the block.  Make three of these blocks with light backgrounds and 11 with dark backgrounds.

Step 6 - Take the half-heart blocks to the cutting board.  We are going to trim a half-inch off the OUTSIDE edge of the heart so that your final block will be 5" x 8.5".  Be sure you trim it off the outside edge and not the center! 

Step 6 - Matching the blocks along the long center line, pair 3 light lefts with 3 dark rights, 3 dark lefts with 3 light rights, and 8 dark rights with 8 dark lefts.  Sew the hearts together.  Press the seams to the right.

And voila!  Your heart blocks are made and you've finished the hardest part of the quilt.  That wasn't so bad, was it?

Now we assemble the quilt.  

You will need 6 light background pieces cut 5"x8.5", 2 pieces cut 5"x16.5", and two pieces measuring 5.5" x a length to be determined (can be pieced).

You will need 6 dark background pieces cut 5"x8.5", 2 pieces cut 5"x16.5", and 4 pieces measuring 5.5"x a length to be determined (can be pieced).

Take the dark and light 5"x8.5" pieces and pairing one of each, stitch on the long edge.  Press seam to the left.  Repeat with the 5"x16.5" pieces.  Press seam to the left.

Using the two-color blocks and the two-color hearts and matching the center seams, create the right and left columns of hearts.  The hearts should look like they are straddling two long strips of color.  Press the seams toward the background fabric blocks.

Using the remaining eight dark background hearts and matching the lower points with the center seam of the block below, create the center column of hearts.  Press the seams down.  Measure the strip, top to bottom.  That is how long you will make your long strips.

Take one 5.5" wide long dark piece and one 5.5" long light piece and sew them together along the long edge, being careful not to stretch the fabric as you sew. Press the seam to one side.  Make 2 of these.

Now assemble the quilt, using one 5.5" wide long dark background strip, the dark/light heart column, the light/dark background column, the dark background heart column, the dark/light background column, the light/dark heart column, and the remaining 5.5" wide long dark background strip.

Step back and look at the beautiful quilt top you have assembled!  And if you're so inclined, there's so much room for beautiful creative quilting on this quilt.  The possibilities are endless!

I would probably use one of the two background colors to bind this quilt to allow it to kind of flow and not stop, but choose whatever makes your heart strings sing!

*&*&*&*&*&*&*

I hope you've enjoyed this scrap buster tutorial!  Please stop over at Tracy's blog or Instagram and show her some love - she was so kind to allow me to take her design and run with it.  I guarantee you'll be inspired!

See you next week!


Hugs!


Sarah


Sunday, May 2, 2021

Hands2Help - A Great Tutorial From Guest Blogger Anja!


Hi, all!

May!  The lovely month of May has arrived, with beautiful springtime weather to enjoy and the end of this year's Hands2Help Challenge in sight.  Today we have another guest blogger joining us - Anja from Nova Scotia, who blogs at Anja Quilts!  Anja is always creating something beautiful, it seems, and she has a wonderful tutorial for us today.  So now I will turn the blog over to her!

*&*&*&*&*&*&*

Thanks to Sarah for hosting another year of Hands2Help and for the opportunity to guest blog.  I'm Anja, and I blog over at Anja Quilts and on Instagram with the same name.

My tutorial continues Sarah's theme of string therapy.  I found a piece of paper in my quilting notebook with some directions, but no indication what the pattern was called or where I found it.  It said to cut strips 14.5-inch long of various widths.  I decided to use 12.5-inch lengths because that's the largest square ruler I had.  Sew strips together to make a 12.5-inch square.


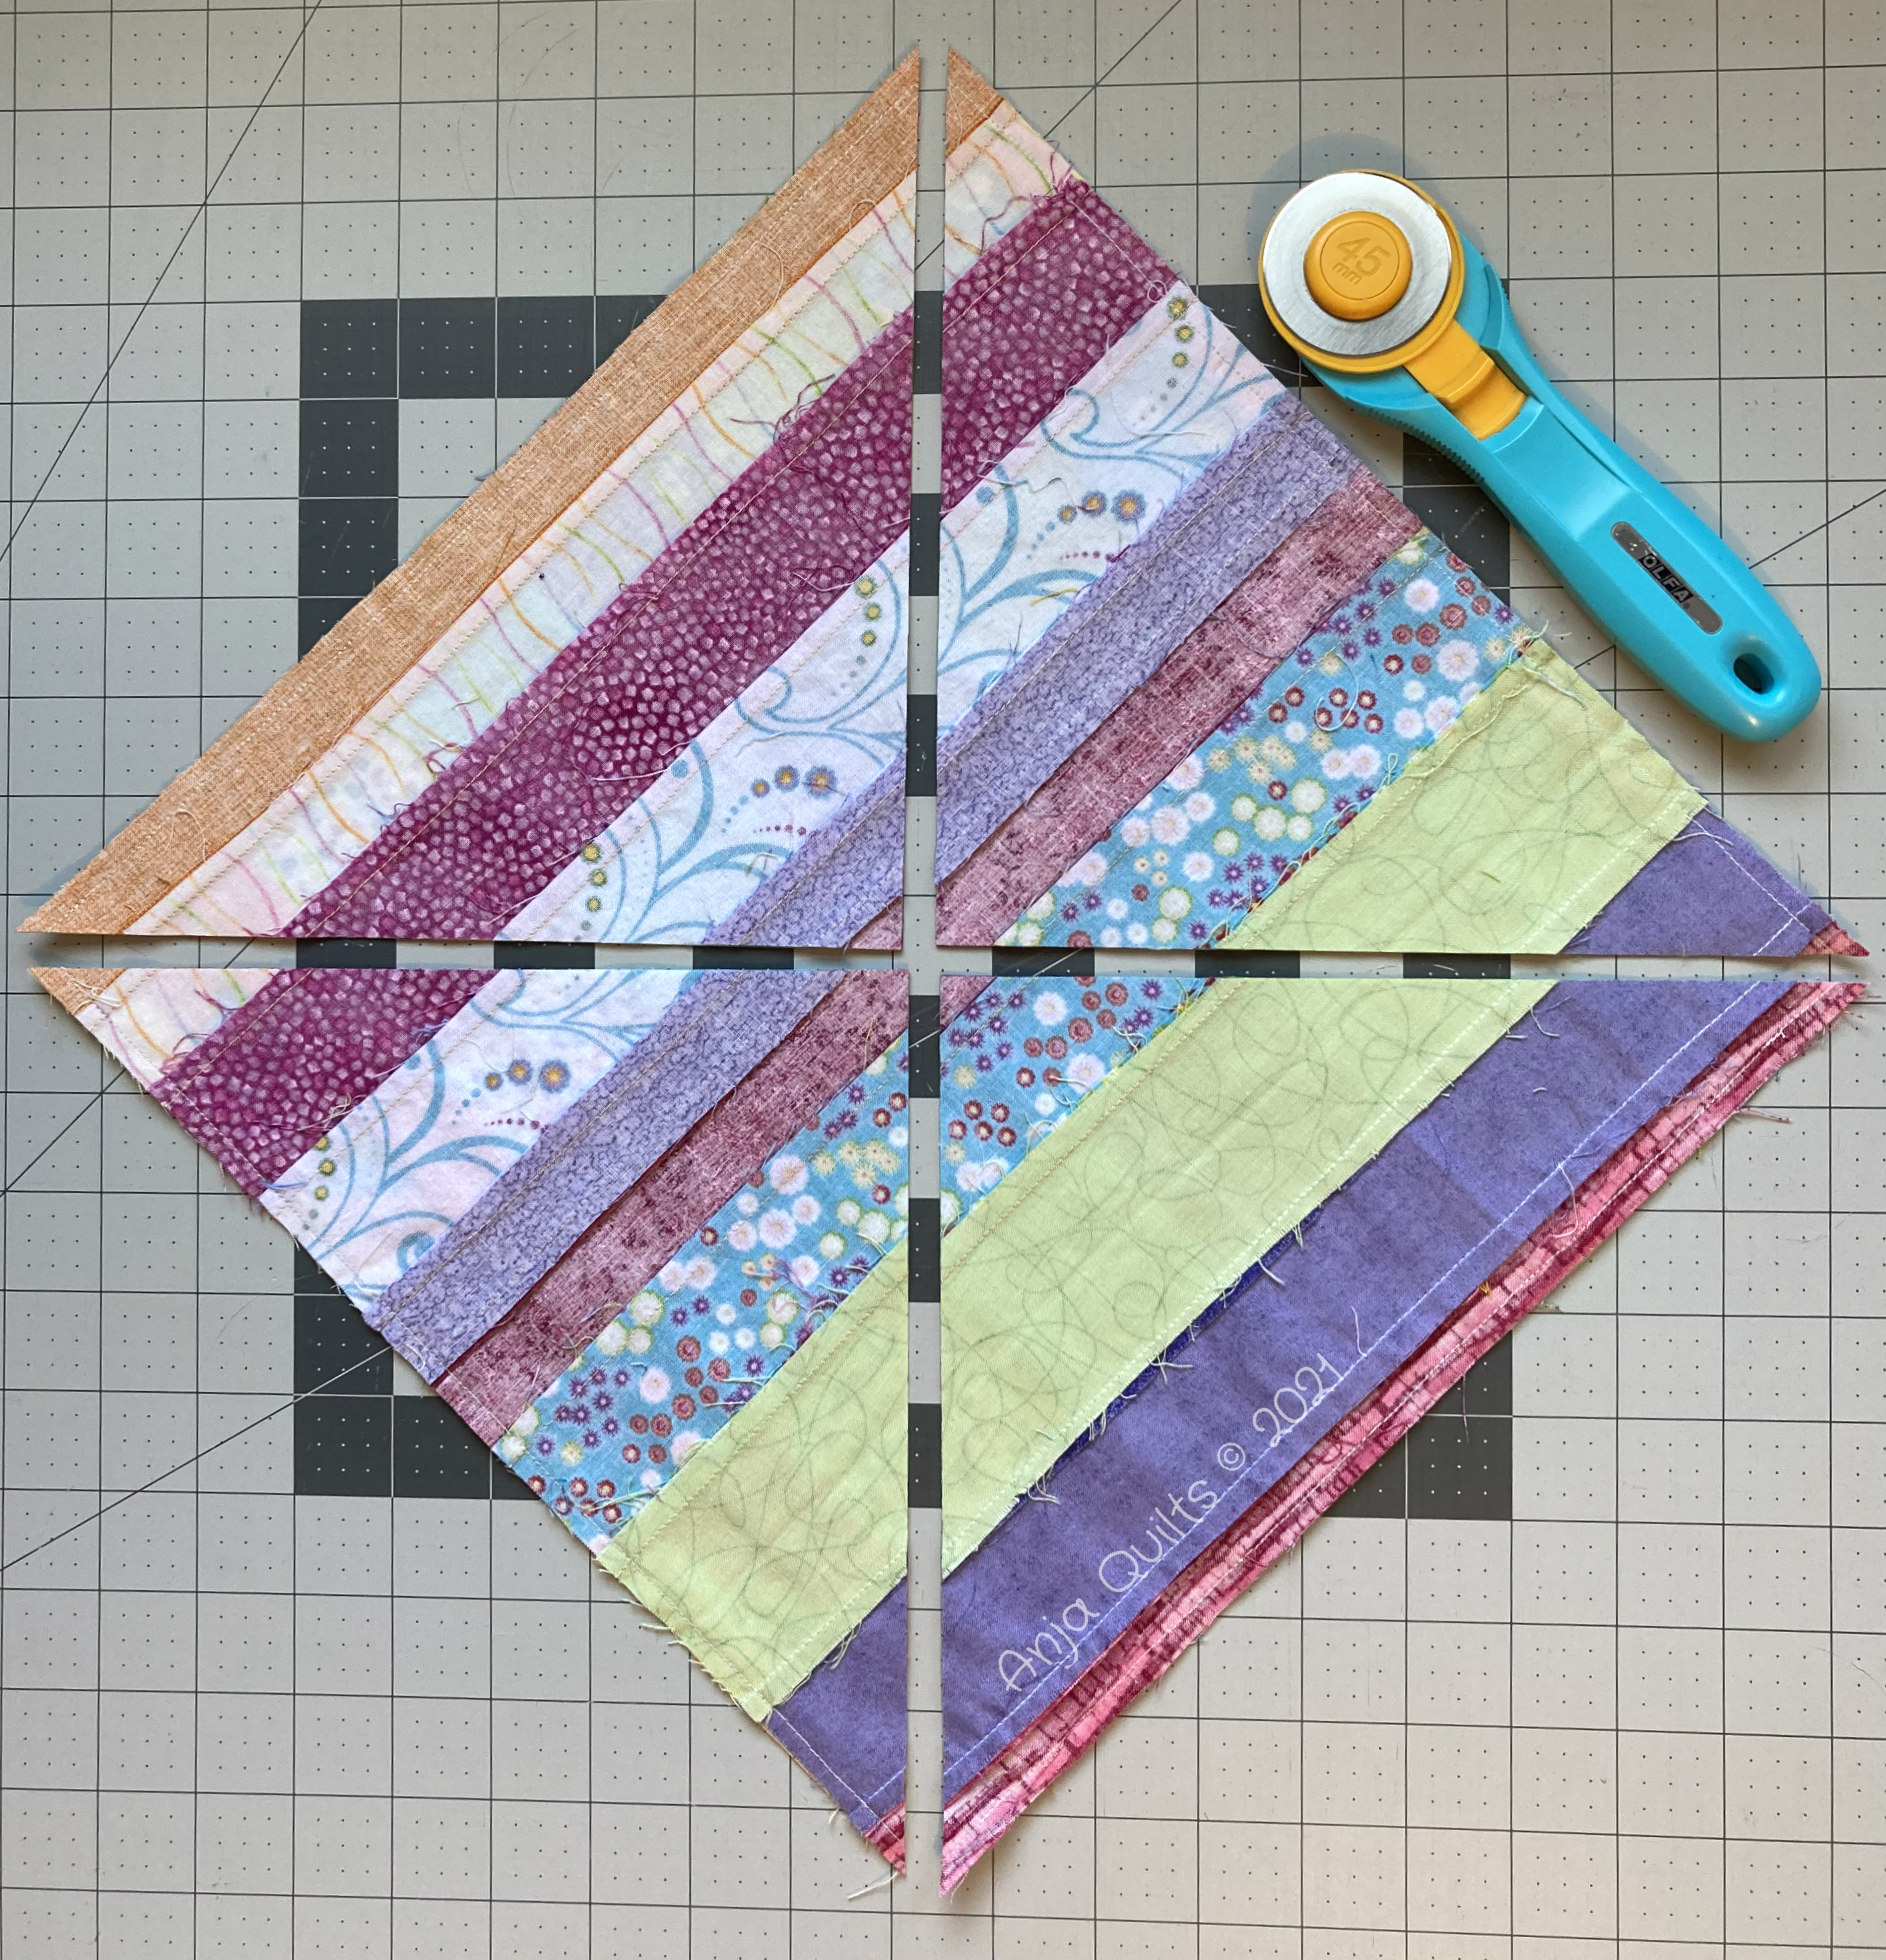
Match two squares together, alternating the orientation of the strips so they are perpendicular.  Sew a 1/4-inch seam around the entire perimeter of the square.


Cut the square diagonally twice to get four sections.


Press each section open to reveal a square.  My note did not say to sew the strips to a foundation, and at this point of the process, I realized that would have been a good idea.  Some of my squares were 8.5 inches, but some were not.  So I trimmed them all down to 8.25 inches.


I ended up making 48 blocks, resulting in a quilt top about 47 x 63 inches.  There are many possibilities to arrange the blocks.


This is a simple way to use up your scraps.

*&*&*&*&*&*&*

Oh, how I wish I had known about this technique when I was doing my string tutorials!  This is such a great and simple way to change up string blocks into something really special.  Thanks for sharing with us, Anja!

Next week we will have another guest blogger, and it's also a check-in week.  If you don't have a blog and want to share your progress, please feel free to send them to me at salliesue57 (at) gmail (dot) com and I will add them to a blogpost so others can see your work!

See you next week!

Hugs!

Sarah

Sunday, March 7, 2021

String Therapy Draws To A Close With Unity.....


Hi, all!

It's finally arrived - our last session of String Therapy.  I thought a good topic for today might be unity - how we can all get along even if we don't think or act exactly the same way.  Seems like we've lost a lot of that in the world today, but it doesn't mean we can't strive to get it back.  Wouldn't everyone be a lot happier if we were united?

I guess you're wondering how that can pertain to a quilt design?  Well, in today's quilt I've united warm colors and cool colors, darks and lights, wide and narrow strips, for a quilt that feels like a personification of Unity.

Above you can see the quilt that was my inspiration.  I believe this picture came from Bonnie Hunter's blog, as she was sharing some quilts from a museum exhibit of string quilts.  This one has quite a primitive feel to it, a little Gees Bend-y, and is very scrappy.  Looking at it, it took me a while to analyze the thing that I thought made it work, but finally I saw it - all of the corners on each round are made of the same fabric.  In other words, the quilter never changed fabrics at the corner, she continued around.  It gives the eye a  place to rest and enjoy the surrounding fabrics, I think.  And that was the starting point for my own version.

Since I still had quite a bit of the beautiful Kate Spain Latitude batiks on hand, and much of it trimmed to 2.5" wide already, I started with those and added some 1.5" wide strips from the remainder of my Latitude scraps.

I chose a center piece, in this case a 2.5" wide strip of pink that was about 4.5" long.  Next I picked two of the teal pieces and seamed them together, sewing them to the pink block along the long side.  

I trimmed the ends even with the center piece and set those pieces to one side so I could use them to complete my corners.  This beginning is so small it will only take two fabrics to go all the way around.

Here you can see the block after I sewed the strips all the way around, but before the final trimming.  

Once you have sewn your first round, square up the block so that all the corners are square and the opposing sides are equal in length.

And yes, there's a reason for this.  As we go forward, you will be measuring the length for your strips rather than just applying them and trimming the ends.  Have you ever worked with a quilt that had "waving borders"?  There's a reason for that.  We all have a tendency to make our seams just a little bit narrower as we get to the end of the seam, which means that the end of your piece is a little wider than the top of it.  Over the course of a quilt, that little bit can make a big difference!  

So when you are adding borders, you should measure across the center of your quilt and make your borders that length, rather than measuring the edge you are applying the border to.  It might not make a huge difference if you are just adding one border, but in a quilt like this, which is essentially all border, it will help you keep it square and flat.  

So now start building your quilt, border by border.  

Alternate using wide strips and using narrow ones.  

Throw in a block of the opposite color family (or two) as you go for interest.  

Just remember to go around the corner with the same print to give your eye a place to rest.

The length of your strips can vary from 1" to 10" or more - whatever makes you happy and works with the strips you have!


I know it's hard to believe, but I actually ran out of strips in the right colors and widths before my quilt was as large as I wanted it to be...


...so I started auditioning borders.  Neither of these was right.  And as impossible as it seems, I didn't have any yardage stashed away that worked.  Time to regroup!  I dug through my remaining Latitude scraps and saw that I had quite a few that were 2.25", 2" or 1.25" wide - not quite large enough for the 2.5" or 1.5" I was using for the quilt, but I could use them for a piano key border.  


I sewed a few together, and really liked the look.  But what to do with the corners?  I really don't like to miter corners - I'm not a big one for fiddly sewing, but I wanted it to have a nice polished finish on those corners.  So I made some fan-like string blocks for each corner to allow the eye to travel around the outer border.


I played a lot of piano keys to make this one...


...but in the end, I had a top I really like!  And look at how nice and flat it lies!  Measuring for each of those borders pays off in the end.


And here's the finished quilt!  "Quilt as desired" in this case meant a quick loopy meander because I ran out of time for anything fancier...


...but I like the way it looks, and it will make a nice soft cuddly quilt!


And just look at those pretty corners!


Those very different colors came together nicely in Unity, I think!


*&*&*&*&*&*&*

And now that we've completed our String Therapy, let's share a little love, shall we?  Come back next Sunday for the beginning of this year's Hands2Help Comfort Quilt Challenge, where I'm sure you'll find the perfect place to donate an expression of quilt-y comfort for someone in need.  I can't wait, can you?  See you there!

Hugs!

Sarah

Sunday, February 28, 2021

Time For A Little String Therapy! Where's Your Happy Place?


Hi, all!

Welcome to another session of String Therapy!  Today we're going to explore that most wonderful of things, your "happy place".  

For me, that is most often the beach.  I would rather be at the beach than almost anywhere, and it is our favorite choice for vacation.  Something about the sound of the waves, the warm sun, the laidback-ness of it all - if you ask my husband what time it is when we are at the beach, his response is always "I don't know, and I don't care!"  

But for my grandmother, it was her yard.  She loved growing things, and her yard reflected it.  She had the largest red-bud tree I've ever seen, and a rose bush that was her mother's when she was a little girl.  It was always an exciting day when that bush had a rose on it.  (It came long before the many-bloomed hybrid rose bushes we have now, and didn't bloom frequently.)  Her yard was always a treasure trove to explore, with blooming plants tucked away in unexpected corners, creeping charlie that gave off a wonderful smell when you brushed up against it, tiny tart wild strawberries nurtured in a corner, and soft, velvety Irish moss at the foot of the pine trees.  She loved to travel, but loved most getting back to her "green place" where she said her soul could rest.

I'm sure you have a happy place too - most of us do!  My quilt today reflects a little bit of mine, and a little bit of my grandmother's, I think.  When I wrap up in it, I feel connected to both, and that makes me happy.  See?  String Therapy!

*&*&*&*&*&*&*

I will preface this post by saying that this quilt tutorial is really more for a confident quilter or an adventurous beginner who can roll with the punches and incorporate any mistakes into a finished product to be proud of.  It is a "seat of the pants" kind of quilt, and I'm afraid this tutorial reflects that a bit, as there are no precise measurements for people who need them.  But I love this quilt and wanted to show it to you as a springboard for creativity if nothing else.  


This is the picture that got my own creative juices flowing.  I loved the scrappiness of it, and the diagonal flow of the quilt.  As I studied it, I realized that she had a gray strip between every three strips of scraps, with a larger 5-row section of scraps running diagonally across the center.  Once I saw that, I knew I could figure out how to make the quilt myself.  The gray stripe gives a cohesiveness to the design, and a place for the eye to "rest", which is important in a busy quilt!

And I had the perfect fabrics for it - a box full of Latitude batik scraps that the fabulous Kate Spain had gifted me with.  I've made several quilts using them, but still had a lot of strings left.  So I took the cool tones and cut as many 2.5" wide strips as I could.  I then cut them down into pieces of varying lengths, from around 4" to around 12", and sewed them together into a l-o-n-n-n-n-g-g-g-g strip, jelly roll style.  I cut that strip into three fairly equal lengths, and sewed them together side by side to make a very long piece of fabric, 6.5" wide and who knows how long? I didn't measure - I knew if I didn't end up with enough, I could always make more. (Like I said, "by the seat of my pants"!)


Then I took 2.5" x width-of-fabric strips of my gray and sewed them together into a long strip, and added it to one side of my scrap panel.  Now I'm ready to cut!


You can see in the above picture that I have laid my ruler diagonally on the fabric strip.  This is how you will cut the pieces for your quilt, building the quilt diagonally from both corners until you meet in the middle.  The first cut is the easiest, because you line up the tip of the ruler with the top of the gray strip and the bottom corner with the side of your ruler.  It really doesn't matter which end of the strip you work from at this point, but be aware you will be alternating ends to get the right shaped pieces.


You will now work to cut the second piece from the opposite end of the strip in order to get the gray strip on the correct side of your cut piece.  (Flipping the strip will also allow you to get the most pieces from your scrap strip without waste, as the angles will be correct on the opposite end for your next piece. You'll see!)  The easiest way I found to be sure I was cutting correctly was to lay the piece I needed to join to above the scrap strip so I could easily see that (a) the diagonal was going the right direction and (b) the gray strip was in the correct position.  For this next strip, cut the end of the strip on the diagonal in the same direction as the strip above. (see picture if that's clear as mud!)  Then measure the long edge of the strip that you will be joining to and subtract 3/4" from that measurement to get the length of the SHORT side of your next strip.  For example, if the long edge of your first triangle is 12", you will subtract 3/4" from that and cut the long edge of the next strip 11 1/4" long.


In the alternative, you can lay your corner on the strip face down with the stripes aligned...


...then measure in 1/4" to see where your cut should be.  This is how I figured out my first piece, then measured to see the difference between the two.  It worked well for the first cut, but could be problematic for the rest as your corners get larger so I recommend using the "subtract 3/4" technique.


Now, being sure your scrap strip is placed so the gray strip is on the bottom, add a short piece of gray, still 2.5" wide, to the top edge so you can cut the triangle for the opposite bottom corner of your quilt.  


Use the same technique as before to cut the second corner piece.  Now you have your two opposing corners!


Now, flipping your scrap strip from end to end, keep cutting pieces and adding to the quilt, working from side to side to keep the gray strip on the correct side of your addition.  Work evenly so each side is the same size.  When it gets near to the size you want (or you get close to running out of scraps never mind!) you'll be ready to make that larger center strip.  


Add one more scrap panel strip to one side.  Then create a long strip of two more rows of scraps only to add to the other side of the quilt.  I highly recommend making that strip a good bit longer than you need so  you can trim the quilt square easily.  I had enough scraps left in my box to create this last strip easily, but if you made more of the scrap panel than you needed for the initial strips, you could always just seam-rip a row of scraps and a row of gray off to get your long 2-row strip.   Once you have added the pieces and connected your top all together, you can square up the corners using a large square ruler.  


And there you have it, a **mostly square** quilt top!  I will warn you, the edges are all on the bias so it takes some care not to get it too out of whack.  Definitely a quilt for a confident quilter, or one who doesn't get too freaked out by improvisation and learning-as-you-go!


But once it's done comes the fun part - the quilting! Because Jolene, my long arm machine, is waiting for her buddy Joe to come see if he can figure out why she started making a really strange noise, I chose to use wavy straight lines down each of the scrap strips on this quilt, working on my tabletop Juki TL98-Q.  It gives it a nice texture and just enough quilting to hold it together and keep it soft and cuddly.


The colors are so much truer in these outdoor shots, too - it was a slightly overcast day which turned out to be perfect for capturing the colors well.


And I love the backing fabric I found for this quilt - the perfect shade of blue, and modern enough to match the top without being overbearing.


*&*&*&*&*&*&*

I hope you've enjoyed our little session of String Therapy this week!  What kind of quilt would you make using your own happy place as an inspiration?  What colors would you use?  


Well, what are you waiting for?  LOL!

Hugs!

Sarah


PS It's my beautiful daughter Nancy's 9 1/4th birthday!  I'm so glad I can put it that way, as the other way makes me feel really old....