Thursday, July 20, 2023

Day Seven of the Twelve Days of Christmas in July!


Hi, all!

Here we are, on the downslope of this year's 12 Days of Christmas in July blog hop!  Hopefully we can enjoy the downhill rush to the finish, pausing along the way to find more Christmas inspiration.  Today I've taken a little trip down memory lane to share a family tradition with you, and we'll also receive the instructions for two more blocks for the quilt or wall hanging. Let's get started!

*&*&*&*&*&*&*

As many of you may already know, we have a tradition in my family that started many years ago, when Lilli, my eldest granddaughter, was very little.  One of my first quilts was made for her, and I gave it to her for Christmas just after her second birthday.  The next year, I was making a quilt for a little girl with leukemia, and Lilli, my constant companion, loved the Dr. Seuss fabric.  She petted that quilt and constantly asked about who it was for. She asked about that quilt even after I sent it off to its new owner, and so I decided to order more fabric and make her one too!


I gave her the quilt for Christmas, along with a doll quilt from the same fabrics for the doll bed my husband made her that year, and thought that would be the end of it.  But then Christmas starts coming around again, and Lilli, always an articulate child, even at three, started listing off all the things she wanted Papa (my husband) to get her for Christmas.  I asked her if she didn't think that was quite a lot of things, and she looked at me and said, "But Nana, all I want from you is a quilt!"  And thus a tradition was born.


Keep in mind at that point I only had one grandchild.  This made making a quilt a year a pretty simple prospect!  Then along came Emmy, and I added another quilt for each of them each Christmas.

Emmy's first annual quilt

At this point, my daughter isn't too concerned.  They only have a few quilts in their house!  A few years later, they adopted Nathanael, and their quilt load was increased by three each year.....

Nathanael's first annual quilt

But finally at some point my daughter started getting concerned, realizing that by the time they all graduated, there would be upwards of fifty quilts at their house!  To calm her nerves, we gave each of the children a storage cabinet one year so they could put their own quilts away in their rooms, and last year I gave them vacuum storage bags so they could store some under their beds!  

Needless to say, though, I'm not going to stop the tradition.  I try to make each quilt a microcosm of things about the last year in the chid's life.  For example, one year Emmy was VERY dramatic about everything, so I made her this cute Drama Llama quilt....


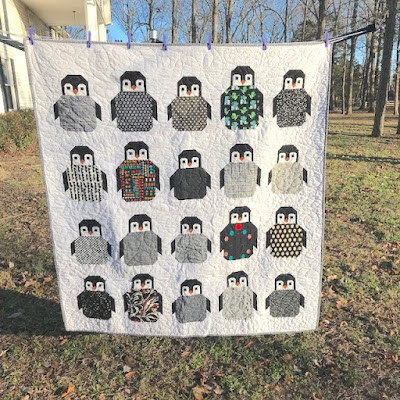
We discussed it thoroughly, and each llama has a name and a distinct personality!  Nathanael loves penguins, and one year I made this fun quilt for him....


And Lilli has cut through a wide swath of colors, themes and styles, but this is my favorite, I think - one year she requested a dolphin quilt with lots of blue...


One of the special things that I add to each quilt is a label that tells a little bit about the past year and how I see them growing up.  It always begins with "The year you turned (age)...".  


I love to think of their children using these quilts someday and reading about what their parents were like when they were children!  They have been comforters when they were sick, playmats or tents when they were cooped up inside, snugglies on the sofa while watching tv or playing video games - and they should continue that wonderful existence for years to come!

This year I already have plans for all three - Lilli will be getting a chocolate chip cookie quilt, Nathanael a Pokemon quilt, and Emmy, my little artist, is already working on drawings that I will copy onto fabric and put into her quilt.

Do you have any special family traditions that go on year after year?

*&*&*&*&*&*&*


First of all, a note - if you happened to read yesterday's blogpost very early in the day, you may have noticed that although I promised two blocks, I only put the instructions for one.  (Oops!)  I've fixed that and so if you missed the instructions for Block C, hop back one day and catch up!

And now it's time to work on the next two blocks for the center of the quilt or wall hanging - Blocks D and E!  These two blocks are identical, so construction should go pretty quickly.

For these two blocks you will need the following pieces:

        10 3.5” sq. white


8 3.5” sq. red/white 9-patch blocks


Lay out the pieces on your work table in stacks of two, as shown below. 


Assemble two nine-patch blocks.  These finished blocks will go to the right and upper left of the top block of the Christmas tree.  You can rotate them as needed to place the white block corner towards the center of the design.


And just like that, you're done for today!  If you are still working on the small 9-patch blocks, hopefully you have some catch-up time now.


*&*&*&*&*&*&*


I hope you'll be back tomorrow, when I will be sharing another kid-friendly craft - I know it is because my grands had a ball with it!  It's quick, easy, down-time friendly, and may help you use up some stray (and possibly overflowing) craft items you have stashed away!  We'll also be assembling the next two blocks for our quilt.


Can't wait to see you then!


Sarah

Wednesday, July 19, 2023

Day Six of The Twelve Days of Christmas in July!


Hi, all!

Welcome to day six of the Twelve Days of Christmas in July 2023!  We are halfway through, but there's still so much fun ahead of us.  Have you been inspired yet?  And remember - if you want to be a stop on the blog hop next year, let me know early!  Because, after all, it's never too early to start thinking about Christmas!

Today we have what should be a very fun stop on the hop.  Kate of Arts and Socks is going to share a fun project with us! I know what it is but I want you to be surprised - I bet you've never thought about decorating THIS particular item for Christmas!  Or maybe you have - but I guarantee you'll enjoy her post.

And we'll be working on the next two blocks for the wall hanging or quilt.  These two are pretty easy, so if you are making the quilt and still need to finish your small nine-patch blocks, you may find some time today!

So let's get started!

*&*&*&*&*&*&*


Today we will be working on blocks B and C, which will complete the blocks needed for the center of the center, so to speak!  Both blocks are fairly simple and shouldn't take long to complete.

For Block B, you will need the following pieces:


1 9.5” x 2” green

1 9.5” x 8” green


4 2” sq. white


Step 1 - Draw a diagonal line on all four 2” white squares.


Step 2 - Aligning the corners and edges, place a white square on each of the upper right corners of both green pieces.  Stitch on the line.  Trim off the corner.  Press out.


Step 3 - Sew the 2” piece to the top of the 8” piece.


All done!


And now we'll tackle Block C.  For this block, you will need the following pieces:


        1 9.5” x 2” green


1 3.5” sq. brown


2 3.5” sq. white

1 9.5” x 5” white


Step 1 - Take the brown square and the two white 3.5” squares.  Sew the white squares to either side of the brown square.


Step 2 - Sew the green strip to the top of the W/B/W unit.


Step 3 - Sew the white 9.5” x 5” piece to the bottom of the G/W/B/W unit.


Finished!  Now you have completed the three blocks that comprise the center of your Christmas tree, top to bottom.  Set them aside for a while.  Tomorrow we'll start working on the side blocks.


*&*&*&*&*&*&*


Come back tomorrow as we continue working on the center motif for the quilt!  I'll also be sharing a long-running family tradition that my grandkids just love.  


Hugs!


Sarah

Tuesday, July 18, 2023

Day Five of The Twelve Days of Christmas in July!


Hi, all!

Welcome back!  I hope you are enjoying yourself as much as I am - I've re-discovered so many things I've wanted to do in the past, as well as some old favorites re-visited.  After yesterday's post, I'm on the lookout for some really cute Christmas fabric to make new pillow covers for this year.  I'll save the buffalo check ones until they come back in style again!

Today I'll be sharing some fun things you can do with your kids, grandkids, or neighborhood kids - activities to keep them busy and stoke their creative juices too!  We'll also have another step in the quilt-along to get a little bit closer to our finished Christmas wall hanging or quilt.  So let's get started!

*&*&*&*&*&*&*

Have I ever told you that my grandkids call my studio "Nana's Playroom"?  And they love to play up there as much as I do.  I keep lots of craft goodies handy in addition to my sewing and quilting supplies, and they know just where they all are.  Sometimes I have to clear off a table or two for them to have room to work, but it's all good!

I'm notorious for sharing great craft ideas that I've found on the internet (particularly Pinterest) and today I've got a bunch for you.  I do not have tutorials for these, and in fact, many of them are so old that their links have become defunct.   But all of them can be figured out with a little ingenuity, and I bet you have many of the supplies in your own stash!


First up are these adorable bookmarks!  Find or take a fun pic of the kids, enlarge and print out on copier paper, glue it to card stock and let your kid cut it out.  Add a string and tassel, and you've got a bookmark!  Great for using up leftover embroider floss or yarn, and even the ends of cans of basting spray!


Wouldn't these make great teacher gifts or stocking stuffers?  Leftover ribbon, small scraps, old buttons, a circle of thin cardboard or plastic and a key ring.  You can either sew them together or glue them together (make the stiff center smaller than your outer fabrics).  For best success with one that will get hard use, I recommend sewing!


Mason jar crafts are always fun, and these two made me smile!  The ones on top are fall themed, but could take on whatever holiday you wish to make them for.  Place a large-ish sticker on the outside of the jar, paint whatever color you want, remove the sticker and add a ribbon and candle.  The ones on the bottom will satisfy the need for sparkle in your life, and are so simple!  Make a white glue wash (white glue and water) and then brush it up the insides of the mason jar. While it is still wet, add some glitter and roll it around the inside of the jar unit the sides have a good sprinkling on them.  Let it dry, add a candle and maybe a ribbon, and you've got a beautiful light catcher for your mantle!


I love these little wooden spool necklaces - noticed the buttons on top? I suspect there's one on the bottom too, that has the bead dangles attached to it.  I don't know about you, but I collect both wooden spools and old buttons, and this would be a good use for them!  A few leftover beads, bits of ribbon, and a small strip of a pretty fabric glued on the spool, and you're all done!  And you can buy really nice fine necklace chain on a spool at Hobby Lobby or on Amazon, enough to make a LOT of these!


And of course, Christmas wouldn't be complete (at least at our house) if we didn't end up making something in the kitchen.  I love the simplicity of these "oreos on a stick" lollipops that are simple enough for kids to make, but pretty enough to share!  Wouldn't they look nice in a short glass on a Christmas treat "charcuterie" board? 

And here's a tip I learned from a caterer - if you put kosher salt in the bottom of a glass or container, it will hold things like breadsticks, etc. in place, but looks like ice crystals or snow!  I have also used it in the bottom of some large hurricane lamps I have, with tiny Christmas trees and some little ceramic figures of gnomes, to make little Christmas vignettes.  The kiddos love them!


I hope you've been inspired to either make some of these with the kiddos in your life, or search out crafts that will work with your particular kind of crafting leftovers!

*&*&*&*&*&*&*

Now let's move on to today's step in the quilt-along....


The center of the quilt consists of nine blocks.  Today we are going to make Block A.  I'm keeping it simple today because there is a technique to making the green blocks that may be new to you - it's simple once you learn it, though!  I can thank Kelli Fannin and Lorna McMahon for showing me how to do this through their patterns.  This is the first time I tried to graph one of my own out, though, and believe me, there was a lot of "rippin' and cussin' and hopin' and prayin'" going on!  

And now that I've given you that particular little earwig to keep you company, let's pull the fabrics for Block A.  You will need the following pieces:

1 9.5” x 5”     white

4 2” x 3.5”     white

2 3.5” sq.     white


1 6.5” x 3.5”   green

1 6.5” x 2”     green
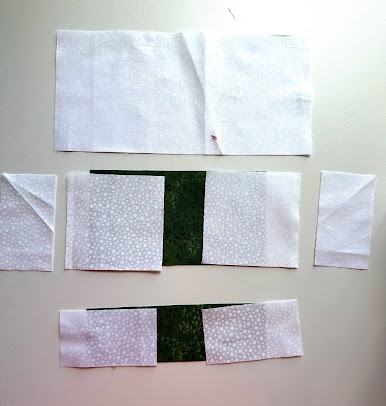


Step 1 - make a flying geese block using the green 6.5” x 3.5” and the two 3.5” white squares.  Draw a diagonal line across the back of the two white blocks, corner to corner.  Lay one on the right end of the green piece, matching the edges and corners, with the diagonal line running from upper left to lower right.  Stitch on the line.  Trim off the corner 1/4” from your stitching line.  Press the white corner out.  Repeat for the other side, having the diagonal line running from upper right to lower left.  Trim off the corner.  Press the white corner out.  


Voila! Your flying geese block is complete.   Now sew the two 2” x 3.5” pieces to each end of the block.


Step 2 - Sew the flying geese strip to the bottom of the 9.5” x 5” white piece. 


TIP:  You are about to make a block using the stitch-and-flip technique.  FYI, it is VERY easy to make a mistake and stitch the wrong direction.  I highly recommend checking to be sure you have sewn it correctly BEFORE cutting off the corner!  You are making the long rectangular piece on the bottom of Block A - check it to be sure the green ends angle correctly before trimming.  


Step 3 - Lay out the green 6.5” x 2” piece on your workspace.  Take one of the white 2” x 3.5” pieces, and place one of the short ends on the right side of the green piece, aligning the top right corner with the top right corner of the green piece.  The remainder of the white piece should hang down as shown above.  Draw a diagonal line from the upper left corner to the point where the lower right edge of the green piece falls under the white strip. (Enlarge the picture if you can't see the line I've drawn.)  Stitch on the line.  Trim off the corner.  Press out.  Repeat for the other corner, drawing your line from the upper right to the lower left.  Stitch on the line.  Trim off the corner.  Press out.  Sew this strip to the bottom of the piece you completed in Step 2.


Your Block A is complete!  It should measure 9.5” square.  Trim if needed. (I suggest doing this for all your blocks.)


Take a deep breath!  You've learned the basic technique that will get you through the Christmas tree center of this quilt.  It may be familiar to you, but if not, it's a good trick to add to your repertoire.  

*&*&*&*&*&*&*

Tomorrow we will get to do a little hopping again - Kate of Arts and Socks has a fun project to share with us and we will work on two more blocks for the quilt-along.

See you then!

Sarah