Hi, all!
Welcome to Day Eight of this year's 12 Days of Christmas in July blog hop! Today I have a fun craft to share with you that may help alleviate some "stash" at your home, as it has at mine, plus give you a way to spend some fun time with the kiddos in your life. We'll also be working on two more blocks for the Christmas tree center of this year's quilt. Let's go!
*&*&*&*&*&*&*
Every so often, you should take the time to look back through your old Pinterest pins. Rather like scrolling through years-old blog posts, you will find things you completely forgot about. I discovered this picture that I had saved as inspiration, and boy was I inspired!
1 2” sq. green
1 3.5” sq. green
1 2” x 3.5” green
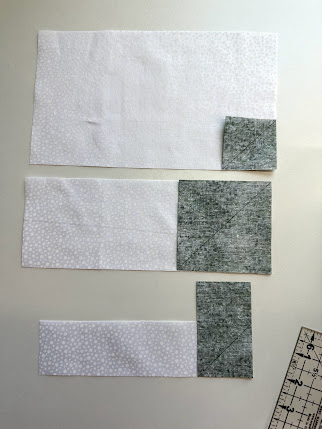
Step 1 - Take the white 9.5" x 5” piece and the green 2” square. Draw a diagonal line on the green square from corner to corner. Take the green square and lay it on the lower right corner of the white piece, aligning the sides and corner, with the diagonal line running from upper right to lower left. Stitch on the line. Trim off the corner. Press out.
Step 2 - Take the white 9.5” x 3.5” piece and the green 3.5” square. Draw a diagonal line on the green square from corner to corner. Take the green square and lay it on the right end of the white piece, aligning the sides and corners, with the diagonal line running from upper right to lower left. Stitch on the line. Trim off the corner. Press out.
Step 3 - Take the white 8” x 2” piece and the green 2” x 3.5” piece. Lay the short end of the green piece on top of the right end of the white piece, aligning the sides and corner, with the extra length of the green piece above the white piece as shown below. Draw a diagonal line from the lower left corner of the green piece to the spot where the white piece and the green piece meet at the upper right. Stitch on the line. Trim off the corner. Press out.
Step 4 - Sew the 9.5” x 3.5” piece to the bottom of the 9.5” x 5” piece. Sew the 9.5” x 2” piece to the bottom of that piece.
1 9.5” x 5” white
1 9.5” x 3.5” white
1 8” x 2” white
1 2” sq. green
1 3.5” sq. green
1 2” x 3.5” green
Step 1 - Take the white 9.5" x 5” piece and the green 2” square. Draw a diagonal line on the green square from corner to corner. Take the green square and lay it on the lower left corner of the white piece, aligning the sides and corner, with the diagonal line running from upper left to lower right. Stitch on the line. Trim off the corner. Press out.
Step 2 - Take the white 9.5” x 3.5” piece and the green 3.5” square. Draw a diagonal line on the green square from corner to corner. Take the green square and lay it on the left end of the white piece, aligning the sides and corners, with the diagonal line running from upper left to lower right. Stitch on the line. Trim off the corner. Press out.
Step 3 - Take the white 8” x 2” piece and the green 2” x 3.5” piece. Lay the short end of the green piece on top of the left end of the white piece, aligning the sides and corner, with the extra length of the green piece above the white piece as shown below. Draw a diagonal line from the lower right corner of the green piece to the spot where the white piece and the green piece meet at the upper left. Stitch on the line. Trim off the corner. Press out.
Step 4 - Sew the 9.5” x 3.5” piece to the bottom of the 9.5” x 5” piece. Sew the 9.5” x 2” piece to the bottom of that piece.
Your block G is finished, and you have completed today's blocks!
*&*&*&*&*&*&*
Come back tomorrow, when I'll be sharing a delicious recipe that makes a perfect small gift, and the last two blocks for the Christmas tree center!
See you then!
Sarah


Those button garlands are such a fun idea, great for sharing time with the kids.
ReplyDeleteWhat a fun project for the kids to work on!
ReplyDeleteWhat a beautiful way to display that old jar of buttons and have fun making it with the kids!
ReplyDeleteI have several button necklaces I made in a quilt shop and they are among my favorite things to wear. My can belonged to my mother - she cut them from old clothes and always saved them in a Folger's coffee can. I did, too, until there was no more space! I've had them in canister sets, in my Kindergarten counting center, my son dumped an entire collection behind a bookcase nailed to the wall, when he was about two. These days, they are in a glass jar and have been used the same way for sorting and counting by my grands. I have a fruit cake tin full that my niece sent to me when I told her about my mom's button can. They are extra special!
ReplyDelete