
Well, better late than never - I didn't get my tutorial written in time to post this earlier (I actually had to make another pillow cover to take some pictures!) but it's done now! First, though, let me share with you this week's blocks for the Gypsy Wife quilt...

This block is called Old Maid's Puzzle, and it's the last of the "named" blocks in the book. As before, these blocks are made out of Kate Spain's Latitude batiks, and I love the colors! The rest of the blocks are designated as "filler" blocks, so this is definitely a milestone! I'll need to figure out how to divide up the rest of the blocks in the book over the next few weeks.
*&*&*&*&*&*&*
And now for the tutorial. I had so much fun making a wide variety of pillow covers over the past few weeks, and they are a great way to use up scraps and orphan blocks! I'm sure there are many ways to make them, but I'm going to share how I do it. Try it my way or experiment until you find what works for you!

First of all, create your pieced top. Standard pillow form sizes are 14", 16" and 18", and I usually make my pieced top about 1/4" larger than the pillow form size. I like my pillows well-stuffed, and making it slightly smaller than the pillow form size will give you a well-rounded pillow that isn't loose in the covering.
Sandwich your pieced top with a piece of batting, and a backing if desired. I like to use Warm & Natural batting, which is dense enough that it doesn't stretch or pull, unlike some other battings. Because of that, there's no need to use an additional backing inside the pillow. If you do need a backing, a simple piece of muslin is sufficient. It doesn't need to be fancy! I like basting spray for these, but pins work as well.
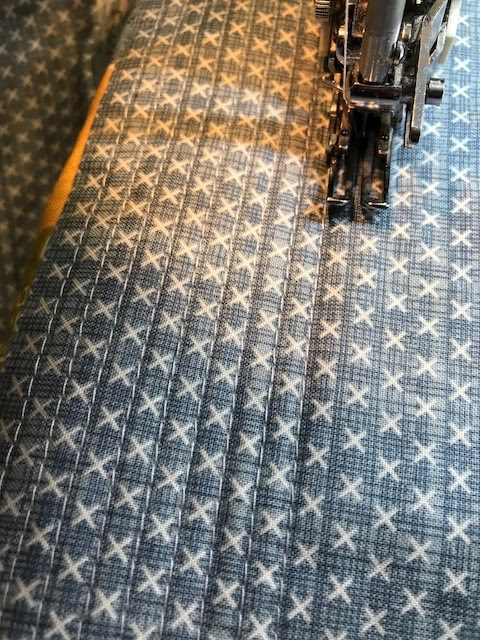
Next, quilt as desired! I chose to quilt this in straight lines because the pattern made that easy without extra marking. You might choose to do cross-hatch or grid quilting, or even free motion quilting. It's all up to you!

Trim any excess backing and batting off your quilted piece, squaring it up as needed.

Here you can see what the back of my piece looks like - the Warm & Natural really looks almost like felt. You could also use a piece of fleece as batting, which wouldn't require an additional backing piece either. If you do use fleece, though, be sure it doesn't show through your block!
Your next step will be to cut two pieces for your pillow back. Each one needs to be the same width as your quilted pillow front, and 22" long. Fold each of them in half so that you have a piece the width of your pillow and 11" long. Press the fold.

Now lay your pillow front face down with the top up at the top of your worktable. Take one of your backing pieces and lay it with raw edges against the bottom and right edges of your pillow top. Pin from the corner about 2/3 of the way to the left along the bottom. (If you are more precise than I am, and your backing piece is exactly as wide as your top, go ahead and pin all the way to the corner.)

Now lay the other backing piece on the top, matching up the top and right hand edges and pinning in place 2/3 of the way across the top and at the overlaps on the side. If your backing pieces are the same width as your top, go ahead and pin the left side the same way as the right side. If not, flip it over to trim the pieces to the correct size.

See! This is what happens when you cut all your pieces at the beginning - quilting almost always makes your front smaller than it started out. So it's time to trim!

Lay your ruler on top of the pillow top and trim the backing excess away.

Now that it's all the same size, finish pinning around the top. Be sure to catch the ends of the overlap so they don't get folded under when you are attaching the binding.
Now let me explain about the binding! I REALLY hate piping. My grandmother used to make beautiful pillows, and she put piping all around the edges. Hers were always perfect. Mine, not so much - I can't ever get nice corners with it. So it kept me from making pillows for a long time. But after I started quilting, I got good at binding - and I realized that pillows could be bound just as easy (or even easier!) than finishing with piping. EUREKA!!!

So make your binding and sew it to the back side of the pillow cover. I like to start on the bottom of the pillow so that my join is down there too.

After you finish sewing the binding all around and joining the ends, trim the corners. Pull the binding back and trim just the pillow, not the binding. This will help your corners lay nicely.

Sew down the binding on the front of the pillow cover...

...and then it's done! Wasn't that simple? No turning, no pushing out the corners, and they're beautifully sharp.

Here you can see both the back and the front. You should have about a 3" overlap on the back, which ensures your pillow form won't be showing through a gap.

And here's what the finished pillow looks like with pillow form! Super simple, they make great gifts, and they use up stash, scraps, and orphan blocks! A winning prospect all around!
I hope you'll share your own creations on a Whoop-Whoop Friday sometime soon!
Hugs!
Sarah
Thank you for the tutorial! I have been admiring your many pillows lately and was going to ask you some things, but here are all my questions answered. Have some leftover string-X blocks I may make into a pillow. The binding method of putting it together looks ideal!
ReplyDeleteThis is wonderful! I never thought of using binding on a pillow as a way to avoid turning it inside out! Excellent. One thing I have not mastered though is machine binding. When I quilt, I sew it on the front by machine but then hand stitch it on the front.
ReplyDeleteSarah, thanks for the tutorial. This is the best way to make a pillow cover yet! Fantastic!!!
ReplyDeleteI love the idea of binding a pillow, instead of adding piping and turning it! Looks great!
ReplyDeleteWonderful tutorial! Thanks!
ReplyDeleteThank you!! and Yay, so happy it doesn't involve a zipper! :)
ReplyDeleteI do have a question though, since I am math challenged . . . you use 22" pieces of fabric for the back of a 14" pillow. If I wanted to make a 16" or 18" pillow, how big would I cut the pieces for the back of each of those sizes? . . . I'm probably the only one who can't figure this out :)
I've not done the binding. I'll have to try it. Makes a nice finishing touch.
ReplyDeleteI love your pillow. Thanks for the tutorial!
ReplyDeleteAwesome tutorial! Binding is my favorite thing to do!
ReplyDeleteThank you for sharing this fabulous project and for being an inspiration to crafters everywhere. I'm looking forward to exploring more of your creative journey through your blog. Happy crafting and best wishes for the upcoming North Pole Festival! 🎄❄️🎁
ReplyDeletehttps://www.frugalishness.com/north-pole-festival/
Your dedication to upcycling and sustainability is admirable. In a world where we often overlook the value of small things like fabric scraps, your post serves as a timely reminder of the potential they hold in the hands of a skilled crafter like yourself.
ReplyDeletehttps://www.promocodehq.com/blog/how-to-add-money-to-cash-app-card-at-7-eleven/
ReplyDeleteYour Pillow Cover Tutorial is a fun and creative way to tackle the scrap problem! It's like piecing together a travel itinerary with an "american airlines promo code reddit" for maximum savings. Thanks for the unique and resourceful blog!