Showing posts with label SOSN. Show all posts

Sunday, March 5, 2023

Something Old, Something New - The Return Of Supernova!


Hi, all!

We have arrived at the last week of this year's tutorial series, and I've saved the best for last - Supernova!  This quilt has, hands-down, been my most popular.  I have pictures of the design made by so many people from Instagram and each is wonderfully unique!  I've personally made it at least six times, including a mini version using bonus triangles from another project....
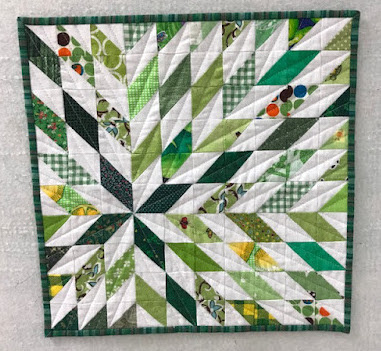
The trick to making this quilt a wonderful experience for yourself is to take the time to square up your half-square triangles.  I know it's a hassle, but you will be so happy with the way your quilt finishes that it's totally worth taking the time.  


I highly recommend getting a Bloc-Loc ruler if you don't already have one - it makes the whole process of squaring up those HSTs so quick and simple.  I have two - a 6.5" and a 12.5" - and I've never had an HST block I couldn't simply square up using one of those two.  I'll admit that the 12.5" was an indulgence, but I wanted to make a Moda Love quilt using 10" squares and I was spoiled by my smaller Bloc Loc ruler!

And honestly, isn't that pile of trimmings pretty?  Such a nice sign that you've been virtuous!


So - - - are you ready to make one of your own?  Here's how!

*&*&*&*&*&*&*

“Supernova”
A Stunning Stars Quilt-Along Quilt


This is a very simple one-block quilt; its secret lies in the layout.

Finished size:  approximately 60” x 60”

FABRIC REQUIREMENTS:  

1 3/4 - 2 yards of background fabric

2 yards (or equivalent) of print fabric; this could be yardage, fat quarters, or scraps.  There are 50 diamond shapes in the quilt, so you could use up to 50 different fabrics.

CUTTING DIRECTIONS:

From the background fabric, cut fifty 7” squares.

Take your print fabrics and choose one that will become the focal star.  From that fabric, cut four 7” squares.  From the remainder of your print fabrics, cut forty-six 7” squares for a total of 50 squares.

MAKING THE BLOCKS:

Take your background squares and draw a line from one corner diagonally across the square on the back of the fabric using a pencil or Hera marker. Pair one background square with one print square, right sides together.


Using the traditional method, make your half-square triangles (HSTs), stitching slightly less than 1/4" from each side of the center diagonal line. You will have 50 sets of two matching HSTs.  Trim your HSTs to 6.5” square.  Don’t skip this step - it will make your quilt go together faster and look better!

Locate your eight focal star HSTs to start your layout.

LAYOUT:

To get a similar look to the finished quilt shown above, use the diagram below to lay out your blocks.  (NOTE: The orange quilt shown in this post has more blocks than this quilt tutorial calls for.  Don’t use that finished quilt as your layout guide!)  


Start with the focal point star in the lower left quadrant, and work out from the star.  Step back often and check to see that your diamonds are going the right direction!  Fill in the gaps at the upper right and lower left edges with half diamonds, splitting up some of your pairs for the purpose.  Assemble the quilt top.  Quilt as desired! 


*&*&*&*&*&*&*

And just so you can see some of the beautiful variations that this quilt can take...


And here's a peek at the beautiful backing I found for this year's version of Supernova...


If you make a Supernova quilt, please tag me on Instagram (@fabricaddictquilts) and use the hashtag #supernova. I love seeing them pop up - the variations are fabulous!!

*&*&*&*&*&*&*

And that's the last of the tutorials for Something Old, Something New.  I hope you've enjoyed these, and found one or more to add to your repertoire of quick, easy quilts!  Stay tuned in the coming weeks for the beginning of this year's Hands2Help Comfort Quilt Challenge!

Hugs!

Sarah

Sunday, February 26, 2023

Something Old, Something New - Pulling My Heart Strings!


Hi, all!

Have I ever mentioned that we have some great scrap quilters here in Tennessee?  And one of my favorites is Tracy of Tracy's Bits N Pieces.  We met several years ago at a Jen Kingwell trunk show in Nashville, and I've followed her on Instagram (@tracysbitsnpieces) ever since.  Her feed is a constant source of inspiration!  So when I saw this quilt pop up....


...I was (a) immediately enchanted, and (b) messaging Tracy to see if she minded if I created my own version for this tutorial series!  She graciously agreed, and suggested that I check out the quilt she made with the pieces she cut off of her string blocks while making the hearts.  Check this out!

Does anyone besides me remember the Certs commercials - "two, two, two mints in one"? I love when you can get two quilts from one!

And if you are like me, you are drowning in strings!  I have a hard time throwing any fabric away, and strings seem to be common, and also easy to store.  I have mine sorted by color in this wonderful set of storage drawers given to me by a friend.  It took Lilli and me a while to do the pressing and sorting, but now they are all ready for use - so let's use them!

Although Tracy used red and cream for her hearts, I would think you could use any color combination you prefer.  So see what you have a lot of in your strings storage and drag them out!

And I'm going to make a confession right here, right now - my nickname could be "Short Attention Span Sallie"!  So my version won't have as many string blocks as Tracy's does.  I get bored easily!

So here's the way to make my version of Pulling My Heart Strings...


Step 1 - take sheets of paper, as thin as you can find (phone books are ideal but a lot harder to find these days!) and cut 28 5.5" x 8.5" pieces.  Yes, that's half of a piece of copier paper.  Makes it easy, doesn't it?  I used an old pad of tracing paper I found in a drawer.

Step 2 - Set your sewing machine stitch fairly short, dip into those strings and start sewing them to the paper in the direction of the long edge.  String blocks are low stress - it doesn't matter if your seam allowances are perfect or your seams exactly straight, as long as you completely cover the paper.  

I start with a strip in the center, then sew another strip to each side because I also recommend pressing after you add each piece, so your block is nice, flat and square when you finish pulling the paper off. Starting in the center means you can sew two seams before pressing!  

Make 28 of these.  

Flip the blocks over, tear away the foundation paper, then trim them to 5.5" x 8.5".

Step 3 - From your light colored background fabric, cut 6 5.5" squares and 12 2" squares.  From your dark-colored background fabric, cut 22 5.5" squares and 44 2" squares.

Step 4 - The Left Side of The Heart - lay the 5.5" square on the lower left corner of the block, matching the left and lower edges.  Stitch diagonally from corner to corner.  You may find it easier to mark the stitching line, with a pencil or Hera marker, prior to stitching.  Now, if you plan to use your bonus triangles in another quilt, stitch about 3/8-1/2" away from that stitching line (closer to the outer corner).  This way you can just cut between the two lines of stitching and your HST block all sewn together and ready for trimming!  Take the 2" squares and lay them on the right and left upper corners, lining up the edges of the squares with the block.  Stitch diagonally from corner to corner.  (These "bonus" blocks would be so tiny that I don't usually save them.)  Cut 1/4" from the stitching line on the corner side of the stitching line. Press the background triangles out, being careful not to distort the block.  Make three of these blocks with light backgrounds and 11 with dark backgrounds.

Step 5 - The Right Side of the Heart -  lay the 5.5" square on the lower right corner of the block, matching the right and lower edges.  Stitch diagonally from corner to corner.  Now, if you plan to use your bonus triangles in another quilt, stitch about 3/8-1/2" away from that stitching line (closer to the outer corner).  Trim either between the stitching lines or about 1/4" from your line of stitching.  Now take the 2" squares and lay them on the right and left upper corners, lining up the edges of the squares with the block.  Stitch diagonally from corner to corner.   Cut 1/4" from the stitching line on the corner side of the stitching line. Press the background triangles out, being careful not to distort the block.  Make three of these blocks with light backgrounds and 11 with dark backgrounds.

Step 6 - Take the half-heart blocks to the cutting board.  We are going to trim a half-inch off the OUTSIDE edge of the heart so that your final block will be 5" x 8.5".  Be sure you trim it off the outside edge and not the center! 

Step 6 - Matching the blocks along the long center line, pair 3 light lefts with 3 dark rights, 3 dark lefts with 3 light rights, and 8 dark rights with 8 dark lefts.  Sew the hearts together.  Press the seams to the right.

And voila!  Your heart blocks are made and you've finished the hardest part of the quilt.  That wasn't so bad, was it?

Now we assemble the quilt.  

You will need 6 light background pieces cut 5"x8.5", 2 pieces cut 5"x16.5", and two pieces measuring 5.5" x a length to be determined (can be pieced).

You will need 6 dark background pieces cut 5"x8.5", 2 pieces cut 5"x16.5", and 4 pieces measuring 5.5"x a length to be determined (can be pieced).

Take the dark and light 5"x8.5" pieces and pairing one of each, stitch on the long edge.  Press seam to the left.  Repeat with the 5"x16.5" pieces.  Press seam to the left.

Using the two-color blocks and the two-color hearts and matching the center seams, create the right and left columns of hearts.  The hearts should look like they are straddling two long strips of color.  Press the seams toward the background fabric blocks.

Using the remaining eight dark background hearts and matching the lower points with the center seam of the block below, create the center column of hearts.  Press the seams down.  Measure the strip, top to bottom.  That is how long you will make your long strips.

Take one 5.5" wide long dark piece and one 5.5" long light piece and sew them together along the long edge, being careful not to stretch the fabric as you sew. Press the seam to one side.  Make 2 of these.

Now assemble the quilt, using one 5.5" wide long dark background strip, the dark/light heart column, the light/dark background column, the dark background heart column, the dark/light background column, the light/dark heart column, and the remaining 5.5" wide long dark background strip.

Step back and look at the beautiful quilt top you have assembled!  And if you're so inclined, there's so much room for beautiful creative quilting on this quilt.  The possibilities are endless!

I would probably use one of the two background colors to bind this quilt to allow it to kind of flow and not stop, but choose whatever makes your heart strings sing!

*&*&*&*&*&*&*

I hope you've enjoyed this scrap buster tutorial!  Please stop over at Tracy's blog or Instagram and show her some love - she was so kind to allow me to take her design and run with it.  I guarantee you'll be inspired!

See you next week!


Hugs!


Sarah


Sunday, February 19, 2023

Something Old, Something New - A Modern Irish!


Hi, all!

When I was planning out these tutorials, I thought I remembered stashing away all the pieces for a second quilt like this one...


...but lo and behold, my memory was faulty and the pieces I had stashed away were for a different red and white quilt!  But by then I had already committed mentally, so I decided to make it again, but in a different color.  This is a great sixteen-patch quilt that is so much easier than it looks!

Sixteen-patch blocks are so very versatile - lots of ways to arrange the fabrics to achieve a different look.  This quilt gives off a kind of updated "Irish chain" vibe that I love! (And yes, that is our old house in the background.  It's fun to see pictures of it crop up from time to time!)

This quilt is made using two different color variations of the same block, using various red and beige fabrics to give it some depth.


Isn't that pretty?  I love all the different shades of red!

I decided to do this year's version in a very different colorway....


Isn't that orange just luscious?  I pulled a bunch of white-on-white prints out of my stash - it felt so good to use up those little bits and bobs of fabric - and it paired so nicely with the orange prints.  And I got so excited about this one, I apparently forgot to take process shots with the new colors - so I'll be using the old instructions and pictures for this tutorial.  Here goes!

My version of this quilt has 49 blocks set into a 7 x 7 grid, with a 2" border on each side to yield a 60" square quilt.  There are 25 red blocks and 24 white blocks.  I used fat quarters cut into 2.5" x 22" strips to make the strata sets (four strips sewn side by side).  I cut my strips from sixteen different reds and sixteen different whites to get a wide variety of shades in my quilt, although you could do it with fewer colors.  You can get 6-7 strips from each fat quarter.  In total, you will need 56 red strips and 50 white strips, 2.5" x 22", to make this quilt.

In the directions below, R stands for red and W stands for white.

For the white blocks, you will need 6 sets of strata assembled WRWW, and 6 sets of strata assembled WWWR.


For the red blocks, you will need 7 sets of strata assembled RWRR and 7 sets of strata assembled RRRW.


Once your strata is assembled and pressed (I pressed my seams open to make it easier to assemble the blocks), crosscut each strata into eight pieces, 2.5" wide.


For each white block, you will need two pieces of WWWR, and two pieces of WRWW.  Arrange them as shown below.  For each red block, you will need two pieces of RRRW, and two pieces of RWRR, arranged in the same way.


Once your blocks are assembled, arrange them alternating red and white blocks.  Arrange the diagonals of the red blocks from upper left to lower right, and the diagonals of the white blocks from upper right to lower left.  I added a red border to finish off my quilt, although you don't necessarily need it.  My finished quilt measures about 60" square.

 And just because it's pretty, here's one last shot of this year's version! 


*&*&*&*&*&*&*

Definitely a blast from the past, but so pretty it was worth checking out again, yes? I could also see this quilt made with assorted batiks or even Kaffe Fassett prints, using a solid for the diagonals.  So it might make a great scrap buster, or a way to use a fat quarter bundle or jelly roll or two that have been gathering dust in your stash. The possibilities are endless!  And now that you know a quick and easy way to make the blocks, what are you waiting for?

Hugs!

Sarah

Sunday, February 12, 2023

Something Old, Something New - Hearts for Valentine's Day!


Hi, all!

I'm so glad you're back for another week of the Something Old Something New tutorials!  This week's quilt design is very appropriate for the holiday - hearts for Valentine's Day!  I'm killing two birds with one stone with this quilt, as my niece requested this design for her new daughter's baby quilt.  When I started looking at the picture she sent me and planning it out, I realized this would be a super simple quilt to make, and thus, perfect for this year's tutorial series.

So without further ado, let's get to the tutorial for this week, for the Have A Heart quilt!


Fabric Requirements:

White (or other) background fabric: two yards or slightly more if you want to add a border or binding.  If you are binding with the same color as your background, you could eliminate a border and have a slightly smaller quilt.

Print fabric: about one yard total of at least three different fabrics. This is a good design to use up scraps in one or more color families!

Cutting Instructions:

From your background fabric, cut

    61    2.5" squares

    61    2.5"x4.5" rectangles

    61    2.5"x6.5" rectangles

    Border or binding strips as preferred

From your print fabrics, cut

    183    2.5" squares

*&*&*&*&*&*

This quilt is a great one for speed piecing!  We're going to start with the four-patch blocks that create the hearts.  Take 61 of your print 2.5" squares and the 61 white (background) 2.5" squares and chain piece them in pairs, one of each.  

It will make your pressing faster if you always put the same on top of your pair as you feed it through your sewing machine - either the print squares or your background squares. If you're new to quilting and don't know what chain piecing is, it's simple - you simply feed one pair after another through your machine, sewing them together without cutting the thread after each pair.  When you finish, you'll have a long "chain" of pieces sewn together!

Take that chain of pairs and press them, with the seams towards the print (darker) pieces.  Cut the thread between each pair and set them aside for later.

Repeat the process with the remaining 2.5" print squares, sewing them together in pairs.  The only guideline here is to not use two of the same squares!  

Now taking your two different sets of pairs, choose one of each and nest the seams together.  Sew the long side of the two pairs.  Repeat until you have 61 four-patch blocks, each with one white (background) and three print squares.  Press the seams to one side away from the white square.

Quick and easy, right?  So's the next couple of steps!


(Both of these steps can also be done by chain piecing, but if you are uncertain of how the blocks go together, I recommend assembling at least one individually before jumping into chain piecing.  The directions for single-block piecing are below.)

Take your 4-patch block and place it on-point (diagonally) on your workspace with the white (background) square to the top.  Take one of the 2.5"x4.5" rectangles and place it against the lower right side of the block.  Sew it to the block.  Press the seam toward the white strip.

Now laying your block on your worktable on-point again, take one of the 2.5"x6.5" rectangles and place it against the lower left side of the block.  Sew it to the block.  

Take your completed string of blocks, and lay them on your ironing board like this:


Laying the blocks this way will make it easy to press half the seams to one side and half to the other, which will make it easier to assemble your quilt!  Once pressed, it will look like this:


Cut the threads between the blocks, and stack them in two stacks - one with the seams pressed in, and the other with the seams pressed out.


And now it's time to lay out and assemble your quilt top!  Using your design wall (or floor!) lay six blocks in a row, on point and with side corner tips touching.  Next row will be five blocks placed in the diamond-shaped gaps created by the row above.  Third row is six blocks.  Alternate your blocks so that the seams will nest when you sew the diagonal rows together.  Repeat until all of your blocks are used. You should end on a row of six blocks.

"On-point" quilts are sewn together on the diagonal.  In this layout, you will have one block in the upper left corner.  Leave it alone, and pick up the three blocks in the next diagonal row.  Sew them together and return them to the layout.  Repeat for each diagonal row across the quilt to the lower right corner.

Now you will sew your rows together.  Remember to match from the center of each row of blocks out.  The sides and top of your quilt top will be jagged.  Those will be trimmed later to make the quilt square.  Match your seams carefully so that it all lines up nicely!

Once your top is completely assembled, take it to your cutting board and lay it very flat.  If you have a large square ruler, lay it in the corner, lining up the 1/4" mark on two sides with the intersection of the seams as shown above.  This will ensure that you have a 1/4" seam and your points will be nice and neat!  

Trim your corners, then using a long ruler, line up the remaining points against the 1/4" line of your ruler and trim away the edge portions of block that are outside that 1/4" seam line.  Yes it looks like a lot of waste, but it is quicker and easier than setting blocks, and allows the quilt design to go all the way to the edges.  It is a design choice!  And just think of all the fun you'll have trying to figure out a way to use those bits you are cutting away!

Once your quilt is trimmed all the way around, you can either add a border or plan to bind in the background color.  Either way, it will not show if you have accidentally cut off a block point! (oh, the tricks we learn!)

Once finished, you will have a 42"-44" square quilt, perfect for that new arrival or as a comfort quilt for a small child.  And it will be one that reminds them that they are loved!

*&*&*&*&*&*

I hope you enjoy this sweet little quilt as much as I enjoyed making it! It really does work up quickly, and can be done in a variety of fabrics.  I'm kind of interested to see what it would look like with a dark solid background and a variety of white-on-white prints as the hearts!

Thanks or joining me today, and I hope to see you next week with another "old friend" design!

Hugs!


Sarah