Showing posts with label Charmed I'm Sure. Show all posts

Sunday, March 15, 2020

Charmed, I'm Sure! Time To Sew!!

Hi, all!

Are you on "coronacation" where you are?  We are - the grandkids are out of school, hubby is working from home, and me?  Well, I'm still unpacking and working on getting my old house ready to go on the market, but I'm hoping to get some time to sew this week without as many outside distractions available! 


And that segues right into the name of this week's Charmed, I'm Sure charm quilt - Time To Sew!  I chose this name because the basic building block of this quilt is commonly called the hourglass block.  You may also have seen it called a quarter-square block.  


These blocks are super-simple to make using charm squares!  I started with a charm pack and yard of coordinating fabric I found while unpacking (isn't it amazing what we forget we have?) and added 42 Kona Snow 5" squares.


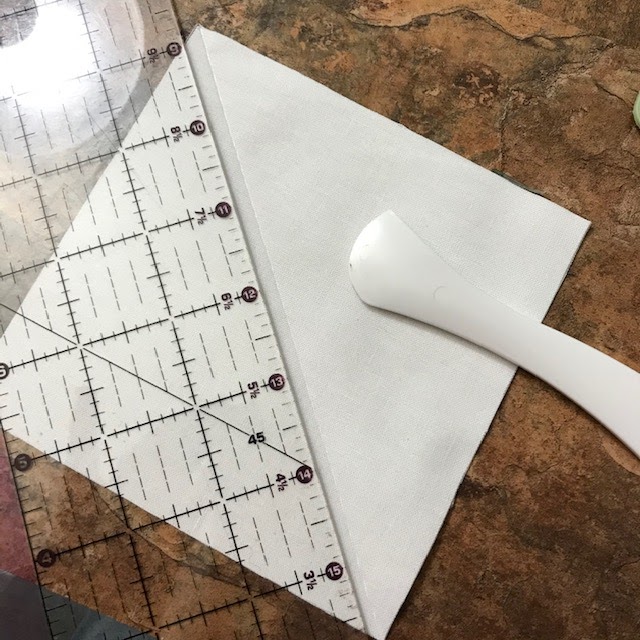
Using my trusty Hera marker and a ruler, I marked a line diagonally across each white square (you can do these two at a time with firm pressure and a good hard surface underneath).


I paired each one with a print square, and the chain piecing began!  I stitched a scant quarter inch from the center line down one side of all the squares, then turned the whole string around and stitched a scant quarter inch from the center line on the other side.


Isn't that a pretty pile of sewn pieces?


Cut those squares into two pieces right along the marked line between the two lines of stitching.  Press the seam toward the prints.

Now normally I would tell you to square up your HSTs, but in this case you want every bit of fabric you can get in those HSTs.  So let's wait to square up until a little later.


Next, choose two of your HSTs and lay them on top of each other, right sides together and seams nesting, with the print square to the right on the top and to the left on the bottom.  Use your ruler to mark a line across the diagonal, lining up the inch marking with the seam to ensure that you get your line perpendicular to it.  It is more important to have your mark perpendicular than point to point, as you can see in the picture above. Just get the straight as close to the points as you can, then make your mark.  


Pin both ends of the mark and the center seam to keep everything together, then sew a scant 1/4" on both sides of the mark.  


Fold back each side to see if your seams matched up properly.   If they did, cut on the mark between the new seams.  


Press the seams by spinning them.  Don't know how to spin a seam?  Here's a great tutorial!


And now it's time to square up that block!  I had enough extra in my block to comfortably square it to 4".  Yours may be a little more or less - so square it to what works for you!  As you can see in the picture above, I lined up the diagonal line on my ruler with the center seam on the block, and the 4" marks are on each corner.  Trim the right side and top, then turn the block 180 degrees and trim the other two sides by lining up the diagonal line with the seam and the 4" marks with the newly cut edges.


You'll find that these blocks work up pretty quickly, especially because you're making two at a time!  And it won't be long before you have a nice little collection on the design wall.  I chose to make my arrangement totally random, print wise, and I like the way it looks.


And before you know it, you'll have a quilt's worth of blocks!  My charm pack made 84 of these cute little blocks, but I chose to lay it out in a 9x9 grid, so I had three blocks left over. They may become part of the back, or they may just take up residence in my orphan blocks tub, to become part of another quilt someday.

Now, I had every intention of sewing this quilt together just as you see it above.


But then I sewed those two columns together, and realized that I didn't have the patience to match all those fiddly little seams.  Some of the seams went the wrong way, were hard to match because they wouldn't nest - - - it just took too long!  So I regrouped and looked at what fabrics I had in my stash.


Choosing some more Kona Snow and a gray/brown blender fabric that coordinated with the charm squares, I cut 1.5"x4" sashing strips and 1.5" blender squares to put between them.  Yes, I had to do a little ripping out of the pieces I sewed together initially, but all in all it saved me hours of matching and construction time!  


opted to add a 1" (finished size) stop border of Kona Snow around the hourglass section, with blender corners...


...and a 4" (finished size) outer border of the coordinating print.  I chose to put blender corners on this border, also, because it was a directional print and I didn't like the way the bunnies looked coming together in opposing directions against each other.  It also allowed me to cut each border piece out of one strip of fabric, eliminating the need to fussy cut the strips to line up the bunnies.  

This quilt finished up at 49.5" square, the perfect size for a new little addition to our family who has been waiting for his quilt for a while now.  I can't wait to finish it up and send it to its new home!

*&*&*&*&*&*&*

And that's a wrap for this year's charm square quilt series, Charmed, I'm Sure!  Thanks for quilting along with me - I hope you've found some inspiration for simple quilts that you can make as we get ready to start on....


Despite all impressions to the contrary, the Challenge is on for this year - its TENTH!  Signup week starts next Sunday, although if you've already signed up (you can do it through the Page just below my header) no worries, and no need to sign up again!  So sign up now, or sign up next week - but be sure to join in the fun....

So gather up your ideas and fabric and get ready to spread some comfort!

Hugs!

Sarah

Sunday, March 8, 2020

Charmed, I'm Sure! Quilty Friends Are The Best....

Hi, all!

As we come back for another week of Charmed, I'm Sure!, I am so very grateful for the kindness of quilty friends!  I received an email earlier this week from Jan Ochterbeck, who blogs over at The Colorful Fabriholic.  In it, she offered to let me use one of her charm square tutorials as part of this series, and as busy as this week was, I am more than happy to take her up on the offer!   


So this week we will be exploring the joys of snowball blocks.  Rather like the real thing, they have a round appearance, but are much easier and warmer to make!  And they are very versatile - you can do a lot with a snowball block, either on its own...


...with pretty sashing...
...or combined with other blocks!


Construction of a snowball block is really very simple. 


Four contrasting corners added to a square, and it's done!  Once it's sewn into the quilt top, the eye reads it as a circle, or snowball.


This is Jan's beautiful version of a snowball quilt, which she calls Charmed Snowballs.  You can find her tutorial for this quilt by clicking HERE - and be sure to leave a comment to thank her for providing this wonderful tutorial!  

And FYI, Jan has lots of other tutorials on her blog, and is a published author of a quilt book (Cut & Shuffle Quilts) and several patterns.  I encourage you to take a look around - you might find something you love and a new blog to follow!

See you next week when I will (hopefully) have finished the charm quilt I am currently working on!  

Hugs!

Sarah

Sunday, March 1, 2020

Charmed, I'm Sure! Two For the Price of One...

Hi, all!

Today's "Charmed, I'm Sure" tutorial is a two-for-one!  You'll understand that better further on, but for right now, let's start with a block tutorial.  Once again, it's an oldie but a goodie, and one that has had a resurgence lately - the economy block, which is also known as a square-in-a-square.


This is a fun little block, and one that lends itself well to our theme of 5" squares.  All of the pieces for this block are cut from five 5" squares.


Here's what you'll need:

      1   4.5" square for the center.  This is a good place to fussy cut!
      2   4" squares cut on the diagonal for the inner triangles
      2   5" squares cut on the diagonal for the outer triangles

So dig into those stacks of 5" squares you have on hand (come on, you know you do - we all do!) and try making one!


After you have cut your pieces, take your center square and make a pinch mark at the halfway point on two opposing sides. (You could do all four sides, but when you press the first two triangles, you'll probably iron out the creases you haven't used yet - something I found out after taking this picture!)


Fold one of your center triangles in half and make a pinch mark, then line it up with a pinch mark on the center square.  You may want to pin at this point.


Now sew the triangle to the square.  I found that by making this a very scant 1/4" seam (as you can see above, I used the side of my presser foot to determine the seam width) I had plenty of trimming room.  This was only for the first set of seams, as you'll see below.  


Next, pin on the triangle on the opposite side and stitch.  Press the seams on these two triangles out toward the triangles.  Repeat the process for the other two sides.


Now, to reduce bulk, trim off those little dog ears!  Press the seams out towards the triangles.  


And this is a VERY important step - trim up that block!  At this stage, your block should be trimmed to 6 1/4" square.  


Yes, I know that's an odd measurement, but it's really pretty easy to achieve.  Line up the 3 1/8" mark with the points of the triangles on the corners, AND line up the 1/4" mark too!  That will ensure that you have a 1/4" seam on each side (you don't want to lose those pretty points!) and that your block is square.


Now you will repeat the process to attach the outer triangles, lining up the pinch mark on your triangles with the point of the triangle on the block.  I suggest sewing these on from the block side rather than the new triangle side, so you can see the seam intersection of the triangle on the block.  AND as you can see from the picture above, I had to make my seam a true quarter inch to get those points perfect (ok, maybe not perfect, but pretty darn good!) It's the little things, folks!


This time you'll trim your block to 8 1/2", which means you'll line up the 4 1/4" mark AND the 1/4" mark on each triangle point.  And voila!  You have a beautiful economy block!  And that little pile of scraps at the bottom corner is all you'll have left of those five charm squares.  I call that a win!

These are quick and easy blocks - I actually found that picking the fabrics took longer than making them!  But if, like me, you are short on time, you may find that you don't have time to make enough for a whole quilt - and now you'll find out about that two-for-one I talked about....

With only four blocks and the need to have a quilt top to show off this week, I had to do some quick thinking.  Looking in my stash, I found a fun piece of material that had been sitting there for too long.  The colors looked wonderful with the four economy blocks I had made already, so I decided on a quick fix.


Bordering the blocks with some teal (that I also had in my stash) to set them off a bit, I appliquéd them to this piece, because I couldn't figure out a way to piece them in and maintain the symmetry of the background.  With a different piece, it would have been simpler to piece them in, but oh well!

Then it was on to borders to make it large enough for a top.  I had several options in my stash (hooray for stash!)...


 ...and in the end, simple won out.  If you had a different preference, have no fear!  I will be using one or the other of the prints on the back once this is turned into a quilt.


Simple, but effective!  Quick, too, plus it has the advantage of using up both scraps and stash.  You could also use this technique with some of those orphan blocks we all have stashed away - that quilt you started, then found out you absolutely hated making the blocks?  Or the UFO you have tucked away and have fallen out of love with.  Whatever your story, I bet you've got something you could use this technique on to make a quilt that will bring love and comfort to someone in need!

FYI, this quilt finished up at about 56" x 60" - perfect lap size!

So that's this week's two-for-one tutorial!  Many thanks to Amy Smart of Diary of a Quilter for teaching me how to make a great and easy economy block in her tutorial - I don't know what I would have done without Amy this year!  

Now tell me - what blocks have you got stashed away that you could turn into a quick comfort quilt?

Hugs!

Sarah

Sunday, February 23, 2020

Charmed, I'm Sure! An Oldie, But A Goodie!

Hi, all!

Welcome to the second week of Charmed, I'm Sure! A series of tutorials designed to be simple enough to use for comfort quilts to be donated, that will also help you build skills and learn new tips and ways to work quickly and efficiently!

Last week, I shared this quilt...


...along with a link to Amy Smart's fantastic tutorial for a simple charm quilt on point!  This was such an easy quilt to make, and a great scrap buster.

Today I want to share a pattern I've seen around a lot, so it's an oldie, but this was actually the first time I've ever tried it myself.  You may have made a disappearing nine-patch in the past (most of us have!) but have you ever tried a disappearing four-patch?  I don't know about you, but I really like cutting up blocks to create something new and different.  So it was about time to try a D4P!


I started with a bunch of two-patch blocks made using some batik charm squares paired with a black and white "etch-a-sketch" print.  While not scrappy, the batik squares had been in my stash f-o-r-e-v-e-r, and this was the tail-end of the black and white print.  I feel virtuous!

FYI, I pressed all the seams towards the B&W print.

I chose two of the two-patch blocks, a blue and a green, and sewed them together into a four-patch block, with the black and white squares on opposite corners.  I "spun" the center seams (click here for a great quick tutorial on the process by Beth Sellers) and then laid it on my cutting board.


Placing the 2" mark of my ruler vertically along the center line, I cut to the right side of the ruler.  Without moving the pieces, I repeated the process to the left side and also horizontally above and below the center line.


And this is what I ended up with!  Now it's time for the magic to happen.  Experiment with moving pieces around!  In the picture below, I took the top center and bottom center pieces and swapped them, and did the same with the right center and left center pieces.


And here's a sample layout that you could make with this block...


But I decided to try something a little bit different.  I took the same center outside blocks and just turned them around in place, and ended up with this block.


I made a few more, then started playing with layouts and ended up with this one...


I sure was happy to get to church and a functioning design wall!


And here's a tip - when you are trying to figure out how to lay out your colors with this layout, lay out your two-patch blocks so the colors match, then decide what colors you want to be on the other side.  Place the four-patch blocks in place before cutting and re-sewing to see how the colors will work.  As you can see, I figured this out late in the game, or I wouldn't have two blue blocks on the top half of this layout!  Alas - live and learn!


After making all the four-patch blocks on Wednesday night at church, I headed home with a picture and a plan!  I sliced-and-diced all the four-patch blocks and put them back together again, then assembled the whole top.


And voila!  A sweet little top just large enough for a baby or small child, or for a comfort item for a foster child.  The blocks finish up just slightly larger than 8" (finished), so this top made with 20 blocks is about 32 x 40.  It would be easy to make almost any size quilt, just increase the number of blocks made.  Time constraints limited this one, but I may make a larger one soon, because it is quick and fun!  

And now, I want to know - - - am I the only person in the world who has never made a disappearing four-patch block before?  

Come back next Sunday for another fun charm pack quilt.  Because those charms aren't going to sew themselves up by themselves!

Hugs!

Sarah