Hi, all!
Well, it's not quite Christmas in July yet - - - but it's drawing nearer every day! Last week I showed you what this year's quilt-along quilt will be (this post) and I promised you a sample block tutorial. I do hope you'll give it a try - it's simple and quick, and it will either help you work out the kinks in advance, or give you the confidence to try the whole project! So let's get started!
*&*&*&*&*&*&*
To make this block, I'm going to keep it really simple. Let's use four colors or fabrics as we learn how to make it. I used four fat quarters to make it, with enough left over to finish it off (as you'll see later!)
If you'll look at the block closely, you'll see that the center is an octagon, made square by adding a right angle triangle on each corner.
The octagon is made up of eight triangles.
Each large triangle is made up of four smaller triangles.
For the purposes of this tutorial, let's refer to each of the four triangles by letter as shown below.
In order to make this block really simple to put together, we're going to employ a sneaky little trick. We're going to cut the A triangles to the correct size - 3.5" - but we're going to cut all the other triangles 4.5" tall. Once the four triangles are sewn together, we'll try the unit down to the finished size - and it will be PERFECT!
So for this sample block, you will need:
"A" triangles: 8 3.5" triangles (from your 1st fabric)
"B" + "C" triangles: 16 4.5" triangles (from your 2nd fabric)
"D" triangles: 8 4.5" triangles (from your 3rd fabric)
You will also need:
Corner triangles: 2 5" squares, cut diagonally (4th fabric)
Here's how to cut your 45 degree triangles. You will need a strip of fabric as tall as your triangles will be. For example, you will cut a 3.5" x 22-ish" strip from your first fat quarter for your "A" triangles.
Lay the strip of fabric horizontally on your cutting mat and place your template on the strip. The 3.5" line should be even with the bottom of the strip and the left bottom corner completely within the usable fabric. Don't catch any of your selvage within the template! If your template comes to a sharp point, that point will extend beyond the top edge of the strip. This is OK! It just means you won't have to trim off the point later. If your template has a cut-off point, it should line up with the top edge of the strip.
Hold the template securely. You may want to put a finger off the edge of the side of the template where you AREN'T cutting to hold it securely in place.
Cut off the left side of the fabric, then, while holding the template securely (shift your hand as needed), cut the right side. This is a place where the adage "measure twice, cut once" comes in handy. Be sure your template is still lined up with the edges of the fabric before you cut!
Now pick up the template, but don't shift the fabric. Slide the cut triangle to the left to get it out of your way. Invert the template so the top of the template is at the bottom of the strip and the 3.5" line is lined up with the top of the strip. Hold it securely and cut the right side. Lift up the template, move the newly cut triangle, and repeat the process, alternating the orientation of the template, until you have 8 triangles. (If you are working with a folded width-of-fabric strip cut from yardage, keep in mind that you will be cutting two triangles at once!)
For the remainder of the small triangles, you will cut 4.5" strips. For triangles B and C, you will need to cut two 4.5" by 20-ish" strips from the second fat quarter. For triangle D, you will need to cut one 4.5" by 20-ish" strip from the third fat quarter. The only difference in the way you cut these is that you will line up the 4.5" line with the edge of your fabric.
For the corner triangles, you can either cut two 5" squares from a fourth fat quarter, or use two 5" squares that you already have cut from your scrap stash. Cut them diagonally so that you have four 90 degree triangles for the corners.
And now for the sewing - the fun part!!
Lay out the octagon on the table in front of you. This isn't strictly necessary for this test block, because all of your large triangles will be identical, but it is good practice for the quilt-along quilt!
Now pull out one segment of the octagon - four small triangles. I will explain how to assemble this segment of the octagon, and the others will be done the same way. You'll also be determining the proper seam width with this first block.
NOTE: On my machine (a Juki TL98-Q), the correct seam width was between the edge of my presser foot and the actual 1/4" marlin on the plate, almost to the edge of the marking. After making this first block, you'll be able to determine if your seam width needs adjusting. So you shouldn't backstitch your seam ends or trim off any points on this block until after you are sure it's correct.
Take your A triangle and lay it on the B triangle, centering it along the longer edge of the B triangle. Sew a scant 1/4" seam. Press the seam open. (Lots of seams coming together make for big lumps if you press them to one side.)
NOTE ON PRESSING: There are a LOT of bias edges in this quilt. There are many ways to deal with them - some people like to starch the heck out of their fabric pieces to prevent stretching - but if you are careful not to stretch your seams while sewing, you shouldn't run into problems. But you should always remember to PRESS (lay the iron on your fabric and move it around as little as possible) rather than IRON (moving the iron around to force wrinkles out of the fabric). There is a difference!
Now take the C triangle, and lay the AB unit face down on the right side of the triangle, centering the A triangle along the longer edge of the C triangle. Sew a scant 1/4" seam. Press the seam open.
Next you'll take the D triangle, and lay the ABC unit face down on the bottom edge of the D triangle, centering the unit along that longer edge. Sew a scant 1/4" seam.
Press the seam open. Press the completed triangle from the front so it's nice and flat.
And here's where the magic of those larger triangles comes in! Go to your cutting mat, and lay your finished triangle unit down with the bottom edge against a line on your mat and the point facing up to the top of the mat.
If you have a 6.5" triangle template, this part is so easy! Lay the template on the finished unit, lining up the seam allowance markings with the top edge of the A triangle, as shown.
Now look at the bottom of your triangle unit. The point of the A triangle should be close to or resting on the seam allowance marking at the bottom of the triangle template.
This is where you will know if you need to adjust your seam allowance. If the point is higher than the seam allowance marking, your seams are too wide. If the point is below the seam allowance, your seams are too scant. Adjust as necessary. (You may want to mark the correct seam allowance on your plate).
Once you have your triangle unit corrected, it's time to trim! Place the triangle unit on the cutting mat and lay the triangle template on top, setting the top of the A triangle with the top corners touching the seam allowance markings on each side and the bottom point of the A triangle touching the seam allowance marking on the bottom of the 6.5" triangle. Holding the triangle template VERY SECURELY, trim around all three sides. And voila! You have a perfect triangle unit for your block, with exactly 1/4" seam allowances on all sides.
(Trust me when I say this technique is much easier than starting with the A-D triangles all the same size. I did it both ways and I had a hard time with the seam allowances on the same-sized triangles. This method is a charm!)
Now you can put the other seven triangle units together and trim them.
Sew pairs of triangles together, pinning through and matching the seams at the upper corners of the A triangles.
Your seam line should run right through where those seams come together, and if you'll notice, there's a little seam line that you can aim for - it will put your needle right through the conjunction of those seams!
Press the seam open.
Repeat until you have four 2-triangle units.
Next you will sew two of those units together, matching the same seams at the corners of the A triangles, and also the seam at the top of the triangles. You will want to pin those intersections and also the bottom of the triangle units. Press the seam open. Repeat for each half.
Join the two halves by matching the A triangle seams, the center seam, and the ends of the units. Press the seam open.
Flip the whole octagon and press one more time. It should lay nice and flat! That's because all of your individual triangles were exactly the same size. Neat trick, right?
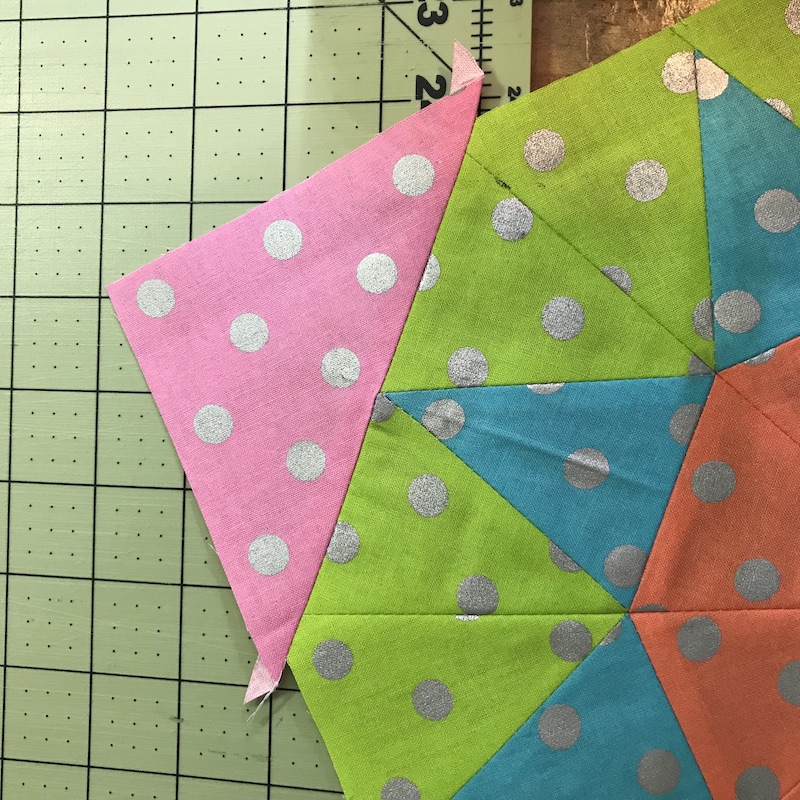
Now it's time to turn it into a square. Take the right-angle triangles that you cut earlier and fold them in half, matching the corners and finger-pressing a fold into the long edge.
Take one of the triangles and place it right sides together against one of the sides of the octagon. From the octagon side, run a pin through the tip of the A triangle and the fold line on the corner triangle to line them up.
Without stretching the fabrics, pin the octagon to the corner triangle at center and ends.
Stitch the seam, passing through the intersection of the A triangle point. Repeat for the remaining three corners.
Be careful - it's really easy to get excited about sewing and sew them to the wrong side of the octagon! Always check your orientation before sewing. This becomes even more important if you make the full quilt, as there are different patterns to the blocks and placement is very important. Press the seams open and press the whole block again from the front.
I bet you're noticing that your corners are larger than the rest of the block. That's easy to fix! Grab a square ruler (I like my 6.5" square for this task) and lay it on the corner, lining up the sides of the ruler with both sides of the octagon.
Trim off the excess fabric, and repeat for the remaining three corners.
Hey guess what! You just made a kaleidoscope block! And the best thing is you only need nine of these to make the quilt-along quilt. Easy peasy!!
You definitely should do something with your test block... like this....
I know a little girl who will love this pillow! I did some simple straight line quilting on the block to give it definition. The block is only slightly larger than 12", so I had plenty of fabric left from my fat quarters to make an envelope back and binding for the pillow. And I took a 14" pillow form (which fortunately had a zipper) and took out some of the stuffing so it would fit in this cute little pillow.
And I don't have another orphan block to stuff in my orphan block tub! Woohoo!!
*&*&*&*&*&*&*
I hope this inspires you to join in the quilt-along - it's gonna be fun! Oh, and please let me know if you come across any errors in this test block tutorial when you try it - I've proofed it as best I can, but may have missed something.
Hugs!
Sarah