Showing posts with label charm squares. Show all posts

Sunday, March 8, 2020

Charmed, I'm Sure! Quilty Friends Are The Best....

Hi, all!

As we come back for another week of Charmed, I'm Sure!, I am so very grateful for the kindness of quilty friends!  I received an email earlier this week from Jan Ochterbeck, who blogs over at The Colorful Fabriholic.  In it, she offered to let me use one of her charm square tutorials as part of this series, and as busy as this week was, I am more than happy to take her up on the offer!   


So this week we will be exploring the joys of snowball blocks.  Rather like the real thing, they have a round appearance, but are much easier and warmer to make!  And they are very versatile - you can do a lot with a snowball block, either on its own...


...with pretty sashing...
...or combined with other blocks!


Construction of a snowball block is really very simple. 


Four contrasting corners added to a square, and it's done!  Once it's sewn into the quilt top, the eye reads it as a circle, or snowball.


This is Jan's beautiful version of a snowball quilt, which she calls Charmed Snowballs.  You can find her tutorial for this quilt by clicking HERE - and be sure to leave a comment to thank her for providing this wonderful tutorial!  

And FYI, Jan has lots of other tutorials on her blog, and is a published author of a quilt book (Cut & Shuffle Quilts) and several patterns.  I encourage you to take a look around - you might find something you love and a new blog to follow!

See you next week when I will (hopefully) have finished the charm quilt I am currently working on!  

Hugs!

Sarah

Sunday, March 1, 2020

Charmed, I'm Sure! Two For the Price of One...

Hi, all!

Today's "Charmed, I'm Sure" tutorial is a two-for-one!  You'll understand that better further on, but for right now, let's start with a block tutorial.  Once again, it's an oldie but a goodie, and one that has had a resurgence lately - the economy block, which is also known as a square-in-a-square.


This is a fun little block, and one that lends itself well to our theme of 5" squares.  All of the pieces for this block are cut from five 5" squares.


Here's what you'll need:

      1   4.5" square for the center.  This is a good place to fussy cut!
      2   4" squares cut on the diagonal for the inner triangles
      2   5" squares cut on the diagonal for the outer triangles

So dig into those stacks of 5" squares you have on hand (come on, you know you do - we all do!) and try making one!


After you have cut your pieces, take your center square and make a pinch mark at the halfway point on two opposing sides. (You could do all four sides, but when you press the first two triangles, you'll probably iron out the creases you haven't used yet - something I found out after taking this picture!)


Fold one of your center triangles in half and make a pinch mark, then line it up with a pinch mark on the center square.  You may want to pin at this point.


Now sew the triangle to the square.  I found that by making this a very scant 1/4" seam (as you can see above, I used the side of my presser foot to determine the seam width) I had plenty of trimming room.  This was only for the first set of seams, as you'll see below.  


Next, pin on the triangle on the opposite side and stitch.  Press the seams on these two triangles out toward the triangles.  Repeat the process for the other two sides.


Now, to reduce bulk, trim off those little dog ears!  Press the seams out towards the triangles.  


And this is a VERY important step - trim up that block!  At this stage, your block should be trimmed to 6 1/4" square.  


Yes, I know that's an odd measurement, but it's really pretty easy to achieve.  Line up the 3 1/8" mark with the points of the triangles on the corners, AND line up the 1/4" mark too!  That will ensure that you have a 1/4" seam on each side (you don't want to lose those pretty points!) and that your block is square.


Now you will repeat the process to attach the outer triangles, lining up the pinch mark on your triangles with the point of the triangle on the block.  I suggest sewing these on from the block side rather than the new triangle side, so you can see the seam intersection of the triangle on the block.  AND as you can see from the picture above, I had to make my seam a true quarter inch to get those points perfect (ok, maybe not perfect, but pretty darn good!) It's the little things, folks!


This time you'll trim your block to 8 1/2", which means you'll line up the 4 1/4" mark AND the 1/4" mark on each triangle point.  And voila!  You have a beautiful economy block!  And that little pile of scraps at the bottom corner is all you'll have left of those five charm squares.  I call that a win!

These are quick and easy blocks - I actually found that picking the fabrics took longer than making them!  But if, like me, you are short on time, you may find that you don't have time to make enough for a whole quilt - and now you'll find out about that two-for-one I talked about....

With only four blocks and the need to have a quilt top to show off this week, I had to do some quick thinking.  Looking in my stash, I found a fun piece of material that had been sitting there for too long.  The colors looked wonderful with the four economy blocks I had made already, so I decided on a quick fix.


Bordering the blocks with some teal (that I also had in my stash) to set them off a bit, I appliquéd them to this piece, because I couldn't figure out a way to piece them in and maintain the symmetry of the background.  With a different piece, it would have been simpler to piece them in, but oh well!

Then it was on to borders to make it large enough for a top.  I had several options in my stash (hooray for stash!)...


 ...and in the end, simple won out.  If you had a different preference, have no fear!  I will be using one or the other of the prints on the back once this is turned into a quilt.


Simple, but effective!  Quick, too, plus it has the advantage of using up both scraps and stash.  You could also use this technique with some of those orphan blocks we all have stashed away - that quilt you started, then found out you absolutely hated making the blocks?  Or the UFO you have tucked away and have fallen out of love with.  Whatever your story, I bet you've got something you could use this technique on to make a quilt that will bring love and comfort to someone in need!

FYI, this quilt finished up at about 56" x 60" - perfect lap size!

So that's this week's two-for-one tutorial!  Many thanks to Amy Smart of Diary of a Quilter for teaching me how to make a great and easy economy block in her tutorial - I don't know what I would have done without Amy this year!  

Now tell me - what blocks have you got stashed away that you could turn into a quick comfort quilt?

Hugs!

Sarah

Wednesday, February 19, 2020

I May Have A Scrap Problem... Reorganizing!

Hi, all!

It's been a busy week around here, and I'm  happy to say my sewing studio is finally starting to shape up!  My long arm machine is back up...


...and hooray, I managed to get my IKEA wire drawers underneath it!  At the other house I had plastic storage tubs full of scraps under the front of the machine, but I really don't think I want to do that here.  And that means it's time for a little reorganization!  

I think I'm going to use the wire drawers to sort and store my scraps by color.  I think the mesh is small enough to hold them, but if not, I'll have to come up with something to line them with.  That will be a project for this weekend, I think!

*******

I've also (finally) started this year's tutorial series - it's called "Charmed, I'm Sure"!  The basic starting unit for each design will be a 5" charm square, which I have plenty of in my stash, since I've been cutting my scraps into that size among others.  And yesterday I managed to carve out some time to do some sewing!


These weren't scrappy charms, but they were a bunch that I have had in my stash for years (we won't say just how many!) and the tail end of some of that black and white print that I love so much.  I'll be sharing a tutorial for this on Sunday!  It's funny, but with all the quilts I've made, I've never done a disappearing four-patch before.  It's a lot of fun!

So what have you been doing with scraps this week?  

Hugs!

Sarah

Sunday, February 16, 2020

Charmed, I'm Sure! Begins - With A Lot of Help From A Friend!

Hi, all!

Well, they do say better late than never, and we sure are getting a late start on this year's quilt tutorial series - but hopefully you will all forgive me!  Moving really threw a monkey wrench in my life for a while, but as you'll see today, a very good friend is helping me out so that we can get started.

This year's theme is Charmed, I'm Sure! and our focus will be on using charm squares.  I don't know about you, but I choose to cut my scraps into pre-cut sizes (2.5", 5", and 10" squares) because I know there are loads of patterns out there for those sizes.  But after cutting them, you really should use them!  So all of our patterns will use charm squares, sometimes in unusual ways.


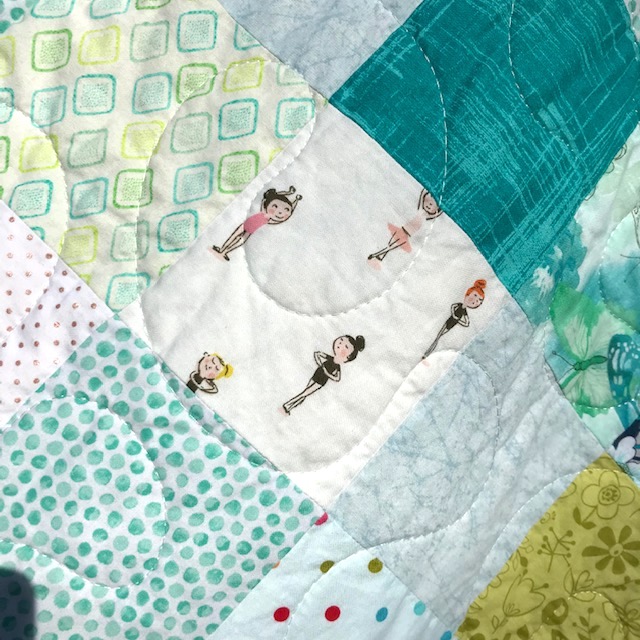
Today's quilt, though, is just a twist on simple patchwork - 5" squares placed on point!  This pattern is by Amy Smart, who blogs over at Diary of A Quilter, and bless her heart, she has graciously offered to allow me to link to her free tutorial so that you all can make one of your own!  It's a simple and fun quilt to make, and allows you to use some pretty focal prints, too...


...like these dancers!  This quilt was a wedding present for a young woman I have known since she was quite small, and dance was a huge part of her life growing up. So when I found these blocks in my stash, I knew they needed to be part of her quilt!


I'm also terribly fond of these Mendocino mermaids, and was happy that their coloring made them fit right into this quilt!


I used one of my favorite prints for both the setting triangles and corners and most of the backing.


Simple quilting on the long arm finished this off so it will be soft and cuddly!


And I was so grateful for a nice sunny day to show off the pretty colors in this lovely quilt!

So now I'm curious - do you also cut your scraps in standard pre-cut sizes?  Or do you have a stash of charm packs that you just couldn't resist at the last quilt show (hand raised in the air!) Well, it's time to drag them out and use them up!  Be sure to stop by next Sunday for another tutorial using charm squares - hopefully you'll find just the thing to inspire you!

And just a reminder - be sure to leave Amy a comment to let her know you were there!  I can't tell you what a relief it was to me when she said it was okay for me to link to her tutorial - quilty friends are the best!!

Hugs!

Sarah

Sunday, January 27, 2019

Rockin' Rectangles Begins! Place Your Bet...

Hi, all!

Welcome to the very first week of the Rockin' Rectangles Quilt-Along!  Now, this is not your typical quilt-along.  Rather than working on one quilt design over the next six weeks, I will be sharing six tutorials for simple quilt designs that you may choose to use for the Hands2Help Comfort Quilt Challenge, which starts immediately after the quilt-along.  All the quilts fit into the theme of Rockin' Rectangles, involving rectangle shapes or rectangle-shaped blocks in their construction.  There being nothing new under the sun, these designs were inspired by beautiful quilts seen out and about, but the tutorials are my own.  

So let's get started with our first quilt design!


*&*&*&*&*&*&*


"Place Your Bet"

I have to credit my husband with the name for this quilt.  I originally started out with the idea of staggered coins - boring!  But they do look like stacks of coins to me, like when you are counting out your - - - loose change!  But then he piped in with "Place Your Bet" - much more interesting, right??  And so it was named.  Like stacks of chips on a poker table, this quilt will be a winner!


This quilt can be a great scrap busting quilt if you choose to do that.  For mine, I used some charm packs that had been gathering dust in my stash.  If you're like me, you like to buy charm packs to get a little bit of each fabric in a collection - but you don't really have a purpose for that charm pack when you buy it.  However, you probably tend to pick the same types of colors, as I found when I was digging through my stash.  I had a charm pack of Kate Spain's Grand Canal and another of Hey Dot by  Brigitte Heiland for Zen Chic.  The colors in each worked well together, so I pulled them out for this quilt.

Quilt Size:  Approximately 62" x 64"

Block Size:  Thirty blocks, approximately 10 1/2" square

Fabric Requirements:

Coins:  2 charm packs or 75 five inch squares, cut into 2.5" x 5" rectangles

Block background: 1 5/8 yards.  Cut into 2.5" width-of-fabric (WOF) strips, then crosscut into:

       150    2.5" x 2.75" rectangles
       150    2.5" x 3.75" rectangles

Quilt background:  1 1/4 yards.  Cutting directions will be given later in the tutorial.

Binding:  1/2 yard

Backing:  3 2/3 yards


Block Assembly:

This is a fast quilt because it lends itself to chain piecing very well!  Take your print pieces and your 2.5 x 2.75 background pieces, and sew a background piece to the side of each print piece.  CAUTION:  Be sure you are sewing the 2.5" side to your prints - there's not much difference visually and it's easy to do the wrong side. (Don't ask me how I know!)  Chain piece as you go, which if you're new to this means that you don't cut the thread between blocks, but just keep on sewing one after the other.  You'll end up with a long string of blocks sewn together - like a chain!


Once you've sewn all the smaller background pieces to one side of the print pieces, take the chain and turn it around, then sew the larger background pieces to the other end, also chain piecing.


Congratulations!  You now have a very large pile of "building blocks" for your quilt!  


Cut the threads between each unit, and press the seams towards the print pieces.  Then lay out a group of five, alternating short end with long end on each side of the block.  Mix those prints up good! If you used two different lines of fabric, like I did, you may want to be sure to mix the two lines in each block.


Sew each set of strips together, pressing all the seams in the same direction.  And don't worry if your blocks aren't exactly 10.5" square - mine weren't - because your columns will end up the same length, or near enough.


Once you have a nice stack of blocks, start laying them out on your design wall (or floor, as the case may be) so you can see how pretty they will look together.  Your top block should have the small background piece in the upper left corner; then flip the next block upside down so that the larger background piece is in the upper left corner.  That will keep the pattern consistent all the way down.  


Each column has six blocks, and there are five columns of blocks, as you can see below.  Be sure that all your columns start with the smaller background piece in the upper left hand corner. Once you are happy with your layout, sew each column of blocks together.


Now it's time to measure for your quilt background strips.  Take all of your columns and measure them down the middle, through the print blocks, from top to bottom.  Take the average of all five measurements, then multiply by six.  This is how many inches of background sashing you will need.  Now cut enough 2.5" x WOF strips from your background fabric to make your six sashing strips. Cut them all to the same length.

This is something you will seldom hear me say, but it's time to pin pin pin!  I usually fold my block column in half and mark halfway from top to bottom, then fold my sashing strip and do the same.  Pin the sashing strip to each end and match the middles, then pin the strip and column together at intervals, easing the fabric to make them match up.  By doing this, you will ensure that your quilt top ends up square and not wavy!  Sew sashing strips between the five columns and on the outside edges of the top.  


Now measure the width of your top.  Do this by matching up the top and bottom edges of your quilt and measuring across the middle (long edge) of the quilt. Using that measurement, create two 2.5" wide border strips for the top and bottom of the quilt.  Pin and attach in the same manner as you did for the sashing between the columns.


Now you're ready to "quilt as desired", add a little binding, and you'll have a finished quilt!   As you can see, I used a random meandering loop on my quilt, quilting it on my long arm.  You could just as easily do straight line quilting with a walking foot on your domestic machine, or even free motion quilting if that's in your repertoire.  


Don't you just love those flamingos?

*&*&*&*&*&*&*

And thus ends our first tutorial.  Simple, fast, and a great way to use up random charm packs or those five inch squares of scraps you've been cutting up!  

If you'd like to save or print the tutorial for this quilt, here's the easiest way to do it.  Scroll to the bottom of this post and look for this little green box:


Don't see the green "Print PDF" box?  That's easy to fix. Go to the top of the post, and click on the post title (in this case, "Rockin' Rectangles Begins! Place Your Bet...").  That will open up this post with the comments, and you will see this between the body of the post and the beginning of the comments.

Click on the green button, and a printer-friendly page will open so you can print and save the tutorial!  Voila! And the best part?  It won't print out page after page of comments and sidebar stuff.  Hooray!

Don't want to print it out?  This tutorial will remain here as long as the internet is alive, so you could just bookmark the post and create a group in your bookmarks for Tutorials!  That way you can find it any time.


Be sure to come back next week for another fun quilt in the Rockin' Rectangles series.  Oh, and if you want to get a head start on a later quilt, grab your string "hamper of shame" or whatever you keep them in, press them and cut them into 8.5" lengths.  It's hard to say how many you'll need - I seriously over-cut, so I'll be making a bunch of these quilts - but it does take time, so start early!

Hugs!

Sarah

PS Are you getting excited about Hands2Help 2019?  I am!!!