Showing posts with label Nifty Nines. Show all posts

Sunday, March 6, 2016

Nifty Nines Quilt-Along - Nines Gone Wild!!


Hi, all!

Welcome to the final week of the Nifty Nines Quilt-Along!  So far we've explored five different quilts using nine-patch blocks - Lattice Play, Time For Chevrons, Easy-Peasy Giant D9P, Great Granny Grunt, and Daisy Chain.  This week's quilt is a more modern take using nine-patch blocks!


Because this quilt has so much negative space, it was the perfect setting for some wild quilting...


I've played with this technique before, but last week I viewed Christina Cameli's new Craftsy class, Wild Quilting.  The class helped define some guidelines for the quilting and I found it to be very helpful in getting a more cohesive design.  I did my quilting on a long arm machine, but Christina does hers on a tabletop domestic machine - so anyone can do this kind of quilting!  I highly recommend her class for anyone who wants to give this a try.  It's a lot of fun!!

And now, here's the tutorial for this quilt!  As always, you can request a PDF of the tutorial by leaving your email address in a comment below.  (PLEASE leave your email address - I have noticed quite an increase in no-reply bloggers recently, many of them people that I know were not no-reply in the past.)

*&*&*&*&*&*&*

Nifty Nines Quilt-Along
Nines Gone Wild!

Size - Approx. 57” x 57”

Fabric Requirements:

Background fabric - 3 yards
From the background fabric, cut nine 5” x width of fabric strips.  
Crosscut those strips as follows:

6 5” squares
44 5” x 7” rectangles (set two aside for squaring off the quilt)

Cut four 5” x width of fabric strips.  (All these are for squaring off the quilt)
        Crosscut those strips as follows:

Strip #1 - 17.5”, 10.75”, 11.75”
Strip #2 - 16.5” 15.5”, 8”
Strip #3 - 16”, 13.5”, 9.75”
Strip #4 - 15”, 12.75”, 11.5” 

2 7.75” squares (for setting triangles)
2 7.5” squares (for setting corners)

Scraps or a mix of fabrics totaling approximately 1 yard.  Cut 306   2” squares from print fabrics.

Block Construction:

There are two basic blocks that form the body of this quilt.  

Block A looks like this: 


Block A is a simple 9-patch, made with all 2” print squares.  This block should be 5” square when sewn together.  Make 34. 

Block B is the 5” x 7” rectangle cut earlier.  
NOTE:  There are also six 5” squares of background fabric which are to be used as spacers to break up the fall of 9-patches down the quilt as desired.


Quilt Construction

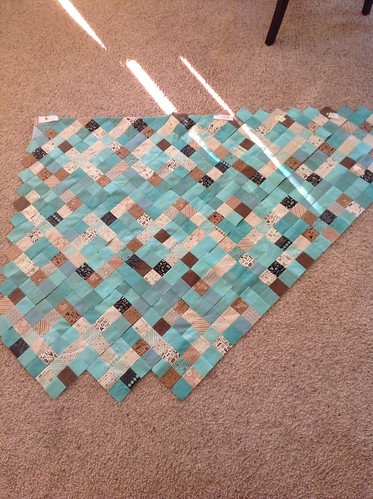
Start building this quilt by laying out the center as shown below.  This will utilize your 9-patch blocks, the 5” background squares, and the 5” x 7” background rectangles.  Do not start assembling yet!


Next, fill in the upper right corner, right side, and lower right corner using the setting corners and setting triangles.   


Then, using the picture above for reference, place the different lengths of fabric at the top, bottom and left ends of the rows.  Your rows will be jagged at the ends, but will be trimmed later.  Starting from the bottom right corner, sew the diagonal rows together, then sew them to each other, matching seams so that the nine-patch blocks and solid 5” squares come down in columns.  Do not sew the left hand corners on yet.  

Trim across the top, using the upper right corner to establish your straight line.  Trim across the bottom, using the lower right corner to establish your straight line.  Trim diagonally across the left hand corner rows, then add the setting corner to complete the corner.  Trim the left hand side in line with the lower left corner.  Now you can add the large upper left hand corner.  Trim if needed, and it’s done!  

Now here’s where I got the name for this quilt - after taking Christina Cameli’s Craftsy class, Wild Quilting, I had a burning desire to do some wild quilting on this thoroughly modern quilt.  Here’s just a sample of the quilting I did…


So have fun with the finishing on this quilt - doodle your little heart out!  Quilt it as desired, bind it, and you are done!


Originally posted on ConfessionsofAFabricAddict.blogspot.com on 3/6/16

*&*&*&*&*&*&*

So this wraps up the Nifty Nines Quilt-Along!  I hope you've enjoyed the quilts that have been featured - I've certainly enjoyed making them!  And next week, you'll get a chance to use this inspiration to do good - the Hands2Help Charity Quilt Challenge starts! 


Next Sunday's post will give all the information about the charities and this year's timetable of events.  If you sign up in the first week, you will be entered in a fantastic giveaway from my friend Shannon at Fabrics N Quilts - so be sure to check it out and join in the fun!  

See you next Sunday!!

Hugs!

Sarah

Sunday, February 28, 2016

Nifty Nines Quilt-Along - Daisy Chain!


Hi, all!

Welcome to Week 5 of the Nifty Nines Quilt-Along!  If this is your first time here, take a look at what you've missed...


Week 1 - Lattice Play...


Week 2 - Time For Chevrons...


Week 3 - Easy Peasy Giant Disappearing 9-Patch...


and Week 4 - Great Granny Grunt!

Each week's quilt utilizes nine-patch blocks in a different format. All the quilts are relatively easy, can be made from scraps, and are approximately 60" square or thereabouts, the perfect size for a lap quilt.

This week's quilt is no exception - it looks complicated, but is actually very simple!


So let's get started - here's the tutorial for Daisy Chain!

*&*&*&*&*&*&*

Nifty Nines Quilt-Along
Daisy Chain

Size - Approx. 60” x 60”

Fabric Requirements:

Background fabric - 3 yards.  This can be all one fabric, or a mix of several light colored solid fabrics if preferred.  From the background fabric, cut:

50 6.5” squares
200 2.5” squares

Scraps or a mix of fabrics totaling approximately 2 yards.  Cut 450   2.5” squares from print fabrics.

Block Construction:

There are two basic blocks that form the body of this quilt.  

Block A looks like this: 


Block A is a simple 9-patch, with the print squares in the corners and the center.  Make 50.


Block B looks like this:


Block B is a simple snowball block.  To make this block, take a 6.5” background square and lay it right side up.  Lay a 2.5” print square right side down on each corner, lining up the outer edges.  Stitch from corner to corner of the print square, across the corners of the underlying background block.  If you need to draw a diagonal line on the print square to make this easier, please do.  You may find you are able to eyeball the straight line.  


After you have sewn the corners on, trim the outer part of the corner off 1/4” from the stitching line.**  Press the print corners out, making your square block a square again!  Make 50.

**NOTE:  You can make yourself a bunch of “bonus HSTs” with Block B by stitching a second line of stitching parallel to your first stitching line and about 3/8” to 1/2” towards the outside corner of each print square before cutting, and then cutting between the two lines of stitching to create your snowball block.  You will then have a tiny HST left over (mine trimmed out at 1 3/4”) to play with afterwards!

Quilt Construction 


This is the easiest kind of quilt to me - a simple checkerboard.  Alternating your 9-patch blocks and your snowball blocks, lay them out in a 10x10 grid.  The chain forms right before your eyes!  Sew your blocks together.  

TIP:   When I’m working on an easily assembled quilt such as this, I will lay it out on my design wall, then pull off a column of blocks to work on at my sewing machine.  Starting at the top, I will pull off the left top block in my left hand, and the block next to it in my right hand.  Continue down the column, laying the blocks in your hand on top of the one you are picking up.  Then go to your machine and lay the two piles down to the left of your machine in exactly the same orientation (right on right, left on left).  Lay the right hand block on the left hand block, face down, pick up the pair and sew the seam.  Do not break the thread!  Chain piece all of the blocks in your stacks this way.  Now I will usually go to the top pair of blocks and put a pin in the top left block so I don’t get the top and bottom mixed up.  Press if you want, alternating seams right and left, or just go ahead and sew your pairs of blocks together at this point, finger-pressing the seams to each side as you go.  Then take it to the sewing table, press your seams, and put the column back up on the design wall.  Do each column this way, then sew the columns together.  Easy peasy!

Quilt as desired, bind, and you are done!

*&*&*&*&*&*&*

I really enjoyed making this quilt - the beautiful colors and light, spring-y feel of the Chez Moi Mimi fabric I used made for a happy quilt.  I also used up several different light shades of solid cream fabric that I had in my stash.  I think it adds a little depth to the quilt to have some slight shade variations in the solids!  

I also did some playing around in EQ7 with a totally different fabric combination...


Isn't that fun?  I think it might be the perfect way to use some of those black and white fabrics I have stashed away!  I think the possibilities are endless with this design - possibly even playing with more negative space for a modern look.  I hope you enjoy it as much as I do!

As always, remember that if you want a PDF version of this tutorial, please leave your email address in a comment below and I'll send one to you.  And if you make one of the Nifty Nines quilts, please post a picture to the Flickr group - I'd love to see what you make!

Just one more week of the Nifty Nines Quilt-Along - I hope you'll come back for a little more inspiration before the Hands2Help Charity Quilt Challenge begins!


Hugs!

Sarah

Sunday, February 21, 2016

Nifty Nines Quilt-Along - Great Granny Grunt!

Hi, all!

Welcome to Week Four of the Nifty Nines Quilt-Along!  I imagine you are wondering about the title of this blogpost - we have a local newscaster in the Nashville area who says "great granny grunt" when something is just over the top or ridiculous - and that's how I felt while trying to take pictures of today's quilt!


Apparently, in Tennessee we aren't allowed to have nice sunny windless days - it's either cloudy and still or sunny and windy!


These pictures were actually taken under the quilt - it was flying horizontally!


But here's a picture taken on my design wall so you can see the layout of this week's design.  As you can see, it's actually an oversized granny square block - so the name Great Granny Grunt fits perfectly!  Here's the tutorial for this quilt.

*&*&*&*&*&*&*

Nifty Nines Quilt-Along
Great Granny Grunt

Size - Approx. 60” x 60”
All seams are 1/4”

Fabric Requirements:

Light background fabric - 2 yards  
Cut:  37 6.5” squares

Dark background fabric - 1 5/8 yards. 
Cut:         20 6.5” squares
          6 9.75” squares (cut twice on the diagonal for setting triangles)
          2 5.25” squares (cut once on the diagonal for setting corners)

Darker scraps or a mix of fabrics totaling approximately 1 1/8 yds.  
Cut:       252 2.5” squares

FYI - this pattern is fat-quarter friendly! If you don’t have a stash of scraps, a fat quarter will yield 48 2.5” squares - more than enough for the 28 nine-patch blocks in this quilt.  So nine fat quarters will provide you with enough fabric for your 2.5” squares, or you can mix it up and use more to make your blocks different!

Block Construction:

This quilt is comprised of three blocks.

Block A looks like this: 


Easiest block ever, right?  Just a 6.5” square of your lighter background material.  You will need 37 of these.

Block B looks like this: 


Block B is a 6.5” square of your darker background material.  You will need 20 of these.

Block C looks like this: 


Block C is a simple 9-patch, made of all scrappy fabrics cut in 2.5” squares.  Make 28.  Trim to 6.5” if needed.

If you’ve completed your cutting, you should also have 24 setting triangles and 4 setting corners from your darker background fabric.

Quilt Construction

This quilt is set out on point, so it helps to lay it all out before beginning to assemble the quilt.  Here’s a picture of the full layout of the quilt… 


Because this quilt is basically just an oversized granny square block, it is easiest to start laying it out from the center.  Begin with an A Block (light background) in the center.  Next, lay four B Blocks (dark background) touching each of the four sides of the A Block.  Your next ring will consist of nine C Blocks (nine-patch blocks).  

Lay another three rings in the same sequence (light, dark, nine-patch).  Lay one more ring of the light background squares. 

Now you will use your dark background setting triangles to square off the edges of the quilt, and your dark background setting corners to finish the corners.

Assemble the quilt in diagonal strips, sew the strips together, and you’re done!

Quilt as desired!

*&*&*&*&*&*&*

I hope you'll enjoy this week's addition to the Nifty Nines Quilt-Along - I'd love to see pictures of your creations if you use the pattern!  You can post your pics on the Flickr group any time.  Here's Susan's version of the Lattice Play quilt - so pretty!  I love her color choices...

Nifty nines lattice with teal background, part of rows assembled.

So post your pics and strut your stuff!  

And remember - if you'd like a PDF copy of today's quilt pattern sent to you, just leave your email address in a comment below!  And for those of you who have emailed me this week but haven't received yours, I apologize - I had some internet problems this week that kept me from answering my email promptly.  I'm hoping to have everyone answered sometime today!

See you next week with Nifty Nines Quilt number five!!

Hugs!

Sarah

Sunday, February 14, 2016

Nifty Nines Quilt-Along - The Simplest Quilt Ever!

Hi, all!

Welcome to Week Three of the Nifty Nines Quilt-Along!  I hope you've been following along, but if this is your first visit, here's a recap of the previous two weeks...


Lattice Play was our first week's quilt...


Followed by Time For Chevrons!

Both quilts feature nine-patch blocks, as does this week's quilt - but this week's quilt is probably one of the fastest, simplest quilts you'll ever make!  


I think I'll call this one the 
Easy Peasy Giant Disappearing Nine-Patch Quilt!

Now, if you're unfamiliar with a disappearing nine-patch block (also known as a D9P), it's really simple.  First you make a basic nine-patch block, and then you cut it up and sew it back together in a different pattern.  It's a great way to make a simple quilt that looks a lot more complicated than it is!  


The quilt top in this picture literally took two and a half hours, from picking out the fabric squares to hanging it on the line for pictures!

There are lots of different designs for D9P blocks, but this quilt is made with one of the most basic designs, just really large.  Here's the tutorial for this quilt!  

*&*&*&*&*&*&*

Nifty Nines Quilt-Along
Easy-Peasy Giant Disappearing Nine-Patch

Size:  approximately 57” x 71”
All seams are 1/4”

Fabric Requirements:

45 10” x 10” squares.  

This is a great pattern to use a layer cake (just add 3 coordinating fabric squares to make up the full 45 squares) or to showcase beautiful large-print fabrics.

Block Construction:

For each oversized nine-patch block, select nine 10” print squares.  On a flat surface, arrange the squares into three rows of three squares, with any fabrics that you want to be dominant in the quilt in the four corners of your block, as those fabrics will remain uncut at the cutting stage.

To piece the block, first sew the squares into three rows.  Press the seams to one side, pressing in the opposite direction for the center row.  Sew the three rows together to create your 9-patch blocks.  Press these seams toward the center, then press the block and set it aside.  Repeat the process, making a total of five blocks.

Cut the blocks into quarters by cutting in half from top to bottom, then side to side.  (Because of the large size of the blocks, it’s easiest to find the center by measuring the center row of blocks, dividing by two and cutting that far from the side seam of the middle row.  If you have sewn an accurate 1/4” seam, that measurement should be 4.75”.)

Arrange your new, smaller blocks into five rows of four blocks apiece.  

Sew the rows, pressing the seams in opposite directions.  Then sew the rows together, nesting the seams for matching corners.   Press the entire quilt top.

Voila!  You’re done!!

Credits:  Original pattern by Vivika Hansen Denegre; featured in Modern Patchwork 2012

*&*&*&*&*&*&*


I hope you enjoy this pattern as much as I do - it's great for pulling a quilt together quickly, and looks wonderful in batiks or large-scale prints. I'm also contemplating making several using some old-fashioned floral fabrics we have in the ministry stash - I think they'll blend well together!  Please share any quilts you make using this pattern or any of the Nifty Nines in the Flickr group!  And if you'd like a PDF of the pattern mailed to you, leave your email address in a comment below and I'll send it to you!

Are you getting inspired and motivated for the Hands2Help Challenge?  It's only a month away!! I do hope you'll join in the fun as we make quilt-y hugs for people in need....

*&*&*&*&*&*&*

And as I sat writing this post, my lovely eldest granddaughter was sitting beside me.  She looked at my blog and wistfully said, "I used to be on your blog all the time."  Realizing she was right, and she hadn't been on there in a while, I snapped this picture so she could be on my blog once again!


She sure has changed since her first appearance on my blog, back in January of 2010...


(And isn't my daughter just gorgeous?)

See you next week for the fourth Nifty Nines quilt!!

Hugs!

Sarah

Sunday, February 7, 2016

Nifty Nines Quilt-Along - Are You Ready For Another?

Hi, all!

Welcome to the second week of the Nifty Nines Quilt-Along!  I hope you're enjoying this as much as I am - it's been fun to revisit the nine-patch block and see all the wonderful variations out there! If you missed last week's quilt, Lattice Play, you can see it by clicking here.  

And without further ado, here is this week's nine-patch quilt - one I've affectionately named Time for Chevrons!


The name comes from the hourglass blocks and the chevron-like border of this quilt.


I broke into my long-hoarded stash of Kate Spain Terrain fabric for the nine-patch blocks, and used some Kona white and a pretty green fabric I had on hand for the hourglass blocks.

This simple quilt packs a lot of impact, but works up fairly quickly. Here's the tutorial for Time for Chevrons!

*&*&*&*&*&*&*

Nifty Nines Quilt-Along
Time for Chevrons

Size - Approx. 60” x 60”
All seams are 1/4”

Fabric Requirements:

Light background fabric - 1 3/4 yards.  This can be all one fabric, or a mix of low volume fabrics
Cut:  Twenty 7.5” squares
Thirty-six 6.5” x 3.5” rectangles
Two 4” squares

Dark background fabric - 1 3/4 yards.  This will look best as one fabric.
Cut: Twenty 7.5” squares
Seventy-two 3.5” squares
Two 4” squares

Darker scraps or a mix of fabrics totaling approximately 1 5/8 yards.  
Cut: 369   2.5” squares

FYI - this pattern is fat-quarter friendly! If you don’t have a stash of scraps, a fat quarter will yield 48 2.5” squares - more than enough for the 41 nine-patch blocks in this quilt.  So nine fat quarters will provide you with enough fabric for your 2.5” squares, or you can mix it up and use more to make your blocks different!

Block Construction:

This quilt is comprised of four different blocks. 

Block A looks like this: 


Block A is a simple 9-patch, made of all scrappy fabrics cut in 2.5” squares.  Make 41.  Trim to 6.5” if needed.


Block B looks like this: 


If you’ve never made an hourglass block before, it couldn’t be simpler (at least for a two color block!)  Here’s how you make this block.  Take the 7.5” squares you cut, and draw a diagonal line, corner to corner, on the light blocks.  Lay a light block on a dark block, right sides together, matching the corners, and stitch 1/4” from each side of that line you drew.  Cut the block apart on the line you drew, and carefully press the seams to the dark side.  (FYI this is also the process for making a half-square triangle block, also known as Block D.)  Do this with all of your 7.5” squares, making 40 HSTs. 

Now, take twenty of those HSTs and draw a diagonal line from the light corner to the dark corner, crossing the stitched line. 
Lay one of the marked HSTs on top of an unmarked HST, with the seams matching and the colors in opposite position, as shown above.  (The top HST is folded back so you can see the alternated colors.)  Pin across the pencil-marked stitching line, making sure that your seams are butted together nicely and corners line up.  Stitch 1/4” from either side of the line you drew.  Cut on the line to separate your work into two hourglass blocks!  Tada!  Continue until you have 40 hourglass blocks.  Trim to 6.5” if needed.


Block C looks like this: 


Block C is a flying geese block, with a light “goose” and dark corners using the 6.5” x 3.5” light rectangles and the 3.5” dark squares.  To make this block, take your 3.5” dark squares, and draw a line from corner to corner.  Lay one square on the right corner of a light 6.5” x 3.5” rectangle, right sides together, matching right and top edges and with the line running from center to lower right corner.  Stitch on the line. 

Now at this point, you can choose to do another line of stitching 3/8” to 1/2” away from your first stitching, closer to the corner, and cut between the lines to create a “bonus” HST to use in another project, or you can simply cut off the outside of the corner 1/4” from your stitching line.  After cutting, press the corner out, with the seam toward the dark side.  

Take another dark corner and lay it on the left side, matching left and top edges and with the line running from center to lower left corner.  Stitch on the line.  Create a bonus HST or simply cut off the outside of the corner 1/4” from your stitching line, and press the corner out, with the seam toward the dark side.  Make 36.


Block D looks like this: 


Block D is a half-square triangle.  (See directions for HSTs at beginning of Block B directions.) Using the 4” light and dark squares, make 4.  Trim to 3.5” square.


Quilt Construction

Even though this quilt looks “on point”, it is set out in a horizontal fashion.  Here is a picture of the center of the quilt. 


Using your A and B blocks, lay out the center of the quilt checkerboard style in a nine-by-nine block grid.  Be sure to start with a nine-patch block (A block) in the upper left.  The hour-glass blocks (B blocks) will alternate their orientation in each row, with the dark triangles on the top and bottom in the 1st, 3rd, 5th, 7th and 9th rows, and on the right and left in the 2nd, 4th, 6th and 8th rows.  This is what forms the “on-point” effect.

Now it’s time to use the C and D blocks to create the chevron effect around the outside edge of the quilt.  Place the flying geese blocks (C blocks) around the edges, alternating their orientation so that they complete the square surrounding the nine-patch block they border.  Place the half-square triangle blocks (D blocks) in the corners to complete the framing.

Here is a complete picture of the quilt layout for your reference… 


Quilt as desired!

*&*&*&*&*&*&*

 I hope you'll give this quilt a try!  It was easy to make, and a so much fun to see the pattern emerge.  As always, feel free to make as many of these as you want - especially if you're making for the Hands2Help Charity Quilt Challenge, which starts just a few weeks from now!  You can post pictures of any quilts you make using the Nifty Nines tutorials in the Nifty Nines Quilt-Along page on Flickr - just click on the group name to be taken to the page!  I can't wait to see your own personal variations!

If you'd like a PDF version of the tutorial emailed to you, please leave your email address in a comment below.

And just because it's pretty, here's one last shot of my finished Time for Chevrons quilt!


Hope to see you next week!!!

Hugs!

Sarah

PS - you can see what I made with my "bonus" HSTs by clicking here...