Showing posts with label 12 Days of Christmas in July blog hop. Show all posts

Tuesday, July 25, 2023

Day Twelve of the Twelve Days of Christmas in July!


Hi, all!

It's finally arrived - the last day of this year's 12 Days of Christmas in July blog hop!  I hope, like me, you've been wonderfully inspired with great ideas.  Maybe, like me, you've also had a chance to walk down memory lane in your Pinterest or blog feed! I will confess - I even found pictures of an annual quilt I made for Lilli that I had completely forgotten about!  

Today we have a chance to hop over to Karrin's blog, Karrin's Crazy World, as she shares some of the gifts she has been making - there should be lots of inspiration there!  And we've reached the end of our quilt-along and it's time to assemble those blocks - finally!!  

Let's go!

*&*&*&*&*&*&*


It's time to put this baby together!  Are you ready?  If you haven't already laid out your blocks, it's time to do that.  

Stitch the blocks together, and you're done!  I know everyone has their own way of assembling a quilt - some do it in rows, some in columns, some in block sections.  I usually take two side-by-side columns, stacking the blocks on top of each other from top to bottom, then take the two stacks to my sewing machine. I will chain piece the pairs together, then sew the cross seams.  Off to the ironing board to press the seams and it goes back up on the wall.  Then it's on to the next pair!  This quilt has an odd number of columns, so I will just sew those blocks together in a strip.  Then I go back and sew the columns together, matching the seams as needed.  To me this feels faster than sewing together one row after another - maybe it's a mental thing, but it works for me!


Your top is now ready for quilting as you desire.  Don't put off that binding, either, unless you've got elves to do it for you!

I can also see this quilt done as a holiday themed quilt for other special days with the chain and/or background in different colors with an appropriately themed design in the center.  For example, imagine it with a heart in the center for Valentine's Day, or a flag or star for 4th of July.  The possibilities are endless!

*&*&*&*&*&*&*

I hope you've enjoyed this blog hop quilt-along, and gotten a good jump on this year's Christmas plans! Many, many thanks to everyone who helped this year!!

And if ideas are just running rampant in your head, consider being part of next year's 12 Days of Christmas in July Blog Hop!  I'll be glad to put you on the list and you'll have a whole year to plan (plus you can buy your seasonal supplies after Christmas, when they go on sale!)

Hugs!

Sarah

Monday, July 24, 2023

Day Eleven of the Twelve Days of Christmas in July!


Hi, all!

Welcome to the 11th day of the Twelve Days of Christmas in July Blog Hop!   I really fell down a rabbit hole while writing this post - I couldn't for the life of me remember what the eleventh day gift was, so I went to look it up.  (Just FYI, it's eleven pipers piping!)  But I also found out that if you received all the gifts listed in the song (and they accumulate - each day repeats all the gifts to date) you'll have 364 separate items by the end of the 12th day!  And since 1984, the cumulative costs of the items mentioned in the song have been used as a tongue-in-cheek economic indicator.  Two pricing charts are created, the Christmas Price Index (the index of the current costs of one set of each of the gifts given) and the True Cost of Christmas (the cumulative cost of all the gifts with the repetition listed in the song).  The people mentioned in the song were hired, not purchased.  In 2015, the total cost of all goods and services in the Index was $34,130.99.  The True Cost of Christmas was $155,407.18 for all 364 items!!  All I have to say is that was one dedicated true love!

Now that I've dug my way out of that rabbit hole, let's get down to today's business!  I've got some cute trees to share with you, along with some guidelines for how to know what you need to decorate your Christmas tree.  Because this is the year of the Christmas tree, after all!  Then we'll have some more instruction on the quilt top.

Let's get started!

*&*&*&*&*&*&*

You'd never guess it, but around my house, we love Christmas and all things Christmas-y!  This is the tree that stands in our front entry area - we usually put up a fresh tree here, and it is decorated more formally than the family tree in the den.  I try to get one large enough to have a real presence in the tall entry, so it's usually 8-9 feet tall.  Luckily, we have a friend who runs a tree farm at Christmas time, so we know just where to get one!

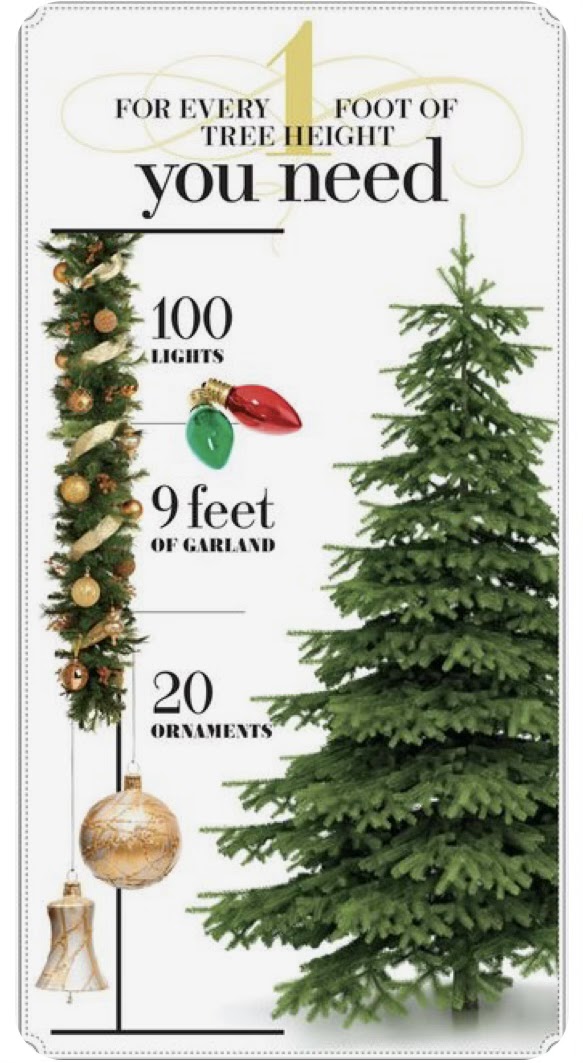
If you're like me, you never know quite how much stuff to drag out to decorate a really big tree.  But I stumbled across a chart on the internet that is absolute genius!


With this chart in hand, I know that for an eight foot tree, I should have 800 lights, 72 feet of garland, and 160 ornaments.  And thankfully, with all the Christmas stuff I've accumulated over the years, that's totally do-able!  It really makes it easier, particularly with lights, to know how much to put on before I start.  

But enough about big trees - how about small ones?  I spent a fun afternoon cutting out these cuties, all from free printables available from Hattifant.  You can click HERE to find out how to get your own!


One tip - I did find that it was easier to open these trees out using a small plastic stick I had on hand.  It's about the size of a pencil or a chopstick, either of which would work well too.  I would also print them out on slightly heavier paper, I think - but they were fun to make and would be easy for kids, too!


Then I stepped back into the world of origami and made this cute little tree!


My husband says that this picture is deceptive, and makes the tree look bigger than it really is.  I just like the fact that it echoes the tree in the center of the quilt waiting on the long arm!  


Maybe this will give you a better idea of the scale, though. This is inside a hurricane lamp, paired up with some kosher salt (the snow) and a tiny elf statue.  

This was super simple to make, although I will admit that folding down the tiny points took a bit of practice!  Click HERE for a very quick video that shows how it is made.  I have no doubt I will be making more of these, and may branch out into different sizes if I can find the right origami paper!

*&*&*&*&*&*&*


Your task today on the quilt is to finish making your 20 double nine-patch blocks.  Once those are done, you are ready to lay out and assemble your quilt.  


The quilt is laid out in a 7x7 grid, with double 9-patch blocks in each of the corners.  The top two rows are a simple checkerboard design, alternating the double 9-patch blocks and white squares.  Lay those out on your design wall or floor.  Now take the 9 blocks that you made for the Christmas tree center and arrange them as shown under the center three blocks. Continue your checkerboard to the right and left of the tree center.  The bottom two rows are also a simple checkerboard.

Tomorrow we'll assemble the quilt top (unless you just. can't. wait!)

Hugs!

Sarah


Sunday, July 23, 2023

Day Ten of the Twelve Days of Christmas in July!


Hi, all!

It's Day Ten of the Twelve Days of Christmas in July Blog Hop, and today we get to visit with Carole of From My Carolina Home again!  This will be the second part of her project, and I for one am looking forward to seeing the finale!  I've also got the next steps in our quilt-along - assembly of the wall hanging, or the next block for our quilt people.  Hop on over to Carole's and see what's going on there, then come back for those next steps!

*&*&*&*&*&*&*


Let's start with the wall hanging folks first.  Today is going to be so simple!  Take your blocks and lay them out as shown above.  

Stitch them together.  This is basically just another large nine-patch block, after all!  Be sure to carefully match the F and G blocks to the B block - you want that second branch from the top to line up just right.  You'll also have another spot for matching, where the bottom of the lower branches (in blocks H and I) meet the top half of the lower branches (in blocks F and G).  Just pin carefully and check your seams before pressing to be sure you are happy with how it looks! 

Once you've got it all sewn together, press your seams and give the top a good press.


Now that you've finished the basic wall hanging, I have some suggestions.  You could add an appliqué star or angel to the top of your tree at this point. You could add garland to your tree using ribbon or trim.  You could even create an advent calendar by sewing on tiny jingle bells that will become "hooks" for you to add small ornaments later.  This step would be simple now, but might make quilting tricky, so you may wish to do that after quilting.  Or you can just quilt it as is and enjoy!  Remember to put some sort of hanging system on the back (corners or a sleeve) so that you or the recipient can enjoy it right away.  Or just use big push pins like I do!


*&*&*&*&*&*&*


OK, it's time to work on finishing up this quilt top!  There's only one more style of block to make, a double nine-patch.  Super simple to make, and you've already got all the components ready.  

You'll be making 20 of these double nine-patch blocks.  For each of these you will need:

4 3.5” sq. white

5 3.5” sq. red/white 9-patch blocks


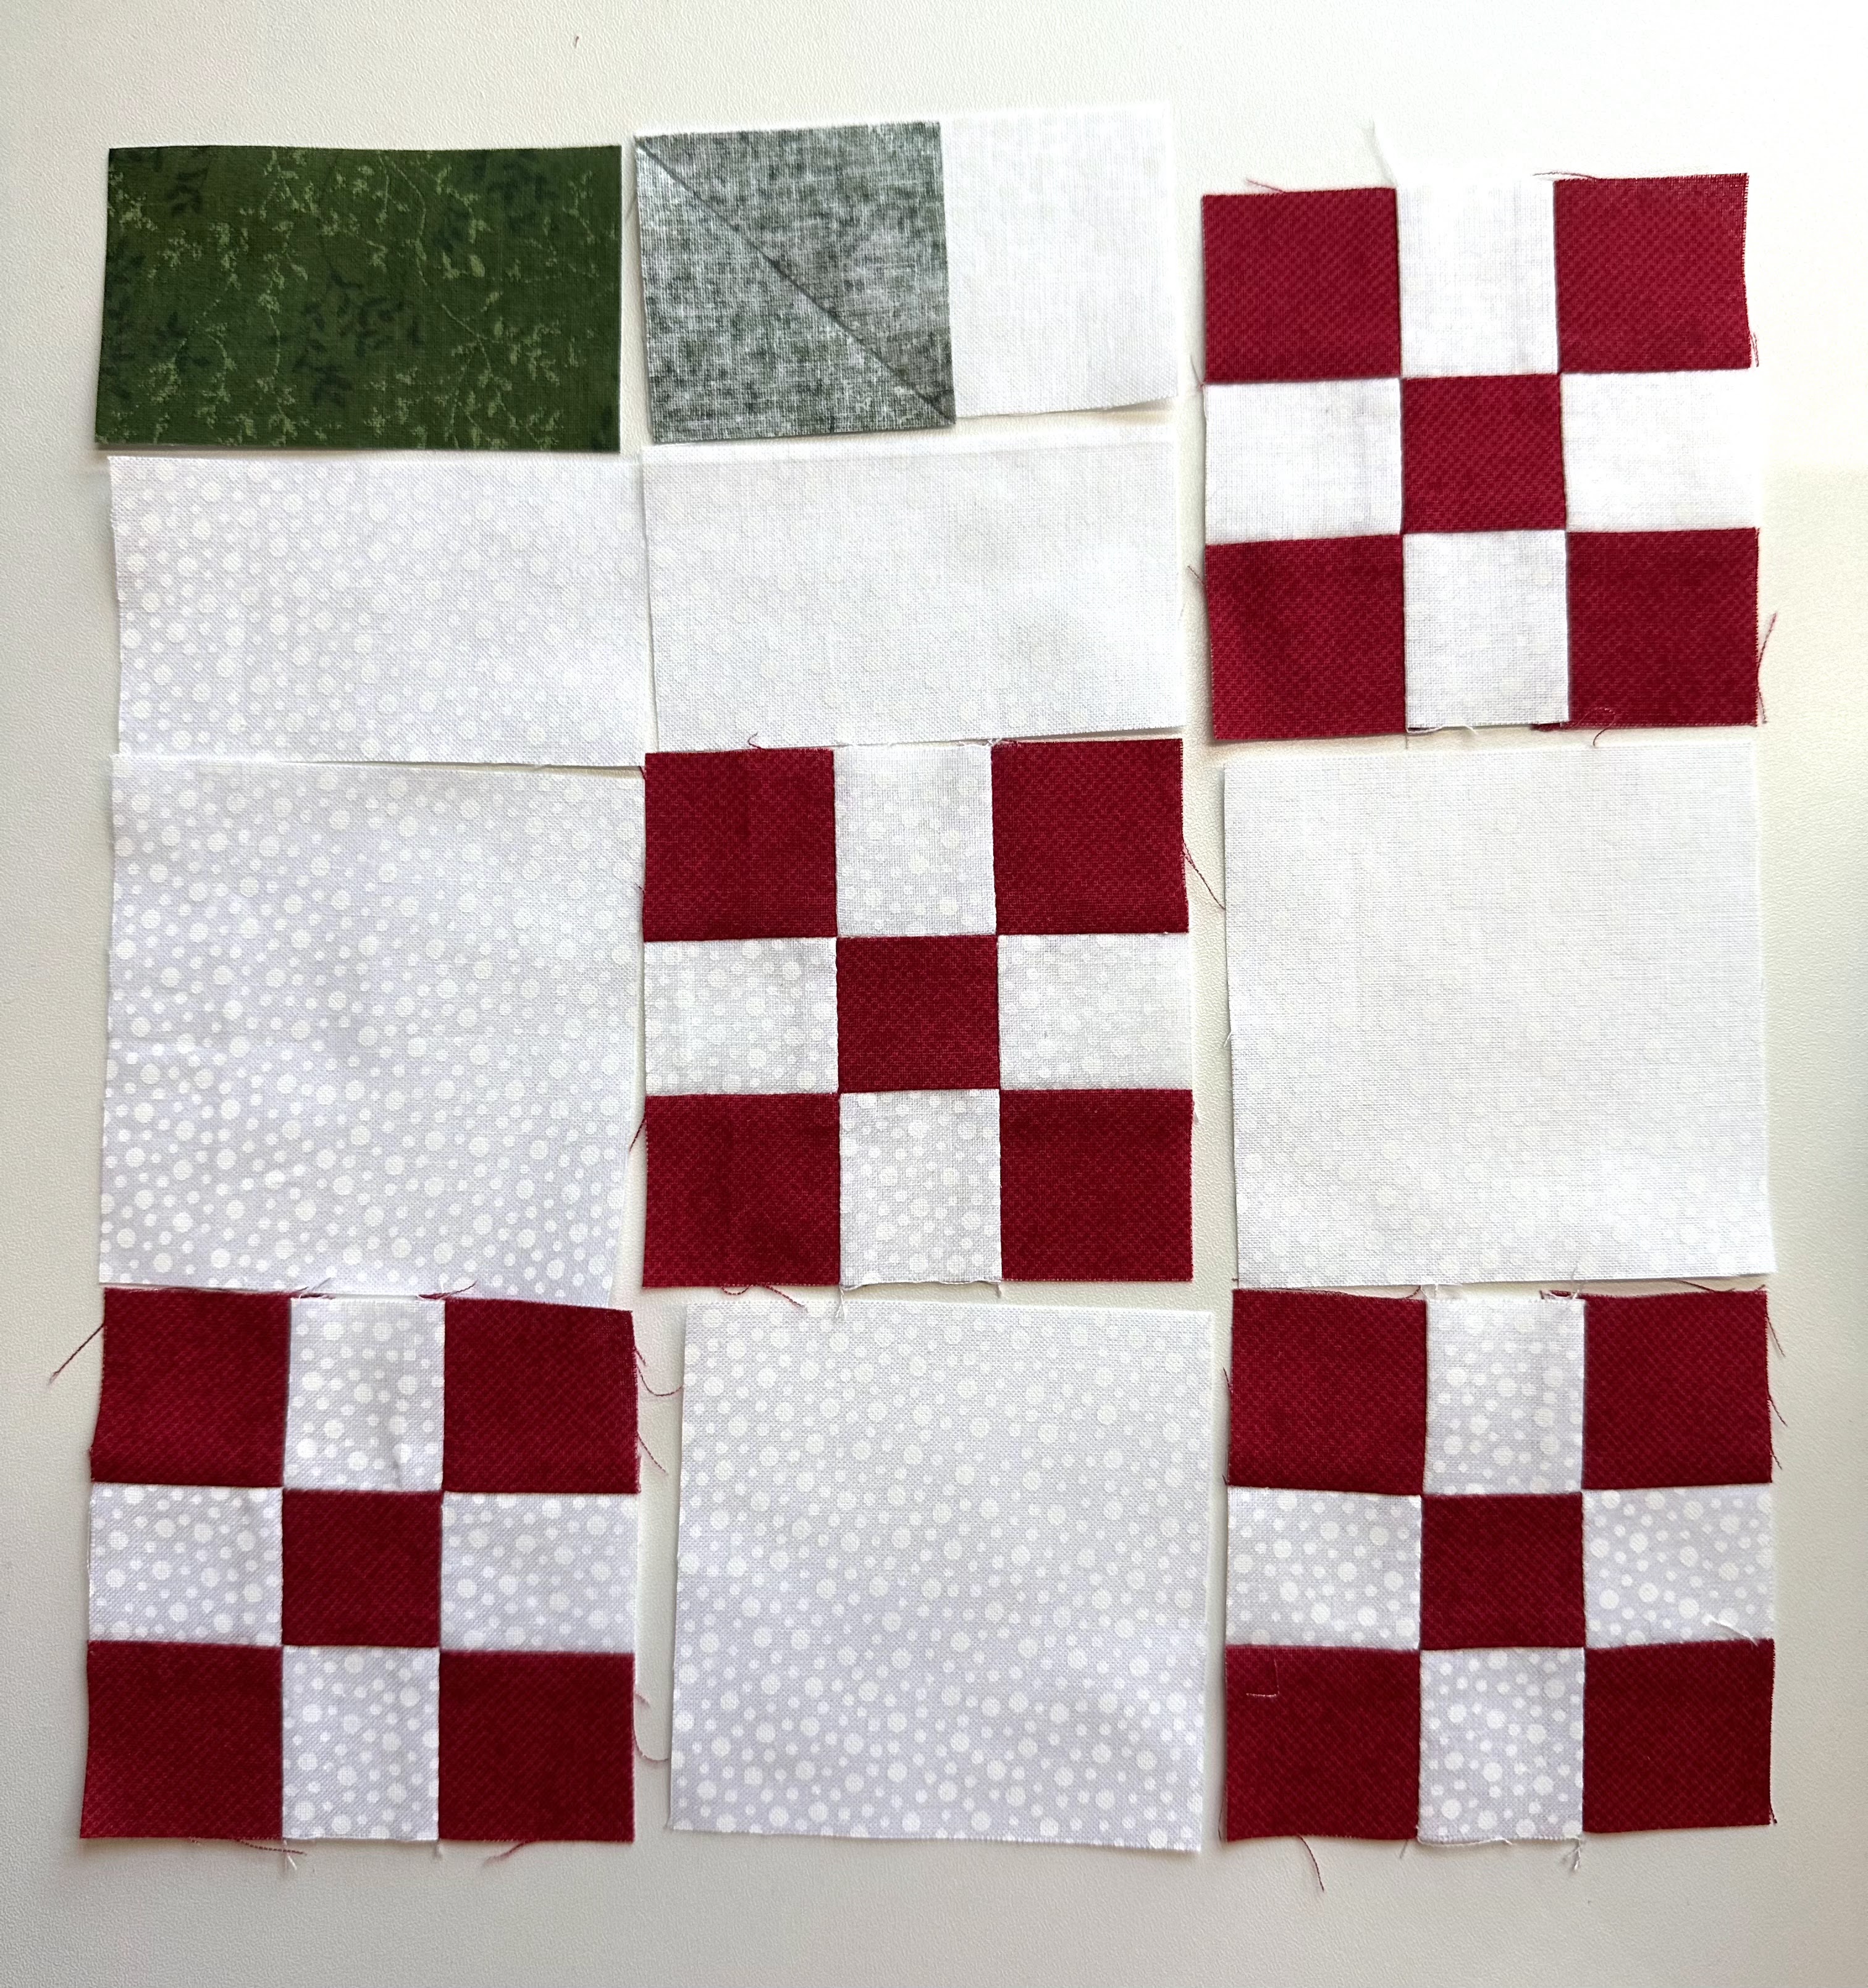
Lay them out as shown below: 


(Please excuse the fact that these are partially assembled - I forgot to take a progress shot!)


Assemble the 9-patch block, using a very scant 1/4" seam.  Your finished block should measure 9.5" square.  Make 20.


Don't worry if you don't get all of these made today - I've also set aside time tomorrow for them.  


*&*&*&*&*&*&*


The end is so close, but we've still got lots of inspiration to come.  Can you hear those sleigh bells jingling yet?


Hugs!


Sarah

Saturday, July 22, 2023

Day Nine of the Twelve Days of Christmas in July!


Hi, all!

How quickly time flies when you're having fun - and just imagine how quickly the days until Christmas are going to fly by!  But I hope that you're getting some inspiration, and maybe even a head start on your Christmas crafting!  Today I'm going to share a recipe with you before we move on to the last two blocks for the center of the Christmas quilt.  Let's go!

*&*&*&*&*&*&*


Many of you already know how proud I am of this girl (my eldest granddaughter, Lilli) since you've seen her grow up from her earliest appearance on my blog in 2010....

...to today.  She's changed a lot, right?  Well, for many years now Lilli has wanted to be a pastry chef (although she's thinking about adding astrophysicist into the mix now!) and she make SPECTACULAR chocolate chip cookies.  We joke that her philosophy is 25% cookie, 75% chip!  That's not precisely right, but for her, it's definitely more is more.  

Well, I asked her if I could share her recipe here for the 12 Days of Christmas in July - because if you're like me, you stink at decorating cookies, but a truly delicious, well made chocolate chip cookie can go a long way in taking people's minds off those pretty decorated ones!  So here's her recipe:

Lilli's Chocolate Chip Cookies

1        cup    butter, softened

2/3     cup    sugar

2/3     cup    brown sugar

       tsp     vanilla extract

1        tsp     salt

       tsp     baking soda

2                  eggs

2 1/4  cup    flour

1        cup    dark chocolate chips

1        cup    milk chocolate chips

Whip together butter and both sugars for 3-5 minutes or until light and fluffy.  

Add in vanilla, salt and baking soda and mix until combined.

Add eggs one at a time.

Add in flour.  When flour is partially mixed in, add chocolate chips.

Mix until fully combined.

Bake at 350 degrees F 13-15 minutes.


Now, in the interest of being sure the recipe was correct, I made a batch.  No other purpose, I promise (ha ha!).  Trust me that your cookies will taste best if you really whip up that butter!  I set my stand mixer to a high speed and set a timer for five minutes, just so I don't shortchange the process.  I do scrape down the sides of my bowl occasionally (I have the really large mixer and small batches sometimes get pushed up on the sides and not mixed well) so you may need to do this as well.  Your butter will get lighter in color as well as fluffier the more you whip it.

Now, I have to admit that quite a few cool kitchen tools have made their way into my drawers since Lilli started baking over here....

...like these magnetic double-ended measuring spoons.  Very useful for this recipe, as I can use one end for the liquid measurements and one end for the dry!  But the fact that they all stick together in the drawer is a plus too.


I also find cookie scoops to be a great and versatile tool!  Yes, I know it looks like an ice cream scoop, and you can probably use it for that, but it ensures that all of your cookies will be similarly sized, which is nice for gifting.  We actually have three sizes of these, with this being the largest.  Using this scoop, I made 20 cookies from this one batch.  Using a smaller scoop would increase the number of cookies, obviously.  I also use a scoop when making anything that I want to be sized alike, such as meatballs.  Really handy little gadgets!


Another handy gadget, although I think I introduced Lilli to this one rather than the other way around, is parchment paper.  It really makes cleanup a snap - you just throw it away - and the cookies don't stick!  Speaking of which, be sure to give your cookie dough a good bit of space to spread out!  I only made six at a time on my large cookie sheets, and see how they spread out?


And one last tool that we've added based on Lilli's recommendation - a dough scraper!  


This thing is positively the bomb at getting up all the little spills and dough scraps from the counter top, and I honestly don't know how I lived as long as I did without one!

One thing that we've discovered with these cookies is that you can add all kinds of things to them - Lilli makes one version she calls an Everything Cookie, that may also have white chocolate chips, semi-sweet chips, nuts, coconut, or even broken pretzel bits in it.  It's a good way to use up little bits of leftovers from previous baking sessions!

Once the cleanup is done and the cookies are cool, you are ready to package them up in a cookie tin, a pretty plate, or even a little plastic goodie bag tied with a bow!  I've found nice cookie tins and plates at the dollar store, and the goodie bags can be found in various sizes at Joann's.


But whatever else you do with your cookies, be sure to have at least one hot out of the oven with a glass of milk!  I hear the calories don't count if you are writing a blog post at the same time..... 😉

*&*&*&*&*&*&*


And now we're ready to make the last two blocks for the center of the quilt, or the remainder of the wall hanging!  Today we will focus on blocks H and I.  Once again, they are mirror images of each other so we will make first one and then the other.

For block H, you will need the following pieces:

3 3.5” sq. white

3 3.5” x 2” white

1 3.5” x 2” green

1 2” sq. green


4 3.5” sq. red/white 9-patch blocks


Step 1
- Lay out the pieces as shown below. 


Step 2 - Draw a diagonal line on the back of the green 2” square.  Take one of the white 3.5” x 2” pieces and lay the green square on the right end of it, aligning edges and corners and having the diagonal line running from upper right to lower left.  Stitch on the line.  Trim off the corner.  Press out.  Take another of the white 3.5” x 2” pieces and sew it to the bottom of the W/G piece.  Press seam down toward the white piece.  Replace in the layout on your work table.


Step 3 - Take the remaining white 3.5" x 2” piece and the green 3.5” x 2” piece and sew them together along the long edge.  Press seam up towards the green piece.  Replace in the layout on your work table.


Step 4 - Assemble the nine-patch block.  This block will go in the lower left of your Christmas tree unit.


For block I, you will need the following pieces:

        3 3.5” sq. white

3 3.5” x 2” white

1 3.5” x 2” green

1 2” sq. green


4 3.5” sq. red/white 9-patch blocks


Step 1
- Lay out the pieces as shown below. 


Step 2 - Draw a diagonal line on the back of the green 2” square.  Take one of the white 3.5” x 2” pieces and lay the green square on the left end of it, aligning edges and corners and having the diagonal line running from upper left to lower right.  Stitch on the line.  Trim off the corner.  Press out.  Take another of the white 3.5” x 2” pieces and sew it to the bottom of the W/G piece.  Press seam down toward the white piece.  Replace in the layout on your work table.


Step 3 - Take the remaining white 3.5" x 2” piece and the green 3.5” x 2” piece and sew them together along the long edge.  Press seam up towards the green piece.  Replace in the layout on your work table.


Step 4 - Assemble the nine-patch block.  This block will go in the lower right of your Christmas tree unit.

And you're done for the day!

*&*&*&*&*&*&*

We're moving right along!  Tomorrow we'll have another stop on the blog hop, as Carole of From My Carolina Home shows us how to finish up the project she started last Sunday, we'll show the wall-hanging people how to assemble their top, and provide the next step for the quilt folks!

See you then!

Sarah

Friday, July 21, 2023

Day Eight of The Twelve Days of Christmas in July!


Hi, all!

Welcome to Day Eight of this year's 12 Days of Christmas in July blog hop!  Today I have a fun craft to share with you that may help alleviate some "stash" at your home, as it has at mine, plus give you a way to spend some fun time with the kiddos in your life.  We'll also be working on two more blocks for the Christmas tree center of this year's quilt.  Let's go!

*&*&*&*&*&*&*

Every so often, you should take the time to look back through your old Pinterest pins.  Rather like scrolling through years-old blog posts, you will find things you completely forgot about.  I discovered this picture that I had saved as inspiration, and boy was I inspired!


Now, if you're like me, you remember fondly playing with buttons in your granny's button box.  My granny had a silver cookie tin that she kept hers in, and it was a favorite game to sort the buttons by size, color, and shape.  So of course my instinct with buttons is to save them, regardless of whether I ever use them or not.  And any time we would receive buttons at church in and among the fabric donations, I would take them home (because the quilt ministry doesn't use them and no one else wanted them!) Which means I have a RIDICULOUS amount of buttons, as you can see here...


I'm guessing that's probably 15-20 pounds of buttons!  But it's perfect for this project. I dug in my drawers of craft goodies and found some leftover cord (although any thin twine would work) and cut 3-foot lengths. 


I tied a knot about three inches from the end and let the kids start threading buttons onto the cord!  We only used two-hole and four-hole buttons, threading the cord through two holes on each.  Once our strands were full, we tied another knot three inches from the end, then tied the strands together.  And look what we made!


It's interesting to see the difference in how they chose their buttons - Lilli's alternates red and green, with a gold button after every seven; Nathanael's are piled one on top of the other; and Emmy searched out the flower and animal buttons to add to her strand!  But all together on a tree, they are so pretty...


We still have a long way to go to make enough for my life-size tree but since this is a project that lends itself to quiet times, I think we can get enough done by Christmas to make a respectable showing!

*&*&*&*&*&*&*


Are you ready to make the next two blocks for your Christmas tree center?  We'll be making blocks F and G today, and while these two blocks look similar, they are mirror images of each other, so it's less confusing to work on them one at a time.  Let's start with block F - for this block, you will need the following fabrics:

        1 9.5” x 5”         white
1 9.5” x 3.5” white
1 8” x 2” white


1 2” sq. green

1 3.5” sq.         green

1 2” x 3.5”         green 


Step 1 -  Take the white 9.5" x 5” piece and the green 2” square.  Draw a diagonal line on the green square from corner to corner.  Take the green square and lay it on the lower right corner of the white piece, aligning the sides and corner, with the diagonal line running from upper right to lower left.  Stitch on the line.  Trim off the corner.  Press out.


Step 2 - Take the white 9.5” x 3.5” piece and the green 3.5” square.  Draw a diagonal line on the green square from corner to corner.  Take the green square and lay it on the right end of the white piece, aligning the sides and corners, with the diagonal line running from upper right to lower left.  Stitch on the line.  Trim off the corner.  Press out.


Step 3 - Take the white 8” x 2” piece and the green 2” x 3.5” piece. Lay the short end of the green piece on top of the right end of the white piece, aligning the sides and corner, with the extra length of the green piece above the white piece as shown below.  Draw a diagonal line from the lower left corner of the green piece to the spot where the white piece and the green piece meet at the upper right.  Stitch on the line.  Trim off the corner.  Press out.


Step 4 - Sew the 9.5” x 3.5” piece to the bottom of the 9.5” x 5” piece.  Sew the 9.5” x 2” piece to the bottom of that piece.  


Your block F is finished!  Now let's move on to Block G, the mirror image of block F.  For this block, you will need the following pieces:

1 9.5” x 5”         white

1 9.5” x 3.5” white

1 8” x 2” white


1 2” sq. green

1 3.5” sq.         green

1 2” x 3.5”         green 


Step 1 -  Take the white 9.5" x 5” piece and the green 2” square.  Draw a diagonal line on the green square from corner to corner.  Take the green square and lay it on the lower left corner of the white piece, aligning the sides and corner, with the diagonal line running from upper left to lower right.  Stitch on the line.  Trim off the corner.  Press out.


Step 2 - Take the white 9.5” x 3.5” piece and the green 3.5” square.  Draw a diagonal line on the green square from corner to corner.  Take the green square and lay it on the left end of the white piece, aligning the sides and corners, with the diagonal line running from upper left to lower right.  Stitch on the line.  Trim off the corner.  Press out.


Step 3 - Take the white 8” x 2” piece and the green 2” x 3.5” piece. Lay the short end of the green piece on top of the left end of the white piece, aligning the sides and corner, with the extra length of the green piece above the white piece as shown below.  Draw a diagonal line from the lower right corner of the green piece to the spot where the white piece and the green piece meet at the upper left.  Stitch on the line.  Trim off the corner.  Press out.


Step 4 - Sew the 9.5” x 3.5” piece to the bottom of the 9.5” x 5” piece.  Sew the 9.5” x 2” piece to the bottom of that piece.  


Your block G is finished, and you have completed today's blocks!


*&*&*&*&*&*&*


Come back tomorrow, when I'll be sharing a delicious recipe that makes a perfect small gift, and the last two blocks for the Christmas tree center!  


See you then!


Sarah

Thursday, July 20, 2023

Day Seven of the Twelve Days of Christmas in July!


Hi, all!

Here we are, on the downslope of this year's 12 Days of Christmas in July blog hop!  Hopefully we can enjoy the downhill rush to the finish, pausing along the way to find more Christmas inspiration.  Today I've taken a little trip down memory lane to share a family tradition with you, and we'll also receive the instructions for two more blocks for the quilt or wall hanging. Let's get started!

*&*&*&*&*&*&*

As many of you may already know, we have a tradition in my family that started many years ago, when Lilli, my eldest granddaughter, was very little.  One of my first quilts was made for her, and I gave it to her for Christmas just after her second birthday.  The next year, I was making a quilt for a little girl with leukemia, and Lilli, my constant companion, loved the Dr. Seuss fabric.  She petted that quilt and constantly asked about who it was for. She asked about that quilt even after I sent it off to its new owner, and so I decided to order more fabric and make her one too!


I gave her the quilt for Christmas, along with a doll quilt from the same fabrics for the doll bed my husband made her that year, and thought that would be the end of it.  But then Christmas starts coming around again, and Lilli, always an articulate child, even at three, started listing off all the things she wanted Papa (my husband) to get her for Christmas.  I asked her if she didn't think that was quite a lot of things, and she looked at me and said, "But Nana, all I want from you is a quilt!"  And thus a tradition was born.


Keep in mind at that point I only had one grandchild.  This made making a quilt a year a pretty simple prospect!  Then along came Emmy, and I added another quilt for each of them each Christmas.

Emmy's first annual quilt

At this point, my daughter isn't too concerned.  They only have a few quilts in their house!  A few years later, they adopted Nathanael, and their quilt load was increased by three each year.....

Nathanael's first annual quilt

But finally at some point my daughter started getting concerned, realizing that by the time they all graduated, there would be upwards of fifty quilts at their house!  To calm her nerves, we gave each of the children a storage cabinet one year so they could put their own quilts away in their rooms, and last year I gave them vacuum storage bags so they could store some under their beds!  

Needless to say, though, I'm not going to stop the tradition.  I try to make each quilt a microcosm of things about the last year in the chid's life.  For example, one year Emmy was VERY dramatic about everything, so I made her this cute Drama Llama quilt....


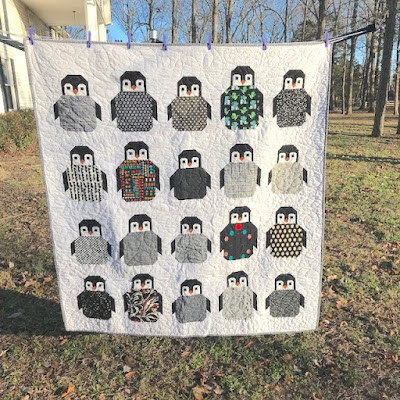
We discussed it thoroughly, and each llama has a name and a distinct personality!  Nathanael loves penguins, and one year I made this fun quilt for him....


And Lilli has cut through a wide swath of colors, themes and styles, but this is my favorite, I think - one year she requested a dolphin quilt with lots of blue...


One of the special things that I add to each quilt is a label that tells a little bit about the past year and how I see them growing up.  It always begins with "The year you turned (age)...".  


I love to think of their children using these quilts someday and reading about what their parents were like when they were children!  They have been comforters when they were sick, playmats or tents when they were cooped up inside, snugglies on the sofa while watching tv or playing video games - and they should continue that wonderful existence for years to come!

This year I already have plans for all three - Lilli will be getting a chocolate chip cookie quilt, Nathanael a Pokemon quilt, and Emmy, my little artist, is already working on drawings that I will copy onto fabric and put into her quilt.

Do you have any special family traditions that go on year after year?

*&*&*&*&*&*&*


First of all, a note - if you happened to read yesterday's blogpost very early in the day, you may have noticed that although I promised two blocks, I only put the instructions for one.  (Oops!)  I've fixed that and so if you missed the instructions for Block C, hop back one day and catch up!

And now it's time to work on the next two blocks for the center of the quilt or wall hanging - Blocks D and E!  These two blocks are identical, so construction should go pretty quickly.

For these two blocks you will need the following pieces:

        10 3.5” sq. white


8 3.5” sq. red/white 9-patch blocks


Lay out the pieces on your work table in stacks of two, as shown below. 


Assemble two nine-patch blocks.  These finished blocks will go to the right and upper left of the top block of the Christmas tree.  You can rotate them as needed to place the white block corner towards the center of the design.


And just like that, you're done for today!  If you are still working on the small 9-patch blocks, hopefully you have some catch-up time now.


*&*&*&*&*&*&*


I hope you'll be back tomorrow, when I will be sharing another kid-friendly craft - I know it is because my grands had a ball with it!  It's quick, easy, down-time friendly, and may help you use up some stray (and possibly overflowing) craft items you have stashed away!  We'll also be assembling the next two blocks for our quilt.


Can't wait to see you then!


Sarah