
Welcome to the 11th day of the Twelve Days of Christmas in July Blog Hop! I really fell down a rabbit hole while writing this post - I couldn't for the life of me remember what the eleventh day gift was, so I went to look it up. (Just FYI, it's eleven pipers piping!) But I also found out that if you received all the gifts listed in the song (and they accumulate - each day repeats all the gifts to date) you'll have 364 separate items by the end of the 12th day! And since 1984, the cumulative costs of the items mentioned in the song have been used as a tongue-in-cheek economic indicator. Two pricing charts are created, the Christmas Price Index (the index of the current costs of one set of each of the gifts given) and the True Cost of Christmas (the cumulative cost of all the gifts with the repetition listed in the song). The people mentioned in the song were hired, not purchased. In 2015, the total cost of all goods and services in the Index was $34,130.99. The True Cost of Christmas was $155,407.18 for all 364 items!! All I have to say is that was one dedicated true love!
Now that I've dug my way out of that rabbit hole, let's get down to today's business! I've got some cute trees to share with you, along with some guidelines for how to know what you need to decorate your Christmas tree. Because this is the year of the Christmas tree, after all! Then we'll have some more instruction on the quilt top.
Let's get started!
*&*&*&*&*&*&*

You'd never guess it, but around my house, we love Christmas and all things Christmas-y! This is the tree that stands in our front entry area - we usually put up a fresh tree here, and it is decorated more formally than the family tree in the den. I try to get one large enough to have a real presence in the tall entry, so it's usually 8-9 feet tall. Luckily, we have a friend who runs a tree farm at Christmas time, so we know just where to get one!
If you're like me, you never know quite how much stuff to drag out to decorate a really big tree. But I stumbled across a chart on the internet that is absolute genius!
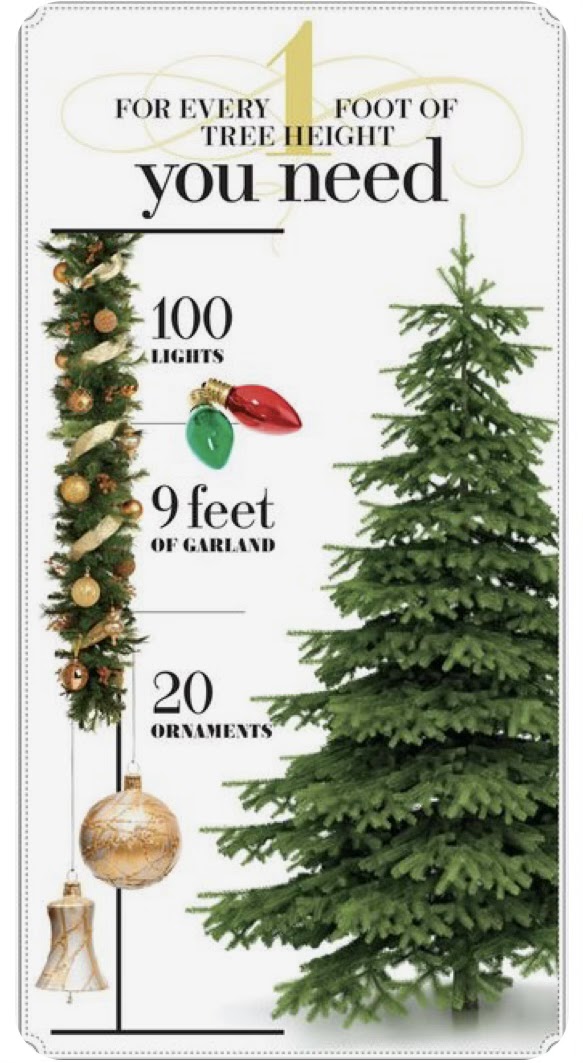


My husband says that this picture is deceptive, and makes the tree look bigger than it really is. I just like the fact that it echoes the tree in the center of the quilt waiting on the long arm!


I'm finally well enough to start!!! The pretty paper projects are adorable! Thanks for sharing all the hints in this post!
ReplyDeleteWhat a fun post...have been away and just catching up. I am not an over-the-top decorator, but this would be perfect any time of the year. Love the design! Congrats on a fabulous Christmas in July hop!
ReplyDeleteThanks so much for a great hop, and all you have shared. Great quilt, many thanks for all you have done
ReplyDeleteI haven’t started this Christmas quilt yet but I think it’s the prettiest I have seen in a while! Love the big tree and have thought about maybe doing red work embroidery in the bigger white squares. Your origami tree is too cute!🥰
ReplyDelete