Wednesday, February 27, 2019

I May Have A Scrap Problem... A Disappearing Act!

Hi, all!

As you probably already know, I was fortunate enough to attend QuiltCon last week.  I signed up for a class called Dynamic Quilts with Solids, taught by Nydia Kehnle.  Considering how many solid scraps I have, you can guess that I was really excited!  We were instructed to bring about 125 7.5" squares, in at least 25 different colors.  Well, I went nuts, pulled everything I could cut a 7.5" square out of, without rhyme or reason, and showed up to class.


This is the class instructor, Nydia Kehnle, and one of her fabulous quilts!  We spent the morning making a bajillion half square triangles, then worked on laying them out with her guidance.  Alas, I had too many colors with no connection between them to work well.  I learned that I should have spent more time researching the type of quilts she made to get a better idea of what colors I needed to bring!

But that meant that I had a lot of HSTs to use up and no plan for them.  I tried laying them out as HSTs at home, but found the they really didn't "flow" like I wanted them to.  So I tried them as hourglass blocks, and that was ok, but no "pop".  What to do?


After staring at this for a while, I decided to do something drastic - I cut it up!  After all, somebody had to take the plunge to make the first disappearing nine-patch, right?  So here goes...


I cut on either side of the diagonal centers, breaking the block into nine patches.


Then I rotated the center a quarter turn clockwise.  Next, I took the top left corner and the bottom right corners and switched their positions, and did the same with the other two corners.


Once it was sewn back together and trimmed, this is the result!  I posted a picture on Instagram, and got some really good feedback, so I'm going to provide a more specific tutorial below.  For the tutorial, I used 10" squares - a layer cake that was gifted to me a while ago, so I'm happy to be giving it a chance at quilt-y life!

The first step is to make your HSTs.  I would suggest pairing up your pieces to give good contrast for this block.  Once completed, press the seams to the dark side.  Pair them up to make the hourglass blocks, being sure to use four different colors in each one.


Lay the two HSTs right sides together, with the two seams nesting into each other.  Place your ruler from one corner to the other, crossing the seam line.  


Line up one of the inch markers with the seam line as shown above to ensure that your ruler is perpendicular to the seam.  Make a line from one corner to the other.  


Pin across the seam in the center to hold the seam in place, then stitch 1/4" from the line on both sides. Cut on the line, then press the seams, spinning the centers, on both hourglass blocks.  Each pair of HSTs will yield two very similar hourglass blocks. 


Once you have made and pressed all your hourglass blocks, turn them over so you can see the back sides. Each pair of near-identical blocks will "spin" in a different directions.  Make two piles, one spinning clockwise and one spinning counter-clockwise.  


Now it's time to square up those blocks!  Starting with 10" squares, I found that these hourglass blocks squared up to 9".  Depending on what size you begin with, yours may square up smaller or larger.


Being sure to use blocks that all spin the same direction, choose four to put together into a four-patch hourglass block.  Assemble the block.  Press it carefully, spinning the seams around the center.  


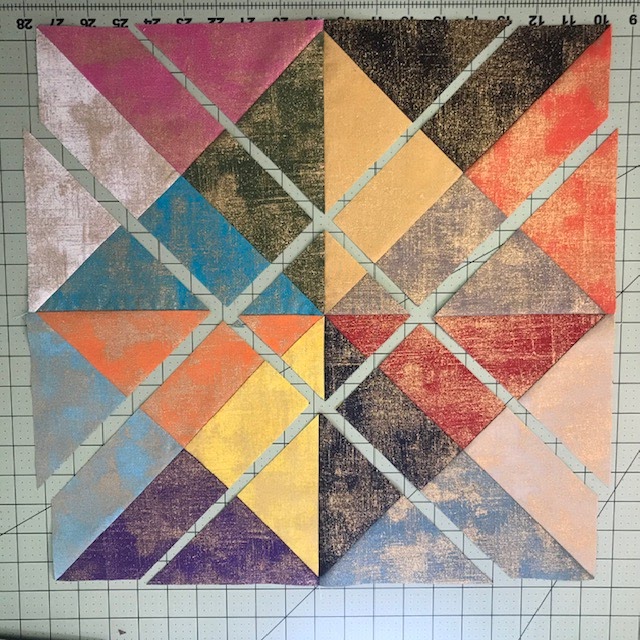
Now it's time to cut it up.  Be careful!  For this size block, I chose to measure 2" from the center diagonals.  How far you cut is up to you!  Rotate the center 1/4 turn clockwise, swap the upper right and lower left corners, and swap the upper left and lower right corners.  NOTE:  If you aren't happy with the way the colors align, feel free to move things around until you are pleased with the layout.  I had to do that on one of my smaller blocks, and it worked out just fine!


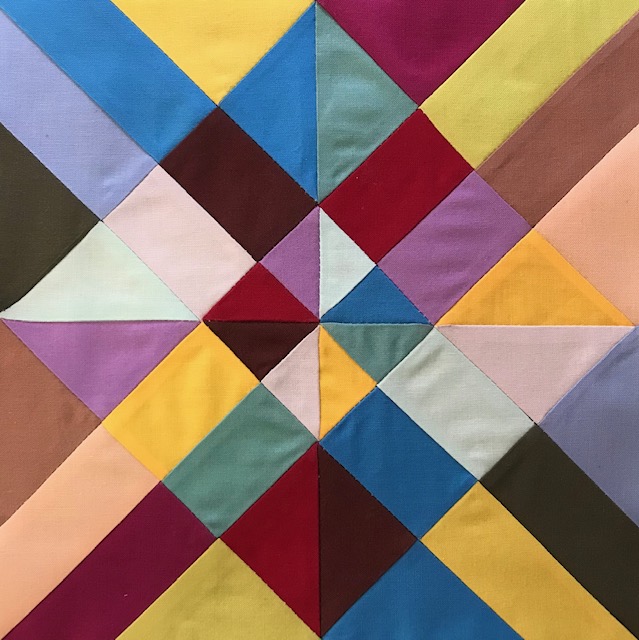
Sew the rows together on the diagonal, carefully matching the seams.  The corners will be longer than the sides - don't worry, it will be trimmed later!  Sew the three rows together, once again carefully matching the seams.  Square the block up, cutting off the corners that extend beyond the top, bottom and side seams.  This particular block, which began from 10" squares, squared up at 16".


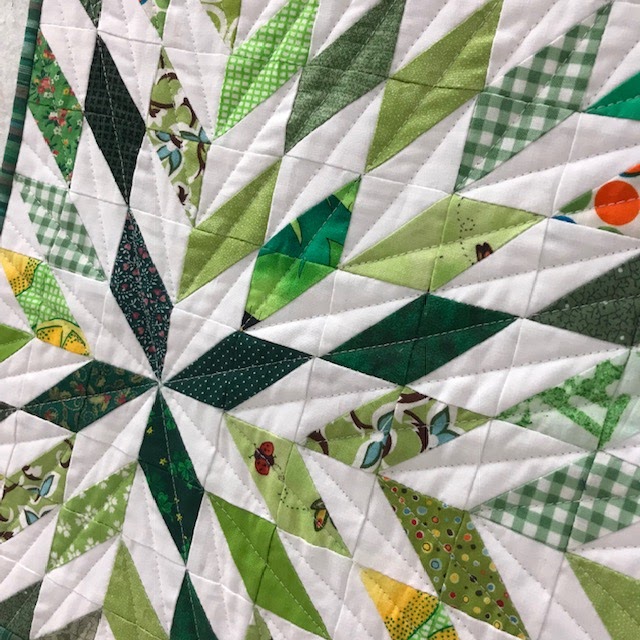
And there's your finished block - a disappearing hourglass block!  I really wanted to know what it would look like when placed with others like it - what secondary patterns would appear.


Here you can see the one larger block, next to four of the smaller ones made from my class HSTs.  In the on-point layout, the crosses are more visible, and in the horizontal layout below, the squares seem to show up better.


It's going to be fun to play with this block!  I'm also interested to see what it looks like in prints - but that's for another day, as I have some quilting I must get to now.  

Let me know if you give this a try (particularly if you don't understand something or find a better way to do something!) I'd love to see what you come up with!

Hugs!

Sarah

Monday, February 25, 2019

Make-A-List Monday - Let's Get To Work!


Hi, all!

Wow!  Monday - it seems like it's been forever since last Monday!  QuiltCon will really make you lose track of your days, it seems.  And Sunday morning I woke up in a panic, thinking I had forgotten to do my blog post - but fortunately I had scheduled it a week before so all was good.  But it really woke me up in a hurry!!


So now that QuiltCon is over, it's time to get back to the real world.  Let's see how my short list from last week went first, though.

1.  Deconstruct t-shirts and make blocks for the commission 
t-shirt quilt.
2.  Start assembling the t-shirt quilt.
Done - and not only started, but the top is finished!


3.  Prep a whoop-whoop Friday post ahead of time and schedule for posting.
Done!  You can read more about this cute little mini quilt here.


4.  Mail a ministry quilt and a donation quilt.
Done!

5.  Deliver three rolls of batting to church (hooray for Joann's doorbuster sales!)
Done!

6.  Pull together my supply bag for each day of QuiltCon!
(can you tell I'm a little excited?)
Done!  

7.  Keep up with any quilt ministry needs that come up.
As far as I know, we didn't give away any quilts this week.  Of course, someone else may have given some out on Sunday when I wasn't there.  I'll find out Wednesday!

So a short list, but I did manage to get it all done!  It was nice to have all that behind me so I could enjoy QuiltCon guilt-free.  But now it's time to get back to the real world and all the fun things I get to do!  Here's this week's list...

1.  Quilt the t-shirt quilt.

2.  Quilt a top for a friend.

3.  Bind a quilt ministry quilt.

4.  Write the final Rockin' Rectangles tutorial.

5.  Contact a few potential new sponsors for Hands2Help.

6.  Work on a special scrap project.

7.  Go all "Marie Kondo" in my closet.

8.  Sleepover with the grandkids Friday night!

9.  Keep up with any quilt ministry needs that come up.

Plenty to do this week, but I'm working in some time for play.  I need to get back to the fun part of quilting, and not just the work!  


I mean, with all the inspiration I saw this week, and all I learned, I should be able to knock one of these out for my granddaughter, right?  HA!  She thinks I can, though...

So now, the question is - - - what are YOU working on this week?

Hugs!

Sarah

Sunday, February 24, 2019

Rockin' Rectangles - Small Town!

Hi, all!

Today I have another junior jelly roll quilt to share with you, which used up my last junior jelly roll, I'm happy to say!  But now that I have a few easy quilt ideas that use one, I may find myself looking for them in the future.  Let's get started!


I'm calling this quilt "Small Town" because it reminds me of farm areas in the midwest where the houses are surrounded by fields of crops.  From the air, it kind of looks like this quilt - plus I just love John Mellencamp's song of the same name! (PS Who gives up a cool middle name like Cougar?)

Quilt Size:  61" square

Fabric Requirements:

From a junior jelly roll, select 16 2.5" strips OR 16 2.5" x width of fabric (WOF) strips from your stash

40" of block background fabric

40" of center, sashing and border fabric

1/2 yard of binding fabric

First Cutting Instructions:

Cut your block background fabric into 16 2.5" x WOF strips.

 Block Assembly:


Pairing a print strip with a block background strip, sew them together along the long edge.  Be careful not to stretch the strips as you sew them!  Repeat for all sixteen pairs of strips.  Press the seams toward the print strips.


Now you will cross-cut your strip set into 10.5" sections.  TIP:  If you have a 10.5" ruler, use it to do this.  All you will need to do is place one edge of the ruler against the end of the strip (trim the strip first, please) and cut against the opposite edge.  No measuring required, which is really handy if you are also talking at the same time (don't ask me how I know this...)  After cutting all 16 strips, you should have 64 2-strip sets.


Next step is to lay out the sets of 10.5" strips next to your sewing machine.  I stacked mine up with all the same prints in a stack.  


Time to chain piece!  Choose two different strip sets and sew them together along the long edge, matching a background strip to a print strip.  Repeat for all the sets.  Press seams toward the print strip. You should have 32 4-strip sets now.


At this point, you may want to take a few minutes to intentionally pair these 4-strip sets together.  The 8-strip sets will be the building blocks for the large blocks of this quilt.  Once you have them paired, sew two 4-strips sets together, matching a print strip to a background strip.  Press seams toward the print strip.  You should have sixteen 8-strip sets.

Second Cutting Instructions:

From your center, sashing and border fabric, cut a 6.5" x WOF strip.  From that strip, cut 4 6.5" squares for the center of your blocks.

Block Construction:


The first step is to lay out four of your 8-strip sets around a center 6.5" square.  Don't be fooled by my one-color strip sets - that's just EQ7 and I was being lazy!  You may want to lay out all four blocks so you can be sure you are happy with how they will all look.  Otherwise you might end up with one at the end that has too many repeats in it!  


To create these blocks, you will need to use a technique called a "partial seam".  It looks complicated, but really isn't.  Place an 8-strip set in front of you with a background strip at the top.   Lay a center square on top of it, matching the top and left edges. Flip it over and stitch a quarter-inch seam about halfway down the length of the center square.    Press the seam towards the strip set just up at the top for now.


Now lay another strip set next to the seamed side of the strip set/center unit.  Match the ends, pin if needed, and stitch the entire seam.  Press the seam towards the strip set.  Repeat for the third side, attaching the strip set to the one you just added and the center block.  For the final side, attach it to the center block and the third strip set. Be sure not to catch the un-sewn portion of the first strip set in your stitching.  Now finish the first seam, attaching the first strip set to the top of the final strip set.  Not as hard as it sounds - just give it a try!  Remember you are going around the center square counter-clockwise.  Repeat to make four of the large blocks.

Third Cutting Instructions:

Using your sashing and border material, cut 9 3.5" x WOF strips.  Sew the strips end to end, then from that strip, cut the following:

1   3.5" square for the center
4   3.5" x 26.5" for sashing (or your finished block's measurement)
2   3.5" x 55" for side borders (or whatever your quilt measures)
2   3.5" x 61.5" for top and bottom border (or whatever your quilt measures)

Quilt Top Construction:

Lay out your four blocks in a way that pleases your eye.  Don't sweat it too much - you're much more critical that anyone else will be.


Now we'll be adding the sashing strips.  Take the top two blocks and sew them on either side of a sashing strip, matching the top and bottom of each block to the same on the sashing strip and easing to fit. Pins are your friend here!  Repeat for the bottom two blocks.

At this point, you may be wondering why I cut a small center square and two more sashing strips, rather than one long strip.  I find that placing that small center square (also known as a cornerstone) in the middle, my blocks ALWAYS line up - and that makes it totally worth the extra time!  You can make it a different color if you want - I wanted the look of a solid strip, but also wanted my blocks to line up, so I put it in.

Take your two remaining sashing strips and the center square and join them together. Pin the top row of blocks to the long sashing strip, matching the ends and the sashing seams at the center, easing the fabrics.  Stitch.  Pin the bottom row of blocks to that strip and repeat.


Now it's time to add your borders.  Start with the side borders, matching the ends of the border and the quilt top and pinning to ease the fabrics together.  Stitch.  Press seams toward the borders.  Repeat with the top and bottom borders. 

And voila!  You have a finished quilt top!  But don't stop there - quilt that puppy!  Someone out there needs that quilt!  


I chose to do a random meander on mine, but you could do something more interesting in the centers and borders to make it really stand out.  But remember - finished is better than perfect, and someone in need of a quilt won't be thinking about whether your stitch length is spot-on, they'll be gratified that someone cared enough to make them a quilt!

And let's have a little rock-and-roll homage now - here's Small Town by John Mellencamp...


And I'm going to do something I don't often do, and that's give a shout-out to a store.  See that beautiful backing there?  I found that at Hobby Lobby, in their clearance bin, for $3/yard - and there were ten yards left on the bolt!  Needless to say, I bought all of it - so I have a lovely big piece to play with.  But it wasn't the only one in the clearance bin - I found several with 8-10 yards on them.  It's certainly worth checking out if you have a Hobby Lobby nearby and can use some large pieces of fabric to stash away for backs. Their fabric is good quality, and much of it is around $6-7 a yard, and 30% off that!

Speaking of giving away your finished product, this quilt is a good size for Quilty Hugs for Happy Chemo, or Mercyful Quilts.  And if you wanted to make a baby quilt for Jack's Basket (or four!) you could use one block with a 5" border to reach their preferred 36" square size.

Come back next week to see the very last quilt in the series - I think you'll like it!  And it's a serious scrap-buster.  We all need that, don't we?  You can get a head start on it by pressing your strings and cutting them into 8.5" lengths. 

Hugs!

Sarah

**If you'd like to save or print the tutorial for this quilt, here's the easiest way to do it.  Scroll to the bottom of this post and look for this little green box:


Don't see the green "Print PDF" box?  That's easy to fix. Go to the top of the post, and click on the post title (in this case, "Rockin' Rectangles Begins! Place Your Bet...").  That will open up this post with the comments, and you will see this between the body of the post and the beginning of the comments.


Click on the green button, and a printer-friendly page will open so you can print and save the tutorial!  Voila! And the best part?  It won't print out page after page of comments and sidebar stuff.  Hooray!


Don't want to print it out?  This tutorial will remain here as long as the internet is alive, so you could just bookmark the post and create a group in your bookmarks for Tutorials!  That way you can find it any time.

Friday, February 22, 2019

Can I Get a Whoop Whoop? Supersmall Supernova...

Hi, all!

Friday has rolled around again and it's a special one - it's time for QuiltCon!  I'm spending my weekend there, meeting friends and taking classes and looking at beautiful quilts, but I still want to do some whooping with you all - so let's get started!


*&*&*&*&*&*&*

A couple of weeks ago I completed a full size Supernova quilt for my youngest grandkids' interpreter.  In one of the comments, Joy of The Joyful Quilter said that she wanted to make one in miniature.  Now that sounded like a great idea!  And I had a whole mess of tiny bonus HSTs left over from Nathanael's green annual quilt that I made for Christmas...


Of course, it might have helped if I had remembered I needed 100 HSTs and not 100 pairs!  But I have a whole other set of HSTs all trimmed and ready to make another one if I ever want to!


I don't generally make mini quilts, and this is why - it took almost as long to put this small version together as it did to make the full size one!


I did the same straight line quilting radiating out from the center that I do on the large quilt.  I think I like it even better in miniature!


I used a narrower binding than usual on this quilt, and actually stitched it down on the back by hand!  I really do like Clover clips for holding the binding inlace when I do it by hand.  Much easier!


And here's the finished version!  It measures about 13.5" square, and the HSTs finished out at about 1 1/4" each.


Isn't it pretty?  I can't imagine making one from scratch in this size, but it's a great way to use up bonus HSTs from other projects.


One last picture just for fun!

So - - - can I get a whoop whoop?

*&*&*&*&*&*&*

And now it's your turn!

What's got you whooping it up this week?


What's making you do a little happy dance?

Share!  We want to dance right along with you,

And it's always more fun to dance with friends!

The party will stay open until midnight Sunday.

Hope to see you there!

Hugs!

Sarah

Wednesday, February 20, 2019

I May Have a Scrap Problem... It's QuiltCon Week!

Hi, all!

Well, it's QuiltCon week, which means that I haven't had much time to dedicate to scrappy sewing!  I've got a few things I have to make headway on before I can play at QuiltCon this weekend, so most of my time has been spent on that.  However, I did do a little scrappy sewing that I'm saving for Friday's post - be sure to stop in and check it out!

In the meantime, since this is the week for inspiration of all sorts, here's some gorgeous eye candy I found on the internet this week!


Let's start out with P's gorgeous thrifted shirt project - isn't this amazing?  She says it's even prettier in person.  You can read more about it, and learn a little bit about P too, right here.


And check out all the gorgeous scrappy goodness of these two quilts!!  The cross quilt makes me want to go dig in my scraps right. this. minute...


I know it's a little late for Valentine's Day, but isn't this heart quilt adorable?  Maybe for next year...


We all know that "made fabric" is a great scrap buster, and this is a great way to use it!  I believe this is the Moda "Love" pattern, but the blocks are made of scrappy made fabric instead of plain 10" squares.  Wonderful!


Check out this unique alphabet - I really like the look of this one.  I've been tempted to try sewing words, ever since Kate Spain unveiled her words quilt several years ago.  This style of text looks very easy to create - I may just give it a whirl!


So take all this inspiration and sew something for me this week, won't you?   I promise more pics from QuiltCon to inspire you next week!  

Hugs!

Sarah