Friday, July 30, 2021

Can I Get A Whoop Whoop? A Different Kind of Week...


Hi, all!

Wow - is it Friday already?  This week has literally flown by, along with the rest of July.  Can you believe that next week it's August, and in most of the country, kids will be heading back to school within a few days or weeks?  I spent some extra time with the kids this week after my daughter reminded me that they start school next week (fingers crossed!) I'm kind of curious how my youngest granddaughter will do back in the classroom full time - she honestly never stops talking!  

But enough chatter (I wonder where Emmy gets it from!) it's time for us to get our whoop whoop on!  Are you ready?  Let's get started!!!!

*&*&*&*&*&*&*

Well, my week started off with a whimper instead of a bang, when Jolene decided (about one square foot from the end of a quilt) that she needed a spa day.  Much to her chagrin, it went from a simple spa day to pretty major surgery...


Yes, that's her upper drive on that table!


Joe, my repair guy, had to open her up e.v.e.r.y.w.h.e.r.e to get to the problem, but thanks to his superior skills, she's back to normal! And I didn't have to indenture any of the grandkids to him at the end of the day.... whew!


Hooray!!!  I'll need to get some ministry quilts on there (including that last square foot she left undone...) but she says she's ready to get back to work!


But don't think I was just sitting on my hands while Jolene was out of commission - I put the center of this memory quilt together, and cut some of the borders.  Hopefully this will be assembled sometime today!


And I put the binding on six quilts for the ministry - we're slowly but surely getting our stash built back up again.  Aren't they pretty?

So - - - can I get a whoop whoop?

*&*&*&*&*&*&*

And now it's your turn!

What's got you whooping it up this week?


What's making you do a little happy dance?

Share!  We want to dance right along with you,

And it's always more fun to dance with friends!

The party will stay open until Sunday midnight. 

Hope to see you there!

Hugs!

Sarah


Monday, July 26, 2021

Make-A-List Monday - Time To Get Back On Track!


Hi, all!

Well, I had a nice little break after writing all the 12 Days of Christmas in July blog hop posts - almost a week with no posts to write!  But now it's time to get back in the regular routine, so let's start it out right with a great to-do list!  

Here's what I'll be working on this week...

1.  Bind five quilts for the quilt ministry.

2.  Work on three commission memory quilts.

3.  Order any needed materials for this year's annual quilts.

4.  Get Jolene back up and running (she decided to take a few spa days right in the middle of a quilting marathon, but Joe will be here this week to get her all fixed up!)


We are trying to rebuild our stash of ministry quilts in the midst of a surge of quilt requests and Jolene couldn't have picked a worse time to break down - but thankfully another member of our quilt ministry got a long arm machine this year and she's doing fabulous in picking up the slack.  So I'll bind what she quilts until Jolene is back in the game!

And just because no post is complete without a beautiful quilt picture...


So now, I really want to know - - - what are YOU working on this week?

Hugs!

Sarah


Sunday, July 25, 2021

12 Days of Christmas in July Blog Hop and Quiltalong, Day 12!


Hi, all!

Merry merry Christmas in July!!  We've made it through the twelve days of Christmas (sort of) and the big day is finally here.  And speaking of the twelve days of Christmas, do you know how many gifts you would receive if you had someone who followed along with the song and gave you all the described gifts?  364!  Thank heavens for Google - I'm just not up to that kind of math - but it is pretty amazing, isn't it?  Today Karrin of Karrin's Crazy World is going to bring us home with a little bit more Christmas decor to brighten our lives, and if you're following the quilt-along, we'll be assembling our tops today! But wait - - - there's more!

Good ideas abound whenever we think of Christmas, and today I'm giving you a chance to share some of your own.  You'll find a linky party at the end of this post where you can link up a Christmas post of your own.  It can be a link to an old post if you want - no worries there!  Because after all, the more the merrier!!  So go back through your archives and share a little Christmas joy with us!

And here's the schedule for the rest of the hop...

Wednesday, July 14th

Thursday, July 15th

Friday, July 16th
Jamie of L'Fair Quilts

Saturday, July 17th

Sunday, July 18th

Monday, July 19th

Tuesday, July 20th

Wednesday, July 21st

Thursday, July 22nd
Sandra of MMM Quilts

Friday, July 23rd

Saturday, July 24th
Joanne of Everyone Deserves a Quilt (Part 2)

Sunday, July 25th


*&*&*&*&*&*&*


Are you ready to finish up your quilt top?  Let's go!


If you haven't done it already, lay out your blocks on the design wall or floor, starting with a star block and alternating with the snail's trial blocks in a checkerboard format.


Lay them out in a 5x5 grid.  Laid out this way, your quilt top will be approximately 60" square when sewn together.  


Now, I know everyone has their own method for joining the blocks for a quilt top, but let me tell you my favorite method.  I take the first two columns of blocks down, stacking them from the top of the quilt to the bottom (so the top blocks on the wall are on the top of each stack) and take them to my sewing machine. I lay the two stacks side-by-side on the table to the left of my machine, and then I put a pin in the top left corner of the top block on the left stack so I remember which one goes in the upper left corner.  (This can save a lot of aggravation later, particularly in a quilt where your blocks aren't identically colored.)  Then I chain piece the pairs of blocks, leaving them connected.  Take them to the ironing board and press the seams - in this instance, I pressed those seams to opposite sides so the intersections would nest when I go back and sew the cross seams.  You could also continue to press the seams open, but at this point, I was in a hurry to finish and knew it would go together more easily and precisely with the seams nesting.  Then return and sew all the cross seams so that you have a column two blocks wide and five blocks long.  Press those seams, then put it back on the design wall and repeat with the third and fourth columns.  Sew the remaining five blocks together in one column.  Then sew all three units together, and voila!  Your quilt top is assembled!  You may want to stitch all around the edges to secure your seams, but that is completely up to you.  I usually only do that if I plan to take pictures of it outside, where the wind will tend to open up those seams.  


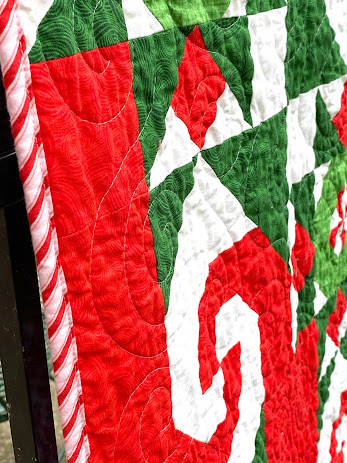
Next up, the dreaded "quilt as desired"!  I thought about it long and hard and finally decided to just use a simple swirl pattern with a sharp point in the center of the swirl instead of a rounded edge.  It takes a little longer but it reminds me of peppermints for some reason!


Find a pretty backing fabric - in this case, I used a perennial favorite from Joann's, because hey, it's peppermints!


And just to add to the peppermint goodness, how about a peppermint twist binding, already printed on the bias so I didn't have to go to the hassle of making bias binding?  I bought a bunch of this when I was on vacation because I loved it so much!!

I hope you've enjoyed this quilt-along - I certainly have!  I'm going to enjoy my own version of Peppermint Twist for many years to come, I'm sure.  And I may just be writing this design up in pattern format rather than tutorial format in the future, if time allows.  We shall see!

*&*&*&*&*&*&*

And now it's your turn to spread some Christmas joy!  Dust off an old Christmas post and share it with us!  Because you can never have too many great ideas, can you?  And try to take a few minutes to visit at least a few of the blogs that link up and let them know you were there - that brings a lot of joy to folks, too!

Hugs!

Sarah

Saturday, July 24, 2021

12 Days of Christmas in July Blog Hop and Quiltalong, Day 11!

Hi, all!

Day 11 of the 12 Days of Christmas in July Blog Hop has rolled around and I'm loaded chock full of wonderful new ideas!  So much great inspiration has been shared, so be sure to check out any posts you may have missed.  Today Joanne of Everyone Deserves a Quilt will be coming back to expand on her earlier table runner post, showing you how to turn the same blocks into a quilt.  And we'll be assembling the second set of blocks for Peppermint Twist.  Looks like it's quilt day!

Good ideas abound whenever we think of Christmas, and tomorrow I'll be giving you a chance to share some of your own.  We'll have a linky party where you can also link up a Christmas post if you want.  It can be a link to an old post if you want - no worries there!  Because after all, the more the merrier!!

And here's the schedule for the rest of the hop...

Wednesday, July 14th

Thursday, July 15th

Friday, July 16th
Jamie of L'Fair Quilts

Saturday, July 17th

Sunday, July 18th

Monday, July 19th

Tuesday, July 20th

Wednesday, July 21st

Thursday, July 22nd
Sandra of MMM Quilts

Friday, July 23rd

Saturday, July 24th
Joanne of Everyone Deserves a Quilt (Part 2)

Sunday, July 25th


*&*&*&*&*&*&*


All right, folks, let's get this block assembled!  Grab that last set of fabric pieces, labeled 2:A, and separate the white and red squares.  


Lay out your block as shown above, with the white A pieces in the upper left and lower right corners, and the red A pieces in the upper right and lower left corners.  Be sure that the dark green star point bases are against the center square unit (white triangles on the outer edge).


Assemble your block!  I use a technique similar to Bonnie Hunter's quilt webbing technique to put my blocks together - as you can see, my rows are sewn together but connected to the row below by a bit of thread.  This is achieved by laying out the block and sewing the top left piece to the top center piece, then WITHOUT cutting the thread, sew the middle left piece to the middle center piece, then without cutting the thread, sew the bottom left piece to the bottom center piece.  Now go back and repeat the process, sewing the top right piece to the other side of the top center piece, the middle right piece to the other side of the middle center piece, and the bottom right piece to the other side of the bottom center piece.  Now you have all the pieces for one block connected together!  You can either take this one block to the ironing board and press those seams open, or you can assemble all your blocks this way and press the seams all at one time.  It's completely up to you, although by this point in the process, I really want to see what it looks like on the design wall - so I usually press and finish a block and put up as much as I can on the wall so I can see the quilt grow!


Once the seams are pressed you will sew the cross seams, matching seams where needed.  Clip the bits of thread that held the block webbed together and press the seams open.  Voila!  Your Block 2 is finished!


Lay all your blocks out together, starting on the top row with a Block 2 in the upper left corner.  The blocks are arranged 5x5.

Tomorrow we will assemble our blocks into a quilt top!  Are you excited yet?

Hugs!

Sarah

Friday, July 23, 2021

12 Days of Christmas in July Blog Hop and Quiltalong, Day 10!


Hi, all!

We're moving into the double-digit portion of the hop, which means we're almost finished - but there's still plenty more inspiration to come!    Today Carole of From My Carolina Home will be sharing some things to use to decorate your home for the holidays.  I don't know about you, but I can NEVER have enough Christmas decor!  I have some favorite pieces that come out every year, but then I pick and choose from the rest so that it looks a little different each time.  

We'll also be continuing work on the second set of blocks for our Peppermint Twist quilts.  We're getting so close!

And here's the schedule for the rest of the hop...

Wednesday, July 14th

Thursday, July 15th

Friday, July 16th
Jamie of L'Fair Quilts

Saturday, July 17th

Sunday, July 18th

Monday, July 19th

Tuesday, July 20th

Wednesday, July 21st

Thursday, July 22nd
Sandra of MMM Quilts

Friday, July 23rd

Saturday, July 24th
Joanne of Everyone Deserves a Quilt (Part 2)

Sunday, July 25th


*&*&*&*&*&*&*


We're in the home stretch on this set of blocks, folks!   Today we will be finishing up those side red/white/green blocks, an easy-peasy bit of sewing if you've squared up the individual units.  If you still need to finish trimming your blocks, do so now.  


Lay out your blocks in pairs, using one of each of your two types of units as shown.  Pin together along the red triangles, matching the top and bottom diagonal seams carefully.  Sew together (chain piecing is great here!) and press the seams open.  


Now you can lay out the pieces of the block and see how pretty it's going to be.  Tomorrow we'll assemble the blocks, but you've done a lot today, so sit back and take a rest!

Hugs!

Sarah

Thursday, July 22, 2021

12 Days of Christmas in July Blog Hop and Quiltalong, Day 9!


Hi, all!

Do you remember the anticipation you felt for Christmas as a kid?  That feeling that the day would never EVER get there - and yet it was such an exhilarating feeling.  (Does anyone else have the song - or an image of ketchup! - running through their head right now?) I kind of feel that way during this hop as I wait to see what our blog stops have in store for us.  Today we will have two stops to make, and two chances for some serious inspiration!  First stop is Kathy of Kathy's Kwilts and More, and then be sure to stop by Sandra's at MMM Quilts.  I hope you're enjoying the hop so far, but if you haven't yet found that one thing that makes you drop everything and run to the sewing machine, hang on - we've got three more days coming!  And if you're participating in the quilt-along, today we'll be getting closer to finishing the second set of blocks - hooray!

And here's the schedule for the rest of the hop...

Wednesday, July 14th

Thursday, July 15th

Friday, July 16th
Jamie of L'Fair Quilts

Saturday, July 17th

Sunday, July 18th

Monday, July 19th

Tuesday, July 20th

Wednesday, July 21st

Thursday, July 22nd
Sandra of MMM Quilts

Friday, July 23rd

Saturday, July 24th
Joanne of Everyone Deserves a Quilt (Part 2)

Sunday, July 25th


*&*&*&*&*&*&*


Today we will continue working on the units we started yesterday...


If you need to refer back to the instructions, click here.  As you trim up your blocks, separate the two kinds of blocks into separate piles.  With the green triangle in the lower left corner, one kind will have the red triangle on the top, and the other will have it on the side.  By the end of today you should have the sewing completed and most or all of the trimming.  Don't worry - tomorrow will be a much easier day, especially if you have finished all your trimming!  

So get to work - we're almost to the finish line!  

Hugs!

Sarah


Wednesday, July 21, 2021

12 Days of Christmas in July Blog Hop and Quiltalong, Day 8!


Hi, all!

It feels so strange to be thinking about Christmas as I sit here on a lovely summer morning writing this, but Christmas will be here sooner than we think, so let's get a jump on our handcrafted gifts!  This is the eighth day of our 12 Days of Christmas in July blog hop and quiltalong, and I hope you've been seriously inspired already - but there's plenty more to come.  Today we'll be checking in with Leanne of The Devoted Quilter for our daily dose of inspiration, and I am really looking forward to what she has to show us.  We'll also be continuing with the second block in the Peppermint Twist quilt - it's getting so close, I can already start to smell the peppermint!

And here's the schedule for the rest of the hop...

Wednesday, July 14th

Thursday, July 15th

Friday, July 16th
Jamie of L'Fair Quilts

Saturday, July 17th

Sunday, July 18th

Monday, July 19th

Tuesday, July 20th

Wednesday, July 21st

Thursday, July 22nd
Sandra of MMM Quilts

Friday, July 23rd

Saturday, July 24th
Joanne of Everyone Deserves a Quilt (Part 2)

Sunday, July 25th


*&*&*&*&*&*&*


Are you ready to assemble the center of this block?  Let's go!


Lay four of your light green blocks together in a 4-patch block, forming a pinwheel at the center.  Pin the blocks together, carefully matching the diagonals so you have nice crisp points.  Sew and press the seams open.  Make thirteen of these center units.  

Congratulations!  The tricky part of this block is finished!  Hooray!! Now on to the easier parts....

NOTE:  Today is easier sewing, but there's a lot of it.  I've planned for this step to actually spread over two to two and a half days, because it can be a time-consuming step.  I would suggest reading over the instructions, then deciding if you want to make all your blocks today, then trim tomorrow, or make part of your blocks today and trim them, then make and trim the rest tomorrow.  Trimming is my least favorite part (although probably the most necessary for a nice flat block!) so I would split it up.  You may not feel the same, so do what makes you happy!


Take the Block 2:B pieces and lay 52 red triangles on the left and 52 white triangles on the right, short sides together.  (This is half of the triangles you have for this step.)  Chain piece them together and press the seams open.

Now take the other half of your Block 2:B pieces and lay 52 WHITE triangles on the left and 52 RED triangles on the right, short sides together - the exact opposite of the ones you just made.  Chain piece them together and press the seams open.


Now you will be using the Block 2:C pieces (dark green triangles).  


Attach them to the red and white triangles along the long side of the triangle, pinning through the seam to keep it open and centered.  Press the seam open.


And now comes trimming!  Once again, I can't stress enough how important this step is.  Yes, it takes time, and you may not be trimming off much, but every little bit helps make this block turn out beautifully.  You will be squaring these blocks up to 3.5".  The diagonal line on your ruler will help you keep the block nice and square as you trim.  Start with the green triangle in the lower right position, line up the diagonal, and line up the 3.5" mark on top with the line where the red and white triangles come together.  Trim the right and top sides of the block.  Turn the block 180 degrees, line up the sides you just trimmed with the 3.5" marks, and trim the other two sides.     


One thing I do like about trimming?  That pretty pile of color that's left when you finish. Sometimes I just put them in a glass jar and admire them for a while.  When I'm done, I put them outside for the birds to use in their nests.  I have the prettiest bird nests in the neighborhood!


Once we're finished tomorrow, you will have fifty-two of each of these units, and we'll be on the home stretch for this block.  Good work!!

See you then!

Hugs!

Sarah

Tuesday, July 20, 2021

12 Days of Christmas in July Blog Hop and Quiltalong, Day 7!


Hi, all!

Can you believe that we've passed the halfway mark in this year's 12 Days of Christmas in July blog hop and quilt along?  But there's still so much more goodness to come, I know you won't want to miss a single day.  Today Vicki of Vicki's Crafts and Quilting will be sharing with us, and I'm on pins and needles to see what she has to put us in the Christmas spirit.  (Maybe I should have checked my chair to be sure my pincushion wasn't there first, but oh well...)  We'll also be moving on to the next step in the Peppermint Twist quilt-along.  Are you making one, or planning to make it?  I'd love to know!

And here's the schedule for the rest of the hop...

Wednesday, July 14th

Thursday, July 15th

Friday, July 16th
Jamie of L'Fair Quilts

Saturday, July 17th

Sunday, July 18th

Monday, July 19th

Tuesday, July 20th

Wednesday, July 21st

Thursday, July 22nd
Sandra of MMM Quilts

Friday, July 23rd

Saturday, July 24th
Joanne of Everyone Deserves a Quilt (Part 2)

Sunday, July 25th


*&*&*&*&*&*&*


Today we will be completing the green squares for the center of this star block.  The process is very similar to what you did yesterday when you sewed the red/white triangle units to your green square.


Take the 2:F piece, fold it in half and finger press a fold line.  Once again, measure 1 3/4" from the corner opposite the red/white triangle unit on both sides of the block and mark as before.  Pin the 2:F triangle  in place.  At this point, you may wish to take your ruler and be sure that the diagonal line in the red/white triangle unit and the diagonal fold in your white triangle are aligned with the far green corner.  Sew the seam with a scant 1/4" seam.  Check to see that, when folded back, it covers the green corner below it.  Make any necessary adjustments if it doesn't.  Once you are happy with it, trim off the green corner underneath the white triangle and press the seam open.  Repeat for all remaining 51 green squares.


These block units should measure 3.5" square each.  Trim as needed and remove the dog ears if you prefer, although removing them is not strictly necessary.

Lay four of them together and you will see the center of your block come together!  Aren't those little center pinwheels pretty?  Tomorrow we will assemble those centers (although you can do that now if you're not too pooped from persnickety sewing) and start on the red/white/green blocks.  But you're almost finished with the tricky part of this block - congratulations!

And here's a little something to make you smile....


Hugs!

Sarah