Welcome to Day 4 of this year's 12 Days of Christmas in July Blog Hop and quilt-along! If you've just now stumbled onto the Hop, I highly recommend you go back and check out the earlier stops on the Hop - you'll be so inspired! Today Bonnie of In Stitches With Bonnie is up to bat, and I can't wait to see what wonderful deliciousness she has for us. I've also got the next steps in our quilt-along here on this blog today.
And here's the schedule for the rest of the hop...
Wednesday, July 14th
Joy of Days Filled With Joy
Thursday, July 15th
Moira of The Quilted Snail
Friday, July 16th
Jamie of L'Fair Quilts
Saturday, July 17th
Bonnie of In Stitches With Bonnie
Sunday, July 18th
Joanne of Everyone Deserves a Quilt
Monday, July 19th
Kate of Katie Mae Quilts
Shasta of High Road Quilter
Tuesday, July 20th
Vicki of Vicki's Crafts and Quilting
Wednesday, July 21st
Leanne of The Devoted Quilter
Thursday, July 22nd
Kathy of Kathy's Kwilts and More
Sandra of MMM Quilts
Friday, July 23rd
Carole of From My Carolina Home
Saturday, July 24th
Joanne of Everyone Deserves a Quilt (Part 2)
Sunday, July 25th
Karrin of Karrin's Crazy World
*&*&*&*&*&*&*
Today we will be making the center square of this block. This is the core of a snail's trail block, so once you learn to make it, just think of all the fun you can have playing with it! It's not hard, just take your time. Let's go!
Pull out your Block 1:A pieces and arrange them in a 4-patch checkerboard pattern with red in the upper left and lower right corners. Assemble these 4-patch blocks using chain piecing (remember, chain piecing is your friend!) Press the seams open.
Your finished 4-patch block should look like this.
Now take the red 1:B pieces and fold in half, finger-pressing a fold mark as shown.
Be sure, before you start the next step, that your 4-patch block is laid out with a red square in the upper left corner. This is the trick to a snail's trail block - the triangle color you are adding always matches the color of the upper left fabric. Take your triangle and match the fold mark to the seam on the block. Pin in place and sew. Repeat for the other side of the block. Press the seams open.
Just look at that! Nice and neat and going the right direction (don't ask me how I know about going in the wrong direction....)
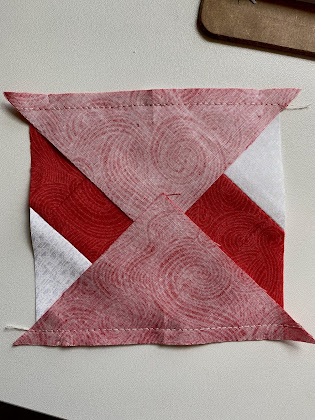
Now you're going to repeat the process with the white 1:B pieces on the other two sides. But before pressing...
...it's a good idea to trim off those little dog ears you see in the upper block. Afterwards, it will look like the lower block in the picture. Press these seams open too. NOTE: You may be wondering why I'm recommending pressing the seams open instead of to one side (my usual method). I found that there were so many seams in both of these blocks that trying to get the seams to match in direction so they nested was almost impossible, plus the multitude of seams meant that there ws a lot of bulk if seams were pressed to one side. This makes for a much flatter block!
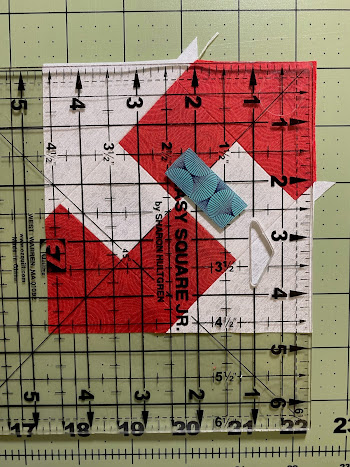
Now for a really important step! Take your block to the cutting mat and lay your ruler on it. You can see here that I lined up the diagonal line with the seam in the 4-patch center, and the 1/4" marks on the side and top with the seam point where the triangles meet. You will trim these two sides of the block, then turn your block 180 degrees and trim the other two sides in the same manner so that there is a 1/4" seam allowance past those points. This will ensure that you don't lose your points in the next round. Lining up the diagonal marking keeps your block square!
For this round, you'll be using the Block 1:C pieces. Lay your block down with the red in the upper left corner, and using the red 1:C pieces, repeat the process from above to add those triangles to the top and bottom of the block. This time you will align your finger-pressed mark with the point where the two triangle seams come together, as shown above.
Stitch both seams. TIP: If you have trouble cutting off or missing your points using a 1/4" seam, flip the block over when sewing and sew with the block side up rather than the triangle side up. This way you can see the point coming and stitch a thread's thickness to the RIGHT of the point. This will keep from cutting off the tip of the point when you press the seam open (and is basically the definition of a scant 1/4" seam!). Press those seams open!
Lay your blocks as shown above and repeat with the white triangles. Trim off the dog ears, press the seams open, and trim the blocks as shown before, ensuring an even 1/4" seam allowance all around.
Set aside in a lovely little pile with your other block components and admire your work!
You're done for the day! Come back tomorrow as we complete Block 1.
Hugs!
Sarah


Thank you so much for the wonderful instructions, Sarah. Looking forward to reading your next post. Happy quilting.
ReplyDeleteI like the extra tips for precision cutting--those are the things that mess up easily and give a sloppy quilt otherwise! thanks!
ReplyDelete