
As you probably already know, I was fortunate enough to attend QuiltCon last week. I signed up for a class called Dynamic Quilts with Solids, taught by Nydia Kehnle. Considering how many solid scraps I have, you can guess that I was really excited! We were instructed to bring about 125 7.5" squares, in at least 25 different colors. Well, I went nuts, pulled everything I could cut a 7.5" square out of, without rhyme or reason, and showed up to class.

This is the class instructor, Nydia Kehnle, and one of her fabulous quilts! We spent the morning making a bajillion half square triangles, then worked on laying them out with her guidance. Alas, I had too many colors with no connection between them to work well. I learned that I should have spent more time researching the type of quilts she made to get a better idea of what colors I needed to bring!
But that meant that I had a lot of HSTs to use up and no plan for them. I tried laying them out as HSTs at home, but found the they really didn't "flow" like I wanted them to. So I tried them as hourglass blocks, and that was ok, but no "pop". What to do?

After staring at this for a while, I decided to do something drastic - I cut it up! After all, somebody had to take the plunge to make the first disappearing nine-patch, right? So here goes...

I cut on either side of the diagonal centers, breaking the block into nine patches.

Then I rotated the center a quarter turn clockwise. Next, I took the top left corner and the bottom right corners and switched their positions, and did the same with the other two corners.
Once it was sewn back together and trimmed, this is the result! I posted a picture on Instagram, and got some really good feedback, so I'm going to provide a more specific tutorial below. For the tutorial, I used 10" squares - a layer cake that was gifted to me a while ago, so I'm happy to be giving it a chance at quilt-y life!
The first step is to make your HSTs. I would suggest pairing up your pieces to give good contrast for this block. Once completed, press the seams to the dark side. Pair them up to make the hourglass blocks, being sure to use four different colors in each one.

Lay the two HSTs right sides together, with the two seams nesting into each other. Place your ruler from one corner to the other, crossing the seam line.

Line up one of the inch markers with the seam line as shown above to ensure that your ruler is perpendicular to the seam. Make a line from one corner to the other.

Pin across the seam in the center to hold the seam in place, then stitch 1/4" from the line on both sides. Cut on the line, then press the seams, spinning the centers, on both hourglass blocks. Each pair of HSTs will yield two very similar hourglass blocks.

Once you have made and pressed all your hourglass blocks, turn them over so you can see the back sides. Each pair of near-identical blocks will "spin" in a different directions. Make two piles, one spinning clockwise and one spinning counter-clockwise.

Now it's time to square up those blocks! Starting with 10" squares, I found that these hourglass blocks squared up to 9". Depending on what size you begin with, yours may square up smaller or larger.

Being sure to use blocks that all spin the same direction, choose four to put together into a four-patch hourglass block. Assemble the block. Press it carefully, spinning the seams around the center.
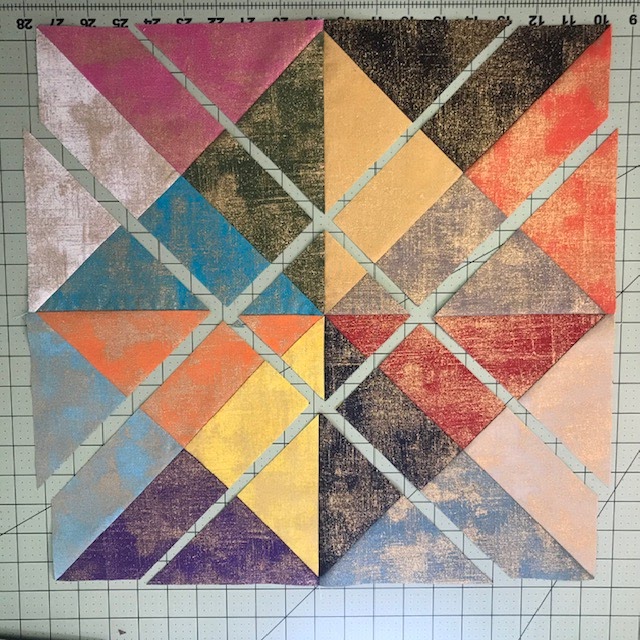
Now it's time to cut it up. Be careful! For this size block, I chose to measure 2" from the center diagonals. How far you cut is up to you! Rotate the center 1/4 turn clockwise, swap the upper right and lower left corners, and swap the upper left and lower right corners. NOTE: If you aren't happy with the way the colors align, feel free to move things around until you are pleased with the layout. I had to do that on one of my smaller blocks, and it worked out just fine!

Sew the rows together on the diagonal, carefully matching the seams. The corners will be longer than the sides - don't worry, it will be trimmed later! Sew the three rows together, once again carefully matching the seams. Square the block up, cutting off the corners that extend beyond the top, bottom and side seams. This particular block, which began from 10" squares, squared up at 16".

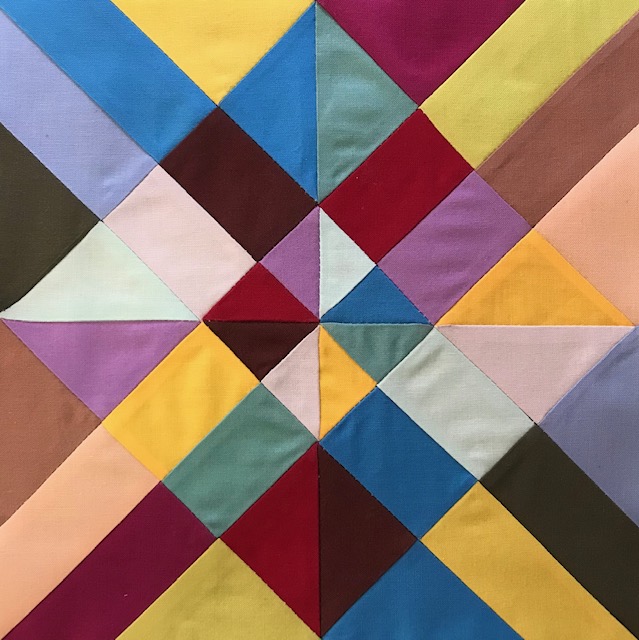
And there's your finished block - a disappearing hourglass block! I really wanted to know what it would look like when placed with others like it - what secondary patterns would appear.

Here you can see the one larger block, next to four of the smaller ones made from my class HSTs. In the on-point layout, the crosses are more visible, and in the horizontal layout below, the squares seem to show up better.

It's going to be fun to play with this block! I'm also interested to see what it looks like in prints - but that's for another day, as I have some quilting I must get to now.
Let me know if you give this a try (particularly if you don't understand something or find a better way to do something!) I'd love to see what you come up with!
Hugs!
Sarah
I love it !! But my guess is that "prints" would only add to the busyness of the block. In only solids it is a busy block with no place for the eye to rest. Good for some of us, bad for others
ReplyDeleteThanks for sharing your projects with us. I am waiting for more of your work! Your blog is very inspiring to me. I like to browse your blog.
ReplyDeletegreat idea and terrific result...i love working with solids...
ReplyDeleteVery creative!!
ReplyDeleteI wondered how you did it. This is amazing. Definitely have to try this. Well done!!
ReplyDeleteLove your variation, Sarah! This block inspires us to be fearless and try something else if what we're doing isn't working.
ReplyDeleteI agree, sometimes we need a nudge to try something a bit different.
DeleteI really like how you played with this block and the block you came up with - really neat
ReplyDeleteThis is brilliant, Sarah! When I saw it on FB, I thought you were making an Arrowhead block, but now I see the difference. How fun!
ReplyDeleteGreat block, especially effective with the softer mottled fabrics.
ReplyDeleteThis is awesome Sarah...you've got my fingers itching to give this a try! I'll post a pic on IG if I do!! :-D
ReplyDeleteLove it. That larger block looks like a marble design.
ReplyDeleteMind blown! Love it!
ReplyDeleteLooks like fun, a great block!
ReplyDeleteGenius! The colors sparkle like facets. Looking forward to see what you do with this concept!
ReplyDeleteThat is dynamite! I love the way it looks and you will have tons of fun with this experiment!
ReplyDeleteThat's absolutely brilliant, well done it looks fabulous
ReplyDeleteThis looks awesome! Making my first disappearing nine patch block and quilt was really inspiring to me. After being given permission to cut up blocks that I didn't like, I no longer simply packed up those unfortunate block-piecing mistakes and set them aside thinking that they'd transform themselves into pretty and usable blocks. I started slicing and dicing and sewing again. Of course some blocks didn't work that way either, but that was ok. I decided those were learning experiences and I didn't feel so bad when they got thrown away. I've only worked with these type blocks in solids one time and I liked those results, but I love your results! I guess it's time to pull out that tub of solids and get busy. Thanks for the inspiration. :-)
ReplyDeleteBeautiful! I’m eagerly looking forward to watching this quilt grow.
ReplyDeleteWow! You know how to turn disaster into desirable! I'm floored. This block is so cool. I love that you made more to see the second design appear. In the horizontal layout (which I prefer), the squares show up better but also there's a 3D "trellis" or "cross" that appears. I'm so in love with this. Yes, I will give it a try when I find my box of solids. Not convinced it will look good with prints, unless they are tone on tone prints. Thanks for sharing this. Oh yes, (your blocks are so awesome that I almost forgot the first picture) I love what Nydia did too. ;^)
ReplyDeleteOMG! That is SEW totally awesome!!!
ReplyDeleteI'm so sorry you weren't armed with quite the right thing for your class, but it looks like you weren't slowed down much. Good creative thinking!
ReplyDeleteOmg I love this, I will have to rethink all those failed quilt or honor blocks from last year..
ReplyDeleteGenius! From dud to darling is quite a journey! Kudos!
ReplyDeleteI won a layer cake of solids recently and I want to try this block RIGHT NOW! If I'm doing the math correctly, each 16" block uses the equivalent of 4 layer cake squares, so a pack of 40 would make 10 of the final blocks. 9 of those would make a nicely sized square baby quilt about 46" on a side.
ReplyDeleteNot sure I followed all the spinning, but sure love the outcome. I guess I would need to actually do one to really understand what you have done. Nancy A: rangerer@sbcglobal.net
ReplyDeleteI agree about the spinning it seems that the original blocks she cut in half didn’t both go into the same final block. So it wove in a second block. The turning 1/4 clock wise and counter clockwise I am lost. How do you decide which blocks start next to each other to turn?
DeleteI LOVE this Sarah!! What size HSTs did you start with? Thank you for sharing how you did it. I'm definitely going to give this a try!!
ReplyDeleteLove this quilt. Fairly new to quilting and would like to know the name of this fabric (kinda like grunge??) Would like to order a layer cake, any suggestions where to purchase? Thanks
ReplyDeleteLove this quilt. Fairly new to quilting and would like to know the name of this fabric (kinda like grunge??) Would like to order a layer cake, any suggestions where to purchase? Thanks, Linda
ReplyDeleteI don't quite understand what you mean by 'some blocks spin clockwise, others, counterclockwise' - How do you determine which way it's 'spinning?'
ReplyDeleteSame here
DeleteProvided you have pressed seams towards the darker fabric, in some blocks you will see (when you look at the wrong side) that the seams all go to the right. That would be clockwise. Other blocks will have seams that go to the left (counterclockwise). I hope this helps.
Deletefor me, it looks BEST in the grunge. The solid Kona is too stark and unforgiving. I think it will look best in blended fabrics...
ReplyDeleteThe very center, is that where you use the with your seems? It seems as though the center will be extremely thick and raised. Help lol
ReplyDeleteI really really like this idea and the tutorial! Thanks for Sharing!
ReplyDeleteGreat idea! Please send me a PDF of this pattern to donna.pratt@att.net. Thanks so much!
ReplyDeleteDonna
What a great idea! And your explanation is very clear. Thanks for sharing!
ReplyDeleteThank you, such a good idea :) I have been looking for an idea for a Marathon quilting Sunday, and here it's come :) Now I just have to find my fabrics.
ReplyDeleteWhen I first looked at the block after you had cut it, I thought you had put about 1/2" gray strips in between the cuts and I thought that looked great!
ReplyDeleteCongrats Sarah! This block is stunning, and I simply love disappearing blocks! I'm going to make some of my own and I'll be teaching other women to do so as well< Thanks a lot for the inspiration! Oh, by the way, I'm Sonia from Brazil!
ReplyDeleteI love this! I have some solids to try this with.
ReplyDeleteYou know how people put their hand to their head and say "POOF" Yep my head exploded. I probably couldn't make a decent pot holder with the lack of solids I have but the willing to bite the bullet and go get some! It is definitely next on the board. Thanks from Chicago!
ReplyDeleteWhen I try to sew my 9 patches back together to make the finished block, my seams no longer nest. Did I do something wrong? All 4 of my blocks spun clockwise, so I know I sewed the correct hourglass blocks together. Help!
ReplyDeleteI am having fun with disappearing 9 blocks! So many different ways to cut them up and reassemble. Thank you for sharing.
ReplyDeleteLove the block. Can you send a PDF of this block to bstephens8909@gmail.com
ReplyDeleteYour blocks and instructions are awesome! Thanks for this. If you have a pdf I would love one at mjcline18@gmail.com
ReplyDeleteI love this idea. I’ve been looking for a block that I can make from a stack of scrap solids and this looks perfect. Please send a PDF to ros23quilt@gmail.com
ReplyDelete