Today's "Charmed, I'm Sure" tutorial is a two-for-one! You'll understand that better further on, but for right now, let's start with a block tutorial. Once again, it's an oldie but a goodie, and one that has had a resurgence lately - the economy block, which is also known as a square-in-a-square.
This is a fun little block, and one that lends itself well to our theme of 5" squares. All of the pieces for this block are cut from five 5" squares.
Here's what you'll need:
1 4.5" square for the center. This is a good place to fussy cut!
2 4" squares cut on the diagonal for the inner triangles
2 5" squares cut on the diagonal for the outer triangles
So dig into those stacks of 5" squares you have on hand (come on, you know you do - we all do!) and try making one!
After you have cut your pieces, take your center square and make a pinch mark at the halfway point on two opposing sides. (You could do all four sides, but when you press the first two triangles, you'll probably iron out the creases you haven't used yet - something I found out after taking this picture!)
Fold one of your center triangles in half and make a pinch mark, then line it up with a pinch mark on the center square. You may want to pin at this point.
Now sew the triangle to the square. I found that by making this a very scant 1/4" seam (as you can see above, I used the side of my presser foot to determine the seam width) I had plenty of trimming room. This was only for the first set of seams, as you'll see below.
Next, pin on the triangle on the opposite side and stitch. Press the seams on these two triangles out toward the triangles. Repeat the process for the other two sides.
Now, to reduce bulk, trim off those little dog ears! Press the seams out towards the triangles.
And this is a VERY important step - trim up that block! At this stage, your block should be trimmed to 6 1/4" square.
Yes, I know that's an odd measurement, but it's really pretty easy to achieve. Line up the 3 1/8" mark with the points of the triangles on the corners, AND line up the 1/4" mark too! That will ensure that you have a 1/4" seam on each side (you don't want to lose those pretty points!) and that your block is square.
Now you will repeat the process to attach the outer triangles, lining up the pinch mark on your triangles with the point of the triangle on the block. I suggest sewing these on from the block side rather than the new triangle side, so you can see the seam intersection of the triangle on the block. AND as you can see from the picture above, I had to make my seam a true quarter inch to get those points perfect (ok, maybe not perfect, but pretty darn good!) It's the little things, folks!
This time you'll trim your block to 8 1/2", which means you'll line up the 4 1/4" mark AND the 1/4" mark on each triangle point. And voila! You have a beautiful economy block! And that little pile of scraps at the bottom corner is all you'll have left of those five charm squares. I call that a win!
These are quick and easy blocks - I actually found that picking the fabrics took longer than making them! But if, like me, you are short on time, you may find that you don't have time to make enough for a whole quilt - and now you'll find out about that two-for-one I talked about....
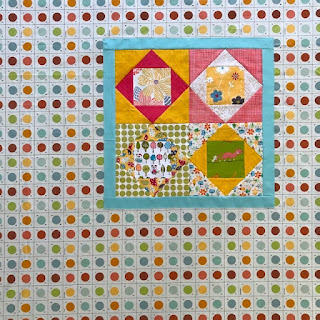
With only four blocks and the need to have a quilt top to show off this week, I had to do some quick thinking. Looking in my stash, I found a fun piece of material that had been sitting there for too long. The colors looked wonderful with the four economy blocks I had made already, so I decided on a quick fix.
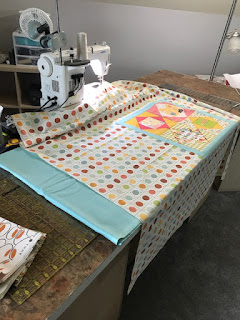
Bordering the blocks with some teal (that I also had in my stash) to set them off a bit, I appliquéd them to this piece, because I couldn't figure out a way to piece them in and maintain the symmetry of the background. With a different piece, it would have been simpler to piece them in, but oh well!
Then it was on to borders to make it large enough for a top. I had several options in my stash (hooray for stash!)...
Simple, but effective! Quick, too, plus it has the advantage of using up both scraps and stash. You could also use this technique with some of those orphan blocks we all have stashed away - that quilt you started, then found out you absolutely hated making the blocks? Or the UFO you have tucked away and have fallen out of love with. Whatever your story, I bet you've got something you could use this technique on to make a quilt that will bring love and comfort to someone in need!
 |
| FYI, this quilt finished up at about 56" x 60" - perfect lap size! |
So that's this week's two-for-one tutorial! Many thanks to Amy Smart of Diary of a Quilter for teaching me how to make a great and easy economy block in her tutorial - I don't know what I would have done without Amy this year!
Now tell me - what blocks have you got stashed away that you could turn into a quick comfort quilt?
Hugs!
Sarah


Thank you Sarah. This is great! I love that you showed all the "Mathy" measuring stuff. When I have to figure it out on my own, it usually adds more frown lines to my face.
ReplyDeleteThis comment has been removed by the author.
ReplyDeleteSweet! I love the economy block...and that circle fabric too :-)
ReplyDeleteWhat a fantastic idea for making a quick quilt! Love it!
ReplyDeleteClever use for those charms!
ReplyDeleteAwesome solution for a fast finish, Sarah!!
ReplyDeleteOK, tell me why this idea has never occurred to me?? So simple and brilliant! I happen to have not one, not two, but THREE little groups of blocks sewn together into pieces not large enough for an entire quilt. Giant borders are the answer!! Thank you thank you!! :)
ReplyDeleteGood use of aqua blue, white and dark shades. Thanks for the detailed instruction. There were helpful and I could follow each step. Using up trash fabrics this way is quite creative. Avoid so much waste from home and they are put to good use. Will wait for more useful tips.
ReplyDeleteI love to stitch and keep trying a lot of crafts using fabric. I came across your blog and was impressed to see your creativity. Some of my students have even started to work on your crafts. They enjoy doing crafts work. Keep posting more craftwork.
ReplyDelete