
![]()
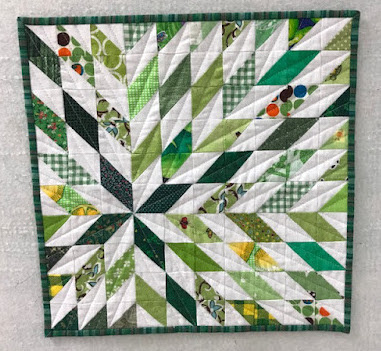
We have arrived at the last week of this year's tutorial series, and I've saved the best for last - Supernova! This quilt has, hands-down, been my most popular. I have pictures of the design made by so many people from Instagram and each is wonderfully unique! I've personally made it at least six times, including a mini version using bonus triangles from another project....
The trick to making this quilt a wonderful experience for yourself is to take the time to square up your half-square triangles. I know it's a hassle, but you will be so happy with the way your quilt finishes that it's totally worth taking the time.

I highly recommend getting a Bloc-Loc ruler if you don't already have one - it makes the whole process of squaring up those HSTs so quick and simple. I have two - a 6.5" and a 12.5" - and I've never had an HST block I couldn't simply square up using one of those two. I'll admit that the 12.5" was an indulgence, but I wanted to make a Moda Love quilt using 10" squares and I was spoiled by my smaller Bloc Loc ruler!

And honestly, isn't that pile of trimmings pretty? Such a nice sign that you've been virtuous!
So - - - are you ready to make one of your own? Here's how!
*&*&*&*&*&*&*
“Supernova”
A Stunning Stars Quilt-Along Quilt

This is a very simple one-block quilt; its secret lies in the layout.
Finished size: approximately 60” x 60”
FABRIC REQUIREMENTS:
1 3/4 - 2 yards of background fabric
2 yards (or equivalent) of print fabric; this could be yardage, fat quarters, or scraps. There are 50 diamond shapes in the quilt, so you could use up to 50 different fabrics.
CUTTING DIRECTIONS:
From the background fabric, cut fifty 7” squares.
Take your print fabrics and choose one that will become the focal star. From that fabric, cut four 7” squares. From the remainder of your print fabrics, cut forty-six 7” squares for a total of 50 squares.
MAKING THE BLOCKS:
Take your background squares and draw a line from one corner diagonally across the square on the back of the fabric using a pencil or Hera marker. Pair one background square with one print square, right sides together.

Using the traditional method, make your half-square triangles (HSTs), stitching slightly less than 1/4" from each side of the center diagonal line. You will have 50 sets of two matching HSTs. Trim your HSTs to 6.5” square. Don’t skip this step - it will make your quilt go together faster and look better!
Locate your eight focal star HSTs to start your layout.
LAYOUT:
To get a similar look to the finished quilt shown above, use the diagram below to lay out your blocks. (NOTE: The orange quilt shown in this post has more blocks than this quilt tutorial calls for. Don’t use that finished quilt as your layout guide!)

Start with the focal point star in the lower left quadrant, and work out from the star. Step back often and check to see that your diamonds are going the right direction! Fill in the gaps at the upper right and lower left edges with half diamonds, splitting up some of your pairs for the purpose. Assemble the quilt top. Quilt as desired!

*&*&*&*&*&*&*
And just so you can see some of the beautiful variations that this quilt can take...


And here's a peek at the beautiful backing I found for this year's version of Supernova...

If you make a Supernova quilt, please tag me on Instagram (@fabricaddictquilts) and use the hashtag #supernova. I love seeing them pop up - the variations are fabulous!!
*&*&*&*&*&*&*
And that's the last of the tutorials for Something Old, Something New. I hope you've enjoyed these, and found one or more to add to your repertoire of quick, easy quilts! Stay tuned in the coming weeks for the beginning of this year's Hands2Help Comfort Quilt Challenge!
Hugs!
Sarah
Fabulous! Thank you. I look forward to making a couple.
ReplyDeleteSupernova has been on my bucket list for ages. Maybe this will be the year for it. I really love the orange version.
ReplyDeleteYes! This is perfect timing to get me going in the studio!
ReplyDeleteLove this! Thanks for the tutorial. Another one for my list!
ReplyDeleteIt looks great in rainbow colours. I get bags of scraps from friends and once I received a whole bag of triangles from a quilt in reds and black. I started piecing them and trimming them down. Some were bigger so I ended up with 1.5 and 2" HSTs. I did two Supernova, finishing at 10.5" and 13" respectively. I might make a big one someday. Thanks for the inspiration. ;^)
ReplyDeleteI've made this a couple of times now since you originally shared it. And yes, it was fun to make and lovely :-) Thank you for sharing it again. I love those Bloc Loc rulers too :-)
ReplyDeleteI've just started making the modern irish chain... but now I wanna make this one too!!! Ugh, you're such an enabler! LOL❤ I think I want to make this in a single colorway, I'll have to see which color I have the most on hand! Thanks!!!
ReplyDeleteWhat a super-fun quilt!! I love all of the color variations that you shared! I generally use Triangles on a roll for my HSTs and I don’t need to trim as they come out the correct size. But, in instances that I am unable to use the Triangles on a roll, I’ve used BlocLoc and I love that method too =)
ReplyDeleteThis is Annie/rubyslipperz =P
DeleteI didn't even know that they made a 12.5" bloclock. I'm on my 2nd 6.5" one (first one fell and broke off a corner)
ReplyDeleteI LOVE the Quilt in a Day Triangle Square Up Ruler. It is laid on the block BEFORE opening it up, so it takes only 2 strokes to trim all 4 sides! (It comes in 3 sizes; I use the 6.5".)
ReplyDeleteThank you for your great tutorial for a great quilt!
ReplyDeleteI've always loved this design, Sarah!! Each version looks amazing!
ReplyDelete