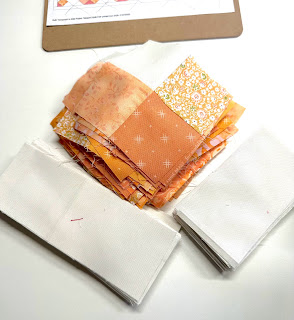
White (or other) background fabric: two yards or slightly more if you want to add a border or binding. If you are binding with the same color as your background, you could eliminate a border and have a slightly smaller quilt.
Print fabric: about one yard total of at least three different fabrics. This is a good design to use up scraps in one or more color families!
Cutting Instructions:
From your background fabric, cut
61 2.5" squares
61 2.5"x4.5" rectangles
61 2.5"x6.5" rectangles
Border or binding strips as preferred
From your print fabrics, cut
183 2.5" squares
*&*&*&*&*&*
This quilt is a great one for speed piecing! We're going to start with the four-patch blocks that create the hearts. Take 61 of your print 2.5" squares and the 61 white (background) 2.5" squares and chain piece them in pairs, one of each.
It will make your pressing faster if you always put the same on top of your pair as you feed it through your sewing machine - either the print squares or your background squares. If you're new to quilting and don't know what chain piecing is, it's simple - you simply feed one pair after another through your machine, sewing them together without cutting the thread after each pair. When you finish, you'll have a long "chain" of pieces sewn together!
Take that chain of pairs and press them, with the seams towards the print (darker) pieces. Cut the thread between each pair and set them aside for later.
Repeat the process with the remaining 2.5" print squares, sewing them together in pairs. The only guideline here is to not use two of the same squares!
Now taking your two different sets of pairs, choose one of each and nest the seams together. Sew the long side of the two pairs. Repeat until you have 61 four-patch blocks, each with one white (background) and three print squares. Press the seams to one side away from the white square.
Quick and easy, right? So's the next couple of steps!
Now laying your block on your worktable on-point again, take one of the 2.5"x6.5" rectangles and place it against the lower left side of the block. Sew it to the block.
Take your completed string of blocks, and lay them on your ironing board like this:
"On-point" quilts are sewn together on the diagonal. In this layout, you will have one block in the upper left corner. Leave it alone, and pick up the three blocks in the next diagonal row. Sew them together and return them to the layout. Repeat for each diagonal row across the quilt to the lower right corner.
Now you will sew your rows together. Remember to match from the center of each row of blocks out. The sides and top of your quilt top will be jagged. Those will be trimmed later to make the quilt square. Match your seams carefully so that it all lines up nicely!
Once your top is completely assembled, take it to your cutting board and lay it very flat. If you have a large square ruler, lay it in the corner, lining up the 1/4" mark on two sides with the intersection of the seams as shown above. This will ensure that you have a 1/4" seam and your points will be nice and neat!
Trim your corners, then using a long ruler, line up the remaining points against the 1/4" line of your ruler and trim away the edge portions of block that are outside that 1/4" seam line. Yes it looks like a lot of waste, but it is quicker and easier than setting blocks, and allows the quilt design to go all the way to the edges. It is a design choice! And just think of all the fun you'll have trying to figure out a way to use those bits you are cutting away!
Once your quilt is trimmed all the way around, you can either add a border or plan to bind in the background color. Either way, it will not show if you have accidentally cut off a block point! (oh, the tricks we learn!)
Once finished, you will have a 42"-44" square quilt, perfect for that new arrival or as a comfort quilt for a small child. And it will be one that reminds them that they are loved!
*&*&*&*&*&*
I hope you enjoy this sweet little quilt as much as I enjoyed making it! It really does work up quickly, and can be done in a variety of fabrics. I'm kind of interested to see what it would look like with a dark solid background and a variety of white-on-white prints as the hearts!
Thanks or joining me today, and I hope to see you next week with another "old friend" design!
Hugs!
Sarah


Sweet quilt and great tutorial, Sarah. Thank you!
ReplyDeleteWonderful tutorial and you are right it would be a fun one to make and go quickly once you start! The old friend designs are just perfect. Not sure what I am making this year, but I have a few candidates for H2H!
ReplyDeleteThank you for sharing another great, quick quilt.
ReplyDeleteWhat a sweet, quick quilt! This looks perfect for my little group to make to donate. Thank you!
ReplyDeleteAdorable quilt. Thanks for the tutorial.
ReplyDeleteVery daring to cut the hearts instead of adding setting triangles!!!! This quilt has so many possibilities! Great job!
ReplyDeleteBeautiful quilt and great tutorial!!
ReplyDeleteSuper sweet quilt! Thanks for sharing the directions, Sarah!
ReplyDelete