Monday, October 30, 2017

Make-A-List Monday - Buckling Down!

Hi, all!

After spending a beautiful long weekend in Asheville celebrating my birthday, I'm back home and ready to buckle down to work - because Christmas is coming faster than fast!  

Let's take a look at how last week's list went...

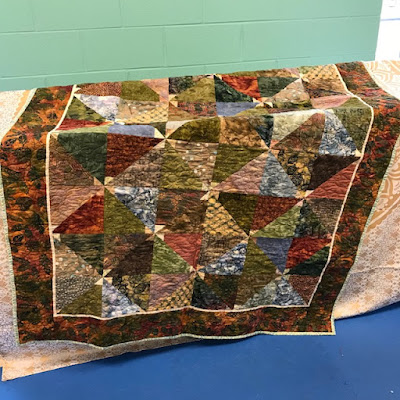
1.  Work on Emmy's annual quilt.
Well in progress!  Here's a picture of how it stands today...


I think I'm about halfway through piecing the top.

2.  Finish up the thank you notes for A Heart For Texas.
Honestly, I meant to take these with me on our trip and address envelopes in the car - but of course, I forgot to pick them up!

3.  Work on hand quilting my Long Time Gone quilt.
However, I did get some good quilting time in on this!  I am loving the way the hand quilting is making it look!


4.  Make the next blocks for my Gypsy Wife quilt.
Done!  These are the pinwheel filler blocks...


5.  Keep up with any quilt ministry needs that come up.
Done!  We did give away two quilts on Sunday, but one of the ministry members took care of it because I was out of town, so I don't have pictures yet.  I'll post about them next week!


So all in all, not a bad week.  I wish I had remembered the thank you notes - that long car ride would have been great time to knock those out - but it was a good productive week!

And here's what I've got on my plate for this week...

1.  Keep working on Emmy's annual quilt.

2.  Meet with a friend about quilting the quilt top her great-grandmother made.

3.  Finish the thank-you notes for A Heart For Texas.

4.  Bind a quilt for the quilt ministry.

5.  Make the next set of blocks for my Gypsy Wife quilt.

6.  Continue hand-quilting my Long Time Gone quilt.

7.  Keep up with any quilt ministry needs that come up.

I'm sure there's more that needs doing but at the moment I can't think of those things... but I'll add them to my action board as I remember them!

So now the question is - - - what are YOU working on this week?

Hugs!

Sarah

Friday, October 27, 2017

Can I Get A Whoop Whoop? I Hear Those Sleigh Bells...

Hi, all!

Well, Friday has rolled around once again, and you know what that means - it's time to get our whoop whoop on!  Now, I know that since we are now officially less than two months away from Christmas, it may start to get hard to show what you're whooping about, but try - those whoops can give you the will to press on, you know!

This week, I'm whooping about getting a great start on the grandkids' annual quilts!  For those of you who haven't been around the blog for long, each year I make each of my grandkids a quilt for Christmas.  I try to make it reminiscent of their past year - reflecting something they really liked that year, for example - and I put a label on the back that tells a little bit about their year.  Kind of like a memory book.  My daughter wishes they were memory books - they'd be easier to store - but my philosophy is that they won't have to buy quilts when they finally move out on their own!


This will be Nathanael's quilt this year - a giant plus quilt!  Those squares each finish out at 8", which made this a really quick quilt to make.  I started cutting after lunch on Sunday and had it completely pieced before suppertime!


Here you can see the superhero sheet which was the color inspiration and will become the back of the quilt.  Nathanael is all about superheroes, so he should love it!  His quilt is twin-sized, because he doesn't have the stash of bed-size quilts his sisters have. Special request from mom so she didn't have to put a "girlie" quilt on his bed if it got messed up in the night....


And Emmy's quilt, which is taking significantly longer to piece, is at least well-begun!  I love these "under-the-sea" fabrics, and those mermaids are to die for!  I love that they're not childish, so this quilt can grow up with her.


Lilli's quilt, unfortunately, is still a bag of blue scraps, but I do have a plan and it should be fairly easy to pull together once Emmy's is finished.

But wait - - - there's more to whoop about!  Have you seen #getyourquiltywishesgranted3 on Instagram?  I happened to come across someone who was wishing for Christmas fabric scraps, and since I had a box full of scraps I've been trying to use up for years, it seemed like a match made in heaven!  So this happened today...


I am doing a serious happy dance here, because that's the first time I've ever had an empty stash of Christmas fabric scraps!  And after making all those pillow cases, the yardage is seriously minimized now too.  That means that if a new Christmas line comes out that I love, I can buy some without guilt!  Whoop Whoop Whoop!!!

And that's what I'm happy dancing about today!  
Can I get a whoop whoop?

*&*&*&*&*&*&*

And now it's your turn!

What's got you whooping today?


What's making you do a little happy dance?

Share!  We want to dance right along with you,

And it's always more fun to dance with friends!

The party will stay open until Sunday midnight.

Hope to see you there!

Hugs!

Sarah

Wednesday, October 25, 2017

I May Have A Scrap Problem... Binding Wars!

Hi, all!

I have to confess that Wednesday snuck up on me this week - I was so proud of having an honest-to-God scrappy sewing success, I completely forgot to make my Gypsy Wife blocks this week!  Of course, working on Emmy's annual quilt was distracting me too, but I'm usually better at remembering than this.  Oh well - I'll try to get them done before Friday, and that will give me something to post about then!

In the meantime, I really did have a scrappy sewing success this week!  I quilted a vintage quilt top for a friend, and decided to finish it off with a scrappy binding.  I may have mentioned before that I store my binding leftovers in a plastic shoebox, after measuring each one, rolling it up and pinning it with a post-it note with the length on it.  Everything is placed in nice neat rows in the shoebox, and it is very easy to pull enough for a binding by adding up the lengths on each one until I have enough.


This system really works for me - I went from having an unusable pile of bindings all tangled up together to having easily accessible and useful items.  But this time when I looked at the box, it was really full - even after I pulled enough to find that vintage quilt!  So I decided to pull out all the solids and make a jelly roll style quilt.


To make this quilt, I added squares of the chinese red, a color that didn't appear anywhere in my pile of solid binding scraps.  I gathered my binding strips and cut any that were more than 30" long or so into multiple pieces, just to get a wide variety.  I had a lot of black, so I placed it every third strip.  Then I started sewing the strips together, with a red square between each one.  And I pressed - between every step - and trimmed threads as I went.  (I find that these quilts are remarkably good at having threads peek out from the seams!)

Now I have a question for you - should I add a border to this?  I have enough black to add a 5" border all around which will bring it to about 58"x70", or leave it as is?  I'm undecided.  I have enough of the deep red left to bind the quilt, and I think that will tie the red blocks in nicely.

FYI, I used this technique in the past to diminish my solid binding leftovers - here's how that one turned out...


It always amazes me how "artful" these quilts look, even though they are completely random.   And it really makes a dent in the binding stash!

So that's my scrappy victory for the week!   Have you been working through your scraps this week?  I'd love to hear what you've been doing!

Hugs!

Sarah

PS Do you realize that Christmas is two months from today?? EEK!!!

Monday, October 23, 2017

Make-A-List Monday - Winter Is Coming!

Hi, all!

Well, fall has "done fell" here in Middle Tennessee!  We had some vicious winds, rain, and cooler weather today - I actually jumped out of my skin when a large branch came down on the roof and made a heck of a racket as it proceeded to the ground.  When I walked outside I realized that it really was fall - it smells different, have you noticed?  And that reminded me that winter (and Christmas) is just around the corner!  Time to get busy!

Here's how last week went....


1.  Finish the t-shirt quilt and deliver.
Done!  It turned out really nice and she loved it! 


2.  Make another pillow cover - a match for one we sold this weekend (the customer wanted a pair!)
Done!  It took a little creative piecing (I was a little short on the matching backing) but it looks great!


3.  And make one more pillow cover, a special request for a customer!
Done! I had a lot of fun with the quilting on this one - it basically creates the design.

4.  Quilt a vintage quilt top for a customer.
Done!  This top was in pretty good shape - I think it dates from the late 50's, early 60's.  I've got another one for the same customer that is older and will need a good bit of repair work before I can finish it.


5.  Cut out Nathanael's annual quilt.
Done - and not only cut out, but pieced!


6.  Keep up with any quilt ministry needs that come up.
It was a quiet week, with no quilt requests.  Gives us a chance to catch up!


Happy happy joy joy! I got everything on the list done!  And I even finished one other thing, but I'll share that on Wednesday...

And here's my list for this week...

1.  Work on Emmy's annual quilt.

2.  Finish up the thank you notes for A Heart For Texas.

3.  Work on hand quilting my Long Time Gone quilt.

4.  Make the next blocks for my Gypsy Wife quilt.

5.  Keep up with any quilt ministry needs that come up.

Short list this week, but I've got a short week - we're going to spend a long weekend in Asheville to celebrate my birthday!  I'm hoping for gorgeous fall color in the mountains and lots of fun and good food.  

So now, the question is - - - what are YOU working on this week?

Hugs!

Sarah

Friday, October 20, 2017

Can I Get A Whoop Whoop? Paying Work Rocks!

Hi, all!

This week has just flown by, and it's finally Friday!  And that means it's time to get our whoop whoop on - are you ready?  I know I am!  Let's get started!

*&*&*&*&*&*&*

I am happy to say that I finished this commission T-shirt quilt!  And just ahead of the deadline - SCORE!


Slowly but surely, these puzzle-style quilts are getting easier.  This one actually laid flat the first time I put it together!   And I didn't rip out any hair trying to do the quilt math....  That's a win in my book!

The front...

I also took one of the t-shirts, a great two-sided Disney shirt, and made this fun pillow!

...and the back!

After fighting with the invisible zipper foot (FYI the foot won), I gave up and put a traditional nylon zipper in the bottom of this pillow cover so that it can be washed when needed.

That's my whoop-whoop for the week! I'm overjoyed to have this off my plate - it's getting close to Christmas and I've got to start working on the kids' annual quilts...

So - - - can I get a whoop whoop???

*&*&*&*&*&*&*

And now it's your turn!

What's got you whooping it up this week?


What's making you do a little happy dance?

Share!  We want to dance right along with you -
And it's always more fun to dance with friends!

The party will stay open until Sunday midnight.

Hope to see you there!

Hugs!

Sarah

Wednesday, October 18, 2017

I May Have A Scrap Problem... Pillow Cover Tutorial!

Hi, all!

Well, better late than never - I didn't get my tutorial written in time to post this earlier (I actually had to make another pillow cover to take some pictures!) but it's done now!  First, though, let me share with you this week's blocks for the Gypsy Wife quilt...


This block is called Old Maid's Puzzle, and it's the last of the "named" blocks in the book.  As before, these blocks are made out of Kate Spain's Latitude batiks, and I love the colors!  The rest of the blocks are designated as "filler" blocks, so this is definitely a milestone!  I'll need to figure out how to divide up the rest of the blocks in the book over the next few weeks.  

*&*&*&*&*&*&*

And now for the tutorial.  I had so much fun making a wide variety of pillow covers over the past few weeks, and they are a great way to use up scraps and orphan blocks!  I'm sure there are many ways to make them, but I'm going to share how I do it.  Try it my way or experiment until you find what works for you!


First of all, create your pieced top.  Standard pillow form sizes are 14", 16" and 18", and I usually make my pieced top about 1/4" larger than the pillow form size.  I like my pillows well-stuffed, and making it slightly smaller than the pillow form size will give you a well-rounded pillow that isn't loose in the covering.

Sandwich your pieced top with a piece of batting, and a backing if desired.  I like to use Warm & Natural batting, which is dense enough that it doesn't stretch or pull, unlike some other battings.  Because of that, there's no need to use an additional backing inside the pillow.  If you do need a backing, a simple piece of muslin is sufficient.  It doesn't need to be fancy!  I like basting spray for these, but pins work as well.  


Next, quilt as desired!  I chose to quilt this in straight lines because the pattern made that easy without extra marking.  You might choose to do cross-hatch or grid quilting, or even free motion quilting.  It's all up to you!  


Trim any excess backing and batting off your quilted piece, squaring it up as needed.


Here you can see what the back of my piece looks like - the Warm & Natural really looks almost like felt.  You could also use a piece of fleece as batting, which wouldn't require an additional backing piece either.  If you do use fleece, though, be sure it doesn't show through your block!  

Your next step will be to cut two pieces for your pillow back.  Each one needs to be the same width as your quilted pillow front, and 22" long.  Fold each of them in half so that you have a piece the width of your pillow and 11" long.  Press the fold.  


Now lay your pillow front face down with the top up at the top of your worktable.  Take one of your backing pieces and lay it with raw edges against the bottom and right edges of your pillow top.  Pin from the corner about 2/3 of the way to the left along the bottom.  (If you are more precise than I am, and your backing piece is exactly as wide as your top, go ahead and pin all the way to the corner.)


Now lay the other backing piece on the top, matching up the top and right hand edges and pinning in place 2/3 of the way across the top and at the overlaps on the side.  If your backing pieces are the same width as your top, go ahead and pin the left side the same way as the right side.  If not, flip it over to trim the pieces to the correct size.


See!  This is what happens when you cut all your pieces at the beginning - quilting almost always makes your front smaller than it started out.  So it's time to trim!


Lay your ruler on top of the pillow top and trim the backing excess away.


Now that it's all the same size, finish pinning around the top.  Be sure to catch the ends of the overlap so they don't get folded under when you are attaching the binding.

Now let me explain about the binding!  I REALLY hate piping.  My grandmother used to make beautiful pillows, and she put piping all around the edges.  Hers were always perfect.  Mine, not so much - I can't ever get nice corners with it.  So it kept me from making pillows for a long time. But after I started quilting, I got good at binding - and I realized that pillows could be bound just as easy (or even easier!) than finishing with piping. EUREKA!!!


So make your binding and sew it to the back side of the pillow cover.  I like to start on the bottom of the pillow so that my join is down there too.


After you finish sewing the binding all around and joining the ends, trim the corners.  Pull the binding back and trim just the pillow, not the binding.  This will help your corners lay nicely.


Sew down the binding on the front of the pillow cover...


...and then it's done!  Wasn't that simple?  No turning, no pushing out the corners, and they're beautifully sharp.


Here you can see both the back and the front.  You should have about a 3" overlap on the back, which ensures your pillow form won't be showing through a gap.


And here's what the finished pillow looks like with pillow form!  Super simple, they make great gifts, and they use up stash, scraps, and orphan blocks!  A winning prospect all around!

I hope you'll share your own creations on a Whoop-Whoop Friday sometime soon!

Hugs!

Sarah

Monday, October 16, 2017

Make-A-List Monday - Christmas is Breathing Down My Neck....

Hi, all!

Whew!  Made it through last week, and I'm still alive!  I've still got a big deadline this week, but at least there aren't as many things also clamoring for my attention.  Do you have weeks like that - when there are so many things that seem to have the same amount of urgency?  Fortunately there aren't so many of them, but boy they're fun when they come!

Let's take a look at last week's list and how it went...

1.  Work on the t-shirt commission quilt; specifically, nail down the layout and start assembling.
Done!  I managed to finish assembling it this afternoon, and it actually lays flat!  Woohoo!!


2.  Update the information brochure for the quilt ministry.
3.  Prep decorations for the ministry booth at the women's event this coming weekend.
4.  Finish working on stock for the ministry booth.
Done!  Everything came together well, and we had a lovely booth with lots of visitors!  It was fun to share about the quilt ministry with some new folks...  and one of our members happened to have her spinning wheel in her car, so she showed us how to spin!


5.  Keep up with any quilt ministry needs that come up this week.
Done!  This quilt went to a woman who was moved into rehab this week...


This one went to a woman with lung cancer, going through chemo...


...and this one went to another woman also diagnosed with 
lung cancer.


This quilt went to a new baby boy!


We also gave a quilt to a young woman going through some hard times right now, but I neglected to get a photo of that one.

I've also been trying to walk each day, and I've taken some beautiful pictures out at the park. This is my favorite one from last week, taken on a very foggy morning...


OK, now that last week is behind me, I have to finish that t-shirt quilt so I can begin the next batch of projects!  Here's my list for this week...

1.  Finish the t-shirt quilt and deliver.

2.  Make another pillow cover - a match for one we sold this weekend (the customer wanted a pair!)

3.  And make one more pillow cover, a special request for a customer!

4.  Quilt a vintage quilt top for a customer.

5.  Cut out Nathanael's annual quilt.

6.  Keep up with any quilt ministry needs that come up.

I've got dozens of other projects to work on, but these are the most urgent for this week, so I'll start here!  Christmas is coming up so quickly - I've been trying to avoid actually counting the days but I can feel it breathing down my neck - can you?

So now the question is - - - what are YOU working on this week?

Hugs!

Sarah