Hi, all!Recently I was contacted by a nurse who works for a local oncology clinic. She had received a quilt from our quilt ministry in the past, and thought our group might be able to help her out. She was looking for someone who could make port pillows for them to give out to chemo patients. Now, I had never heard of port pillows, but she sent me some pictures and I went in search of a pattern.
Port pillows are designed to attach to the strap of a seat belt and prevent the belt from irritating a port, which is implanted under the skin of the upper chest to facilitate the administration of chemo. I found lots of patterns but found one I really liked on a website called createtodonate.org. (FYI they also have a lot of other really good patterns if you are looking for other things to donate!) This pattern is super simple, as you'll see below! So here's how I made them...

The first thing you'll need is two pieces of fabric, cut 4" x 7". I used scraps that I cut off the end of a quilt backing for this, and it was a great way to use a middling large piece of scrap! You'll also need two pieces of sew-in hook-and-loop tape (Velcro), each 3.5" long. It probably goes without saying, but when I refer to a "piece" of hook and loop tape, it consists of both a hook side and a loop side.

I found this nice assortment of colored hook-and-loop tape on Amazon, but be careful - they state that this is 24 yards of hook and loop tape. However, it is 12 yards of hook (one yard each of 12 colors) and 12 yards of loop. So essentially, it is only 12 yards of hook and loop tape. But it was still a really good deal, price wise. You can get five sets of two from a yard of hook and loop tape. I thought I had a really good stash of leftover hook and loop tape, but it turned out that all of mine was sticky backed - not good for this particular purpose!

There are probably many ways to attach the velcro to the fabric, but I found that by putting the two pieces together in a 4" strip, then attaching them, I didn't have to deal with it sticking together where I didn't want it to. Fortunately, I had a 4" ruler that was perfect for this, so I laid the loop side even with one end and clipped it on, then lined the hook side up even with the other end of the ruler and carefully pressed it down on the loop side. Now my tape was put together and not likely to catch on anything else, AND was exactly four inches long and ready to be sewn on.

With the loop side facing up and lined up with the right side of the fabric, I measured 1.5" down from the top and stitched 1/8" away from the end, just to hold it in place. Then I flipped it around and, measuring once again, stitched down the other side.

Repeat on the other end of the fabric so that you have two pieces of hook and loop tape attached.

Now lay your second 4"x7" piece, right sides together, on the first piece. Pin if you feel so inclined (you can see how I pinned it above) and, leaving a 2" opening on one of the short ends, use a scant 1/2" seam to stitch the two together.
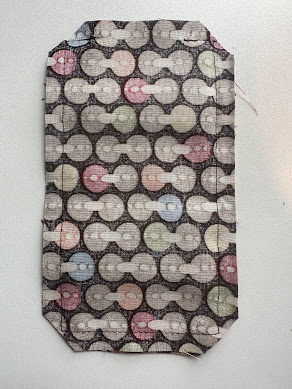
Now, this is a step I added to the on-line pattern, but I trimmed my corners diagonally, which makes it turn nicely! I use a chopstick to turn mine, and also to stuff them, but maybe you have another trick for turning. Do whatever works best for you!

Cheap polyester fiberfill works really well, and a one pound bag goes a long way! I've made 18 already and haven't made a dent in my bag.

And here's the last step - sew that opening shut! I did mine on the sewing machine - just pushed the fiberfill back, held the two edges together, and stitched right next to the edge. If you do this, be sure to catch both edges all the way! Or you can hand sew this seam - it only takes a few minutes.

And voila! You have a port pillow! These are so easy and quick to make - it takes me about 10-15 minutes to make one from start to finish. I cut out a bunch of fabric pieces and hook and loop tape strips and put them together assembly line fashion to make them in bulk. It's a fabulous way to use up scraps - you could even sew strings together and cross-cut them into the 4"x7" pieces, or use two different fabrics for each port pillow, different on each side. If you had a bunch of 4" orphan blocks, you could add fabric to the top and bottom to make your 4"x7" piece. The possibilities are endless - but this can definitely be a scrap buster that will make a serious dent in your stash. And you can do good with it as well!
Want to join me in making life a little bit easier for chemo patients (and emptying your scrap bins a bit in the process)?
Hugs!
Sarah


