Hi, all!
Welcome back to the 12 Days of Christmas in July blog hop! This is our sixth day, and I can sure feel the creative juices flowing! I hope you're being similarly inspired - if you're not, you haven't been paying attention!!
Today our hop starts with Joanne, who blogs over at Quilts by Joanne. But she doesn't limit her creativity to quilts - she's got a neat craft to share with us today that you're going to want to try!
Suzy, over at Adventurous Appliqué and Quilting, has a fun project to share with us, too. You won't even need to have Christmas fabric on hand to make this great craft - you're going to love it!
So hop on over and check out today's stops on the hop, then come back here for day 6 of the quilt-along! See you soon!
*&*&*&*&*&*&*
Today we'll be making the flying geese units that comprise the inner and outer stars of the block.
First we'll work on the inner star units. Take the thirty-two inner star HSTs (green on the diagram), and make two stacks of 16, stacking them with color on top of color, background on top of background.
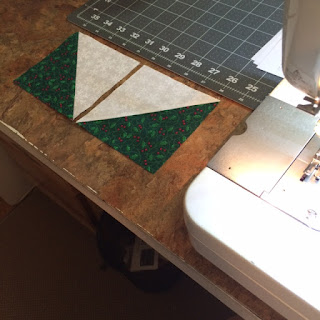
Lay the two stacks face up next to your sewing machine with the two background triangles meeting in the center and the two green triangles to the bottom outside corners. Place the HSTs with the seams pressed toward the background fabric on the right, and the ones with the seams pressed toward the color on the left.
Lay an HST from the right hand stack face down on the left stack. Take the pair and nest the seams, then stitch the right hand side where the background triangles meet. Chain piece all sixteen pairs.
Cut the piecing chains apart. Press the seams open. This will help reduce bulk when the units are assembled. Set these units aside until tomorrow.
Now we'll work on the outer star units. Take sixteen of the outer star HSTs (red on the diagram) with the seams pressed toward the colored fabric and stack them with color on top of color, background on top of background. Take sixteen more of the outer star HSTs (red on the diagram) with the seams pressed toward the background fabric and stack them with color on top of color, background on top of background.
Lay the two stacks next to your sewing machine with the two background triangles meeting in the center and the two red triangles to the bottom outside corners. Place the stack with the seams pressed toward the background fabric on the right side of the two stacks.
Lay an HST from the right hand stack face down on the lest stack. Take the pair and next the seams, then stitch the right hand side (where the background triangles meet). Chain piece all sixteen pairs. Cut the piecing chains. Press the seams open. Set aside in a stack.
Take sixteen of the outer star HSTs (red on the diagram) with the seams pressed toward the colored fabric and stack them with color on top of color, background on top of background. Take sixteen more of the outer star HSTs (red on the diagram) with the seams pressed toward the background fabric and stack them with color on top of color, background on top of background. Lay the two stacks next to your sewing machine with the two red triangles meeting in the center and the two background triangles to the bottom outside corners. Place the stack with the seams pressed toward the background fabric in the left stack.
Lay an HST from the right stack face down on the left stack. Take the pair and nest the seams, then stitch the righthand side (where the red triangles meet). Chain piece all sixteen pairs. Cut the piecing chains. Press the seams open. Set aside in a stack.
That's all for today! Tomorrow we'll assemble the flying geese units into the "B" units of the quilt blocks. See you then!
Hugs!
Sarah
Here's a list of all the great bloggers participating in the hop:
July 14th: Sharon Vrooman @ Vrooman’s Quilts
Carole Carter @ From My Caroline Home
July 15th: Yanicka Hachez @ Finding Myself As An Artist
Chris Dodsley @ made by ChrissieD
July 16th: Marsha Hodgkins @ Quilter in Motion
Leanne Parsons @ Devoted Quilter
July 17th: Tonia Conner @ All Thingz Sewn
Selina @ Selina Quilts
July 18th: Lara Buccella @ Buzzin Bumble
Soma Acharya @ Whims and Fancies
July 19th: Joanne Harris@ Quilts by Joanne
Suzy Webster @ Adventurous Applique and Quilting
July 20th: Vicki in MN @ Vicki’s Crafts and Quilting
Jennifer Fulton @ The Inquiring Quilter
July 21st: Michele Kuhns @ Crayon Box Quilt Studio
Jan Ochterbeck @ The Colorful Fabriholic
July 22nd: Alla Blanca @ Rainbows. Bunnies. Cupcakes.
Zenia Rene @ A Quilted Passion
July 23rd: Joanne Hubbard @ Everyone Deserves a Quilt
Paige Alexander @ Quilted Blooms
July 24th: Carolyn Jones @ …by CJ
Tisha Nagel @ Quilty Therapy
July 25th: Susan Arnold @ Quilt Fabrication
Beth Sellers @ Cooking Up Quilts
Linda Pearl @ One Quilting Circle


The quilt pattern is so pretty, wish I could have joined in. Really enjoying this blog hop :)
ReplyDeleteI love the QAL and really hope I can join in soon.
ReplyDeleteIt's hard to believe that we've reached the halfway point. Your Quilt along directions look great Sarah! I hope to do it at a later time.
ReplyDeleteExcellent instructions. Two great new tutorials from our hosts today.
ReplyDeleteThe projects today are lovely too.
ReplyDeleteNesting seams makes piecing so much easier! Sarah, great instructions!
ReplyDeleteI'm almost all caught up :) I'm stopping for the evening because I'm too tired to sew anymore. But I'll look at it again tomorrow:)
ReplyDelete