
Are you ready for another great scrap quilt idea? I'm excited to introduce you to Kristi, who you may also know as @kristiquilts on Instagram. She creates marvelous scrap quilts all.the.time and when I started looking for help with this series of tutorials, she was one of the first people I knew I had to ask. I was so excited when she agreed to help out, and I'm even more so now that I've seen what she has for us today. So let's get this show on the road - and don't quit before the end, as we'll have a winner from last week's giveaway and another scrappy giveaway, too!
*&*&*&*&*&*&*
Thank you Sarah for hosting the Hand2Help Challenge. I am very pleased to be able to share this quilting tutorial with you today!
I love making use of all my scraps, but like all quilters I am always looking for great ways to keep them tamed! After exploring the myriad of ideas for ‘scrap-organizing,’ I decided on a simple system for myself. For me, anything ⅛ of a yard or more I keep folded neatly in my fabric drawers for a variety of projects. Anything smaller than that I cut into 2 ½ inch strips. Whatever remains from those strips (that is bigger than ½ inch) becomes a string or a crumb. I store my scraps by color in small fabric bins with plastic bags to sort the 2 ½ inch strips, strings, and crumbs.

When my bin starts to look full (like the green and orange ones in the photo), I start cutting up the 2 ½ inch strips for a scrap quilt. I’m always on the lookout for simple patterns that use 2 ½ strips, so when my bin is full, I can get a project ready to go quickly!
Inspiration for the Stacked Coin Quilt
I had been collecting ideas for coin quilts for a few months. There are many ways to make this type of quilt—from straight stacked coins, to offset coins, to random size coins with crazy offsets that look like they are about to topple. I knew I wanted to make my coins uniform (to use the 2 ½ inch scraps) and to make the offset uniform to simplify the construction. Thank you to all the Stacked Coin Quilt makers that came before me!

Planning
For this quilt I used my green and orange 2 ½ inch strips. All values in either of these colors from the lights to the darks went into this quilt.

The unifying aspect of this quilt is the neutral background color. Choosing one fabric to use as a background gives the variety of scraps in this quilt cohesion so the scraps can sing without being wild. For the stacked coin design, I would choose a fabric that is either a solid or a simple all-over print. I would steer away from fabrics that are obviously directional. Directional fabrics require more thought in placement, and could be too busy with the variety of scraps in the quilt.
I auditioned a few grays from my stash to use as the background (see photo). Any of these could have worked, but I decided to go with the gray fabric on the right for its medium value. (Actually, I had just enough of that fabric for the center of the quilt, and had to make-do with the darker gray fabric on the left for the border.)
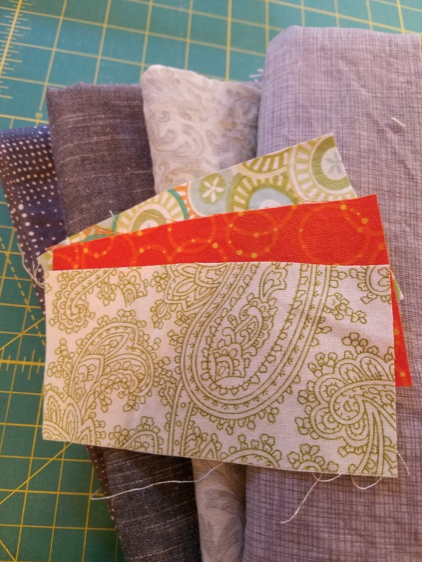
As for the binding, you could use additional background fabric, or go scrappy with lots of binding leftovers in various shades of green and orange.
Yardage Requirements
Quilt Size: 54 by 69 ½ inches
Unit of two coins: 4 by 6 finished or 4 ½ by 6 ½ unfinished
Background and Vertical Sashing: 2 ¾ yards
Border: ¾ yard
Colored Fabric Scraps: about 2 yards worth, or about 1000 inches of 2 ½ inch strip scraps, or 96 (5 by 5) charm squares
Binding: 5/8 to ¾ yard depending on your preferred size
Cutting
Background:
- 192 rectangles 2 by 2 ½ inches (for coin units)
- 8 strips 3 inches by Width of Fabric (WOF) (for sashing)
Border:
- 7 strips 3 inches by WOF
Coins—Colored (green and orange) scraps:
192 rectangles 2 ½ by 5 inches (for coins)
- Yardage: Cut into 2 ½ inch strips by WIF. Then cut those strips into 192 2 ½ by 5 inch rectangles.
- Scraps: iron and cut 2 ½ inch strips of at least 5 inches long. Then cut those pieces into 192 2 ½ by 5 inch rectangles.
- Charm Squares: Cut each in half once to make two 2 ½ by 5 inch rectangles which will yield 192 2 ½ by 5 inch rectangles.
When I cut lots of one type of piece, I like to clip them in sets of 10 with little binding clips.

Binding:
- Cut into strips for your preferred binding size
Sewing
Making Coins
Sew a small background rectangle onto one end of each colored rectangle. Press to one side or open. I pressed mine towards the background.

Joining the coins into pairs
Now sew the coins together in pairs. This task, although not difficult, is critical to making the staggered stack of coins. Let me explain this part in detail to help you avoid an orientation pitfall.
When you sew the pairs together, you want the top coin to be on the left side and the bottom coin to be on the right as shown in the next photo:

To sew, fold the top coin down onto the bottom coin, pin, and sew.

When it’s done, it looks like this!

Now watch what you can do with this unit: if you rotate it around so that the bottom coin is now on the top...look! The new top coin is still on the left! No matter which orientation you choose, the top coin will always be to the left.

Take a moment to lay one two-coin unit above a second two coin unit and they will look like the next photo. Awesome!

After you’ve sewn all your pairs together, take a moment to stack them up and make sure that all the top coins in the pairs are on the left. If you find any stray units that have the top coin on the right, as shown next, it’s time to get out your seam ripper and fix it so the top coin is to the left.

The problem is that if any of the units have coins going to the wrong side, when you try to line them up, you’ll end up with mismatched coins. Oops!!

Joining the Pairs into 4’s and then into 8’s
Once you have the pairs together correctly, the rest goes together much easier because you can’t mess up the orientation by rotating the units. So feel free to rotate the units to make pleasing combinations. Join each pair into 4’s and then join the 4’s into 8’s. Up until this point, I did all these combinations of colors randomly, by picking up one piece and then picking up another piece without much deliberation.


Sewing the Columns
Now that you have 8’s, it’s time to arrange them on your design wall (bed, floor, table) to find a placement of the colors that you are happy with. There are six columns each with four sets of 8’s.
Once you have the arrangement you like, sew the four sets of 8’s into columns.
Adding Vertical Sashing
To add the sashing, seam the strips of background fabric and then cut pieces to the correct length. First measure each of the columns of coins and average the measurements (or pick the measurement that is in the middle of the grouping). Write this number down. Now sew background sashing strips together and cut so that you end up with five long pieces that are the length that you wrote down. If you sewed a perfect ¼ inch seam then these pieces will be 64 ½ inches long! 😊
Sew a long piece on the right side of the first five columns of coins. To do this, I fold the long piece into halves, and then into quarters. I mark the ends, ¼, ½, ¾ points on the border. I do the same for the column of coins. Then pin the border to the column of coins at the corresponding points. Sew from the top of the quilt to the bottom. Press toward the sashing.

Now attach the coin columns together. Change the direction of your seamline by sewing from bottom to top this time.
Adding Borders
For the two vertical side borders, seam border strips together and cut two long pieces that are the same measurement as the vertical sashing. Sew from top to bottom to attach the side borders. Press toward the outside borders.
For the top and bottom borders, measure the width of the quilt at the center. Seam together strips and cut them so that you end up with two long pieces that are the center width of the quilt. If you sewed a perfect ¼ inch seam then these pieces will be 54 inches long! 😊 Pin (at the ends, ¼, ½, ¾) and sew the strips onto the top and bottom. Press toward the outside borders.

Finishing
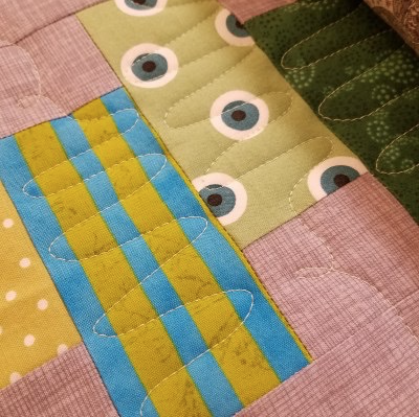
Now you have a completed stacked coins top! Add some fun quilting and your favorite binding and you’ll have a finished quilt!


Happy Sewing!
Kristi

Kristi, a fourth-generation quilter, has been quilting actively since 2013. She loves sewing quilts for kids and using up all her scraps! When not working as a Database Administrator during the day or sewing in her free time, she can be found enjoying the outdoors near her Northern California home with her husband of 30 years and their 11-year-old son. You can follow her on Instagram at https://www.instagram.com/kristiquilts/
*&*&*&*&*&*&*
Isn't that a fabulous quilt? And such a great scrap buster, too. I can see many of these in my scrappy future! Thank you, Kristi, for sharing your talents with us!
And now, how about a winner for last week's giveaway? I asked little Miss Random, and she said...


Congratulations, Kathy! I'll be contacting you later today to get your snail mail address for a package of scraps!!
And because I've yet to make any kind of significant dent in my scraps, I'll happily give away another package this week! Just leave a comment below (if you don't want any more scraps, just say so!) and I'll draw another name next week. Be sure to leave Kristi some quilt-y love, too - she's not a blogger, but I'd sure like to show her how wonderful bloggers are! If you're on Instagram, be sure to check out and maybe follow her feed - she always has beautiful eye candy to share!
Hugs!
Sarah
Kristi - thanks for breaking this down into easy to understand and follow steps!
ReplyDeleteLove the quilt Kristi, looks like an easy pattern and I will be using this design sometime. Sarah, thanks for organizing the post. Again, no scraps for me!
ReplyDeleteKristi-Love the quilt and your detailed directions and hints and illustrations. I love when I get such good tips that will help me avoid problems. Coin quilts are fun and I love that you chose orange and green to go with gray. So modern!! And Sarah, I'm still interested in your scrap giveaway. Thanks!
ReplyDeleteA great quilt and very detailed tutorial! Thanks Kristi! I followed you on Instagram so I can enjoy more of your work!
ReplyDeleteI'd love some scraps to play with! Thanks for the chance, Sarah!
To be gifted some scraps would be great. I recently moved cross country and I gifted all my scraps to quilty friends before I moved, so now, of course, I keep seeing fabulous scrappy patterns. Thanks!
ReplyDeletePerfect leader and ender pattern for some leftovers from a previous quilt. I can't wait to get started! Thanks for the patterns and for a chance at some scraps.
ReplyDeleteKristi, thanks for the wonderful quilt and fantastic tutorial. I think this will be my next leader/ender project.
ReplyDeleteThe coin quilt is very pretty and a clever way to use scraps. Thanks for the chance to add to my collection!
ReplyDeleteGreat tutorial, Kristi! Thank you and I'm definitely inspired. I love strip quilts and this is a fun twist for the coins. The greys were a great choices for the background and borders.
ReplyDeleteAnd Sarah :-) Thank you for the scraps giveaway. It would be fun to sew with a better variety than I seem to have going on!
Love the coins tutorial - and thanks for showing what can happen if coin ends up in wrong corner!
ReplyDeleteBeautiful scrap quilt Kristi. Your tutorial was very easy to follow along. Thank you for sharing today.
ReplyDeleteSarah, I would love the chance to win a box of scraps. Thank you so much.
What a neat quilt! Perfect for little boy quilts. Imagine making it in brights for legos. I don't need scraps, but thanks anyway!
ReplyDeleteWhat a great quilt. I think some call those matchsticks. So many things to make!
ReplyDeletePut my name in the hat! Have a great week!
Love the quilt and thanks for the quilting close ups! I have a pet peeve with "quilt as desired"; I never know what to do.
ReplyDeleteI'll take a chance on the scrap bag, thanks.
Love this quilt! I would love some scraps.
ReplyDeleteKristi great quilt. I love your organizing tips. I sort by color but have pieces of all sizes. Need to cut some strips and pull the crumbs. Thanks. Would love some scraps.
ReplyDeleteGreat tutorial and great quilt! Thanks for showing us the way, Kristi!
ReplyDeleteThank you...great tute..and nice quilt
ReplyDeleteYes please for a chance at the scraps! Beautiful quilt, thanks for sharing!
ReplyDeleteVery good tutorial for a stacked coin quilt. Thank you Kristi. I would love to win some scraps. dorthac at aol.com
ReplyDeleteI always love getting ideas for using my scraps. Kristi provided us with a great tutorial...Thanks. I would love more scraps.
ReplyDeleteThat is a lovely quilt and it would look great in any number of color combinations! Kristi's tutorial included a tip that I have used for years. Pinning the borders as described is the key to successful border application. Thanks for the reminder!!
ReplyDeleteI'm so excited to be on your blog today! Thank you so much for hosting this event Sarah! Our internet has been down all day because of a break in the fiber optic cable somewhere in Northern California. First thing I did when it came back live, was come to your site! Thanks for all the lovely comments, I look forward to seeing you all on Instagram!
ReplyDeleteGreat idea for scraps! I'm currently destashing yardage because I never use it - I always reach for scraps! I'd love to add some of yours to my beloved scraps!
ReplyDeleteAnother great pattern for H2H charities. Thank you Kristi. And Sarah, another giveaway of a bag of scraps. Thank you again, and again. So much fun.
ReplyDeleteSuch a nice variation on the usual coin quilt! Love it!
ReplyDeleteI love this quilt, thank you!
ReplyDeleteKathy, this was a wonderful tutorial! I'm getting ready to make some little doll quilts, to accompany the dolls of "A Doll Like Me" and smaller versions of this quilt would be perfect.
ReplyDeleteAnd, Sarah, I'm still loving the Christmas scraps I won from you recently, so I feel it would be greedy to enter again...I'll bow out this time and leave the luck to someone else. :)
Great pattern, Kristi! Thanks for making it so clear! I was looking at your quilting and I'd like to ask if you used a walking foot or a free-motion foot to quilt your coins? It's very clever and I would like to try it!
ReplyDeleteThanks Sarah, for putting this all together for us again this year!
Kristi, a great tutorial on making your quilt - love your 'oops' pics - a great help to keep things right! Thank you for sharing, Susan
ReplyDeleteWhat a great scrappy quilt! Another idea to add to my list of things to make! I'd be happy to receive scraps, what a fun thing to get in the mail. Thanks for the chance.
ReplyDeleteI really enjoyed reading this post, big fan. Keep up the good work andplease tell me when can you publish more articles or where can I read more on the subject?
ReplyDeletedomeinnamen
Fabulous quilt Kristi! You really do need to become a blogger to share with us non Instagramers!! Sarah-throw my name in the drawing again.
ReplyDeleteGreat quilt idea - thanks Kristi! I'm new to Instagram - happy to follow you for some quilt inspiration!
ReplyDeleteThis is a fantastic tutorial! Lots of detail, and a very clear explanation about how to not get the blocks reversed. Love it, Kristi! Thank you so much for taking the time to write this up for us.
ReplyDeleteI also really like Kristi's scrap management system and wish I had the room for that particular method. Someday!
Great quilt and a way to use scraps. I love scraps and would be so happy to receive some of yours.
ReplyDeleteKristi, thanks so much for this very clear tutorial. I'll probably be trying this out for one of the quilts my little group of quilters make for the senior citizens in our area. Sarah, thanks for yet another easy scrap buster quilt. I'd love to win some scraps. My scraps would love to play with yours!
ReplyDeleteLove this coin quilt. Also love the inspiration from this series of posts.
ReplyDeleteThanks Kristi. The tutorial is very easy to follow and the quilt looks like a fun way to use up scraps. It would be even better with some scraps from Sarah's collection.
ReplyDeleteLove this! Thank you so much! I have more in my brain than I could ever really do but I am having such a great time putting scraps together in my head. :-)
ReplyDeleteThank you Kristi for sharing your storage system. It's always a problem for scrap fabriholics, and I love to see what others do to keep them in control. The Chinese Coin is a lovely quilt and have already added to my (long) list of scrap quilts to make. Thanks for sharing.
ReplyDeleteGreat tutorial! Love seeing how you store your scraps as well.
ReplyDeleteWonderful idea, and now so easy to understand! Thank you so much for this tutorial.
ReplyDeleteI've always wanted to make a coin quilt and Kristi's has given me inspiration to push it further up the queue. Thanks for posting. cknapp3626(at)sbcglobal(dot)net
ReplyDeleteWhat a fun quilt! I can see this also with longer rectangles and the result would be a larger quilt. Seems like this pattern would be a good beginner quilt for one of my granddaughters. Great tutorial!
ReplyDeleteThank you sooooo much Kristi, for sharing how you deal with your scraps, and this quilt in Beautiful..& definitely using this great Tutorial to make one (or more...giggle)
ReplyDeleteThank you for chance to win some Scraps too. :D
Good article and impressive by the A Nimble Thimble
ReplyDelete