Saturday, April 30, 2016

Paducah Recap!!

Hi, all!

Well, one week ago today I was in Paducah, KY at the AQS Quilt Show!  Quilt City, USA is quite the place during quilt week - definitely a bucket list experience if you've never been.  We did some antiquing - where this jumped into the back of my car to come home with me...


...and of course, I had to get some strawberry shortcake, a Paducah tradition!  Mmm, so yummy!


I got to meet a blog friend, Jan Ochterbeck, in real life as she was there promoting her new book, Cut and Shuffle Quilts.  What fun!


And I had a chance to snap a picture of Lara Buccella's new book, Crafted Applique, on the AQS store racks.  I'll be doing a review of Lara's book on May 13th - be sure to catch it, as she's got a neat new technique for applique that you're going to love!  Had a great conversation with one of the staff members about how they publish their books, too.  What a treat!


And oh, the quilt-y eye candy!!  There was so much to see, and I remembered to take pics of a few of my favorites...


This gorgeous quilt was made up of one-inch squares!!!


I love this quilt - the left corner is made up of wonky nine-patch blocks and the quilting was amazing!


This quilt is one of Christa Watson's quilts - what a great use of scraps!!  I had fun spying out scrappy quilts this year - looking for inspiration for the Wednesday blogposts!


I love the colors and the flow of the leaves this quilt.  The quilting was pretty amazing, too, but hard to photograph!


And this one has to be my all-time favorite!  I've always wanted to make a Storm At Sea, but this one just takes my breath away!!

The one thing I noticed as I looked through the quilts was how many of them were appliqued.  I don't know if that's a trend or if it just happened to be what made it through the jurying process, but it was interesting to see...


 Then there was the shopping!  With so many vendors to choose from, it would be easy to spend a fortune, but I tried to be a little frugal.  I did find these adorable name tags for the dresses I make my grandkids - they came from our friend Shannon at Fabrics N Quilts!


I found this really cute pattern for a Christmas tree wall hanging - I'm thinking it might look great made with those left-over green strips from my March project!  Time will tell...


And in one shop, we found this great wall hanging!  If you don't know, our church's quilt ministry is named Piece*Love*Quilt, so this just HAD to come home with us!  I'll finish it up and we'll hang it on the door to our "sweatshop"!


And of course, no trip to Paducah would be complete without at least one stop at Hancock's of Paducah!  I found some cute fabrics...


The rocket ship fabric will be for a dress for Emmy, who LOVES rockets.  The Basic Grey prints just spoke to me, and I'm sure I'll find a project for them.  I think the Kaffe Fassett prints and those two Kona pieces will work together nicely for a quilt someday in the future, too!


And then I saw this!  Oh. my. goodness....  These are sold by a gentleman who makes great die-cut metal barn quilts to hang on your house, inside or outside.  The company name is Classic Metal Company, and you can see their website here.  I have one hanging by my front door, and I also have a ruler rack that I love!  So this had to come home with me too...

And then I had a great idea!  I talked to the man who owns the company, and he agreed to become a sponsor for Hands2Help 2016, which means that we now have a beautiful metal barn quilt  that will be going to one lucky participant in this year's Hands2Help Challenge!  Woohoo!!!  Be sure to check out his site and keep it in mind when you need to give a quilt-y gift (or when you want to get one!) because these things are awesome!!!

*&*&*&*&*&*&*

So that's my recap of our Paducah weekend!  So much to see and do, and I always forget to take pictures as I go - sorry about that!  As I said, this is definitely a bucket list experience - I hope you'll get to go someday too - and if you do, be sure to let me know you'll be there, and maybe we can meet up IRL!!

Hugs!

Sarah

Friday, April 29, 2016

Can I Get A Whoop Whoop? A Whole Lotta Quilting Going On...

Hi, all!

Welcome to Friday!!  It's time for us to get our whoop whoop on again - I hope you're ready!  Remember, as always, it doesn't have to be a finish (good thing, because I haven't finished much this week!) but just something you are doing a little happy dance about!  Let's get started...

*&*&*&*&*&*&*

It's been a busy week for me - a lot of this has been going on...


...resulting in this stack of five quilts ready for binding.  They will be part of my big secret project (more on that to come soon!)

Tomorrow's task? A whole lotta binding...

I also finished this pretty orange peel top this week - I wish I'd had time to quilt it, but I guess that will have to wait a little longer!  


And when I was in Paducah last week, I went to a fabulous antique store and found this beauty...


 Isn't she gorgeous?  I was trying to talk myself out of buying her, and then my daughter texted me "But it's Mommom green!"  You see, my grandmother (Mommom) loved that particular shade of green - she painted almost everything in her house that color, including her refrigerator!  Well, that was the kick in the seat of the pants I needed - and so she came home with me.  I think I'll call her Jade!


She's a model 185J, made in St. John's, Quebec, Canada in 1954 - I wonder if that means I'll get the urge for a double double when I'm working on her?

And in honor of her pretty color, I decided to celebrate spring and sandal weather and paint my toenails jade green too!  


 So - - - can I get a whoop whoop??

*&*&*&*&*&*&*

And now it's your turn!

What's got you whooping it up this week?


What's making you do a little happy dance?

Share - because we want to dance right along with you -
And it's always more fun to dance with friends!

The party will stay open until Sunday midnight -

Hope to see you there!

Hugs!

Sarah


Wednesday, April 27, 2016

I May Have A Scrap Problem... My Oranges Are Blue!

Hi, all!

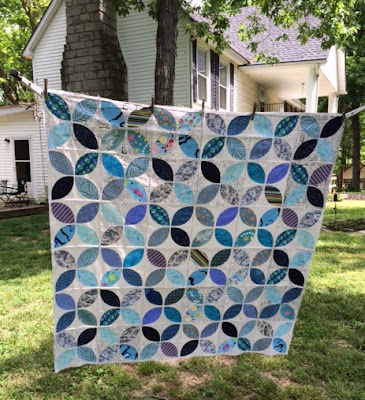
April showers may bring May flowers, but April scrap-sorting brought orange peels to my house!  It's been an eventful and busy month, and my efforts barely made a dent in my blue tub of scraps, but at least it's a start.  Here's what I started with...


...slightly over ten and a half pounds of blue scraps.  That's about twenty-nine yards of fabric!  I started out my month by pulling out the largest scraps for the orange peel segments, which eventually resulted in this top!


I really love the way this turned out - there's just something about true scrappiness that makes me happy!!


I used an interesting technique to make these orange peel blocks, from a new book by Lara Bucella called Crafted Appliqué.  I'll be reviewing the book on May 13th (with a giveaway!) so be sure to come back then for more about this quilt!!


And just one more picture, because it's so stinkin' pretty!!

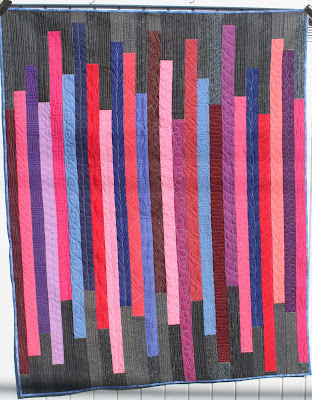
I also made another scrappy quilt this month, although I didn't pull the fabric from my blues bin.  These fabrics came from my overflowing binding scraps tub!  I pulled out all the solids, pressed them flat again, and make a jelly roll race quilt from them.  I just love the way it turned out!  With a jelly roll race quilt, you can only hope for the best with color layout, but this one is a winner...


This past Sunday afternoon, with the end of the month just around the corner, I pulled out the unfinished (meaning unsorted) blue tub and set up for business on my sewing counter.  Here's what I started with...


...and here's what I had by the end of the afternoon!  A big improvement on the original.  There are a lot of strings in there, but my string bin is definitely overflowing, so they will remain in the blue bin until I have time to make more string blocks and reduce the overcrowding!


So that was my month of April scrappy results.  I didn't get as much done as I wanted to, but I was also working on another big project, so I'll take these results and keep moving forward!  After all, life happens to all of us... On the positive side, though, all of my scrap related sewing was made from stash, fulfilling my Sew My Stash 2016 goals!

Now it's your chance to show off your scrappy progress!  What did you work on this month?  I've seen some wonderful scrap quilts popping up on the internet - let's see what you've been doing!  You can link up below until next Tuesday night - and remember to go check out all the scrappy inspiration in the other link ups!

Next week I'll be sharing my May goals, and I hope you'll join me and share yours, too! I think it will be a good time for some more scrappy inspiration, so check back even if you haven't settled on a goal - maybe you'll see something you've just got to make!

Hugs!

Sarah

Monday, April 25, 2016

Make-A-List Monday - Starting Out Fresh!


Hi, all!

Welcome to Monday - it always seems like a fresh beginning, doesn't it?  All new possibilities, new goals - or sometimes regrouping on the previous week's goals, LOL!  Do you set goals for yourself?  Do you make them daily, weekly, monthly, quarterly, or annually?  I've found that weekly works best for me - short term goals with an end in sight.  Although I'm trying out the monthly thing with the Wednesday scrap challenge.  It will be interesting to see how that works out!

Anyway, let's take a look and see how I did on last week's list...


1.  Make three more tops for the big project.
Done!   I've got the last five tops all made and ready to be quilted. And the most wonderful part?  They all came from stash! 


2.  Put together some orange peel blocks.
Done!  In fact, all 36 are done, and I stitched around the orange peels today.  I should have a finished top tomorrow!


3.  Finish pressing and folding the blue scrap tub.
Done!  I'm glad to have this one all pressed and folded, ready to be cut up!


4.  Mail some scrap bundles, prizes and quilts.
Done!  I love sending off happy mail to folks!

5.  Write a book review to be posted Tuesday.
Done!  If you missed it, you might want to check it out - Christa Watson and Angela Walters have written a fabulous book that covers both sit down and long arm quilting techniques - something for everyone!


6.  Keep up with any quilt ministry needs that come up.
Done!  We only gave away one quilt this week - to a gentleman in our church who is going through chemo right now.  
I think he liked it!


7.  Go to the AQS Show in Paducah and have fun!!!
Done!  We had a ball, and I'll share more about that in another post - pretty quilt pics and all the great loot I picked up!  

OK, last week's list went pretty well, even though it was a short and busy week for me!  Let's see what's on tap for this week...

1.  Make backs for the five quilt tops for the big project.

2.  Quilt at least three of those quilts.

3.  Finish the orange peel quilt top in time for the "I May Have A Scrap Problem" month-end post.

4.  Write a post about Paducah!

5.  Start cleaning up the house - it's even beginning to bother me! (and that's saying a lot....)

6.  Do a little yard work... a very little...

7.  Keep up with any quilt ministry needs that come up.

Well, that's definitely enough to keep me busy!  I'd really like to finish all five of those quilts this week, but I'm trying to be realistic in my goals.  That way if I get to them all, I'm ahead of the game!!  I have until Thursday the 4th to finish them - May the Fourth, in fact - so I guess I need someone to say "May the Fourth be with you"!!  LOL!

So now, the question is - - - what are YOU working on this week?

Hugs!

Sarah
Sunday, April 24, 2016

Hands2Help - The Maybe Quilt Tutorial

    
Hi, all!

It's been so exciting seeing all of your progress on your Hands2Help quilts - sorry I haven't been commenting, but I've been so so busy!  I'm glad you're back this week, because we've got an awesome guest post by Linda Swanekamp, who blogs over at Art In Search.  You guys are going to LOVE this quilt tutorial!!

*&*&*&*&*&*&*&*

Thank you, Sarah, for allowing me again to share a tutorial for the Hands2Help Challenge to encourage you to make a quilt. I am calling this quilt the Maybe quilt because all of us are in a different part of our quilting journey, yet are called on to share with others what we do. So, this quilt is a simple, adaptable, quick, and all in one design. 


Maybe-
-You don't think you have any extra time to cut something out and make it by the deadline
-You only make complicated quilts that take up most of your energy
-You have a hard time with multiple blocks and steps
-You can't go and buy any fabric just now
-You are a new or inexperienced quilter
-You don't have the colors you want
-You hate making borders
-You don't think someone might like what you make
-You like what you see but you would tweak it with ...
-You just want to try something without a big investment of time and money
-You could try one
And more.

This quilt is very flexible, changeable, and forgiving. I am going to explain one arrangement , but please, share what you do with it. Most important, someone needs this quilt.

For this size, about 52" x 60", I used 26 different 2.5" WOF (width of fabric) strips and 13- 2.5" white WOF strips (you can use any one solid color- I have used black tones). The 26 different strips could be any theme or color temperature or pattern. I have used batiks, kid fabric, Redwhiteblue, rainbow tones, etc.


Black tone strips instead of white
I cut the Kona white strips in half so they were about 21" long.

Lay out the 26 strips to figure a rough placement, side by side the long (vertical) way, and then sew the 2 short ends of each strip to a white strip short ends, making a tube with each strip.

All the strips
Trim off selvages
Chain piecing the short ends of the strips

The tube
Lay the tubes on a big table and arrange the order you want them to be across.

Starting at the first tube, cut the white strip randomly across the 2.5" width and open the tube the long way. The next strip, decide where to randomly cut the white to stagger the color fabric up or down. In this quilt, I cut the white strip. 

Tubes on table laid out in order

 (In another quilt, I cut the color strips-the color strips are then at the top and bottom with the white staggered strips in the middle). 

Cutting the colors instead of the white example
After all the white strips were cut and I was satisfied with the placement, I used painters tape at the top of the strips and numbered 1 - 26. I made sure the tops were even. 


Your choice- you could trim all the colored strips before you sew the short ends so everything is even top and bottom, but I just use the strips as is and the bottom is uneven until I am all done. If one strip is real short, I can just add some more white on that end instead of trimming everything short.

Sew all the long strips in pairs from the TOP. I pinned all the pairs right side together with the pin on the side of the seam that needed to be sewn and then chain pieced all the pairs. 


All strip pairs ready at machine for sewing
Cut the threads and now pin the pairs to the pairs next to them in number. I started a few pins at the top on the side that needed to be sewn and a pin in the middle, and then the bottom (in my case it was uneven). After pinning the pairs of pairs, sew the seams from the BOTTOM to the top so you do not get waves in the strips.


Pairs pinned to pairs with pin on the side it will be sewn
After these sets, pin the larger strip sets from the top to keep even, but sew from the BOTTOM to the top. 


2 sets of pairs, now pin and sew this seam
Eventually, all strip sets are sewn. I then pressed all the seams in one direction with my new Eurosteam iron, first on the back, then on the front. 

As soon as you square up the bottom and top of the strips, you are done! No need for borders. If you would like it longer, you can sew on white strips across the top and bottom. 

This quilt could even be sewn with the strips horizontal so it would be 60 inches across or longer depending on the length of your white strips. 

Strips sewn horizontally
You would have to add more colored strips (finish at 2"). For example, 40 horizontal strips would give you about 80" length.

I really am a much better quilter than writer, so if you have a question, please ask.


Now, maybe you have an urge to go and make one?

*&*&*&*&*&*&*

WOW!  I know I certainly want to go make one of these - and I'm thinking about that overflowing binding box again!  Such a simple quilt, it would work up in a snap - and if you use scraps, it's basically free!  That's a win-win any way you look at it!! Thank you so much, Linda, for sharing this great tutorial.  I bet it makes it on a lot of "bucket lists"!

See you next week when we have another great guest blogger - Sharon from Vrooman's Quilts.  And keep on quilting, because there are lots of folks out there who need a quilty hug...

Hugs!

Sarah

(Sorry about the weird color and font at the end of this post - HTML is not my friend!!)