Hi, all!
May! The lovely month of May has arrived, with beautiful springtime weather to enjoy and the end of this year's Hands2Help Challenge in sight. Today we have another guest blogger joining us - Anja from Nova Scotia, who blogs at Anja Quilts! Anja is always creating something beautiful, it seems, and she has a wonderful tutorial for us today. So now I will turn the blog over to her!
*&*&*&*&*&*&*
Thanks to Sarah for hosting another year of Hands2Help and for the opportunity to guest blog. I'm Anja, and I blog over at Anja Quilts and on Instagram with the same name.
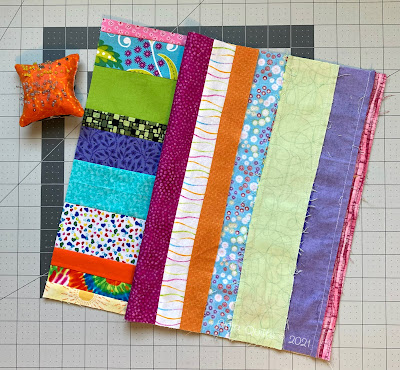
My tutorial continues Sarah's theme of string therapy. I found a piece of paper in my quilting notebook with some directions, but no indication what the pattern was called or where I found it. It said to cut strips 14.5-inch long of various widths. I decided to use 12.5-inch lengths because that's the largest square ruler I had. Sew strips together to make a 12.5-inch square.
Match two squares together, alternating the orientation of the strips so they are perpendicular. Sew a 1/4-inch seam around the entire perimeter of the square.
Cut the square diagonally twice to get four sections.
Press each section open to reveal a square. My note did not say to sew the strips to a foundation, and at this point of the process, I realized that would have been a good idea. Some of my squares were 8.5 inches, but some were not. So I trimmed them all down to 8.25 inches.
I ended up making 48 blocks, resulting in a quilt top about 47 x 63 inches. There are many possibilities to arrange the blocks.
This is a simple way to use up your scraps.
*&*&*&*&*&*&*
Oh, how I wish I had known about this technique when I was doing my string tutorials! This is such a great and simple way to change up string blocks into something really special. Thanks for sharing with us, Anja!
Next week we will have another guest blogger, and it's also a check-in week. If you don't have a blog and want to share your progress, please feel free to send them to me at salliesue57 (at) gmail (dot) com and I will add them to a blogpost so others can see your work!
See you next week!
Hugs!
Sarah


Love this!
ReplyDeleteThat is a wonderful quilt , thanks for the instructions.
ReplyDeleteThis is a great idea--I'm going to try it! Thanks!
ReplyDeletePDF please charlotta58@gmail.com
ReplyDeleteSuch a great technique! If a foundation was used, what kind would you suggest? A leave-in lightweight fabric, or paper?
ReplyDeleteKathleen -- kakingsbury at verizon dot net
Foundation fabric can make the quilt awfully heavy.
DeleteNice block, Anja! Thanks for the tutorial :)
ReplyDeleteLove this block! Can't wait to play with my scraps.
ReplyDeleteWhat a fun scrappy quilt, Anja!!
ReplyDeleteThis is a great tutorial for those of us wanting to attempt quilting for the first time. This will be a great project! Thanks for your hard work with the tutorial.
ReplyDeleteBecause that's the largest https://banksnear-me.com/bank-of-america-near-me/
ReplyDeletesquare ruler I had Sew strips together.
Love this idea!
ReplyDeleteI’m planning to try this pattern. Would light weight rice paper work for the foundation. Or what do you suggest?
ReplyDeleteI would love the PDF😊. treba.sinclare@yahoo.com
ReplyDeleteaconlin108@yahoo.com
ReplyDeleteLove this idea!Thanks!
ReplyDeletepdf please thejuryfamily@msn.com
ReplyDeleteEs muy hermosa y divertida para confeccionar y de ésta manera no desperdiciando tanto retacito que lo podemos utilizar .
ReplyDeleteMuchas gracias y felicidades por ser tan creativa
I would love a pdf also of this pattern thank you I just found you!
ReplyDeleteMy dress is brendaedwardssmith@outlook.com sorry
DeleteWhat a fantastic idea ! Love the way you did this. A new way to use up my scraps. Thank you !!
ReplyDeleteMargaretadkins302@gmail.com
ReplyDeleteSew many possibilities! I want to try this! Can you explain the foundation paper? Do you mean foundation as in paper piecing? If, yes, why? sheteaches56@gmail.com
ReplyDeleteWhen you cut something like this apart, you need foundation, To keep the squares from losing the shape, being pulled against the bias or whatever.
DeleteI found this pattern in America Loves Scrap Quilts, 2009. It then has borders around each square and sashing between blocks. I've made a number of these and it eases on the many seams of each block. It was good to see a quilt without borders, etc. Thank you.
ReplyDeletePDF please samu812@aol.com
ReplyDeleteI’d live a pdf. Cblaylock32@gmail.com.
ReplyDeleteThank you for sharing! Your generosity is much appreciated
ReplyDelete