
Hi, all!
Well, finally, as promised, today starts this year's tutorial series. I thought this year I would go back and revisit some of the most-loved tutorials from past years, plus add in a few new simple designs too! I think we'll call this year's series Something Old, Something New. That seems appropriate! For those of you new to the blog, these quilts will be simple designs that can be easily worked up for charity or comfort quilts. We'll have one each Sunday for the next five or six weeks, depending on how many designs I end up with, and immediately after that, this year's Hands2Help Comfort Quilt Challenge will begin.
So let's get started with the first tutorial! I saw this quilt on Pinterest...

...and my initial thought was "Wow! Gorgeous, but that's a LOT of piecing." Then I remembered a technique I learned and thought that it would be a lot easier that way, making it a good choice for this tutorial series. I popped over to the blog for Doodlebugs and Rosebuds Quilts, where I read that she did not have a pattern for this quilt, so I decided to mock it up in EQ8.

Once the quilt was graphed out, I counted and found that it uses 541 print 2.5" squares and 100 white 2.5" squares - and I have tons of those already cut out, so hooray!!
Here's the simple technique that will take this from tedious traditional piecing to quick, easy, and perfectly pieced blocks. You will need to get sheer weight fusible interfacing (with the fusible on one side only). If you are like me, you have tons of the stuff stashed away somewhere; if not, it's easily available at your local Joann's or equivalent. You want the lightest weight you can get, because it will remain in your blocks.

Lay the interfacing on your ironing board with the fusible side up. Arrange your squares, with edges touching but not overlapping, on the fusible interfacing. For the 9-patch blocks in this quilt, you should use four white squares for the N-E-S-W squares, and prints for the remaining five.

Next, you will trim close to the squares on the interfacing. This is before you iron them down, so if they shift, just put them back in place.

Now press the nine squares down to the fusible interfacing. I use a very hot and very steamy iron to do this and merely press the iron down, then lift it up and move it to another section. I don't recommend moving the iron side to side as you would if you were ironing clothes, as it may move the squares.

After ironing the block, if you hold it up to the light you will be able to see very narrow lines between your squares. This is normal and good!

Now fold the block on one of those lines and take it to your sewing machine.
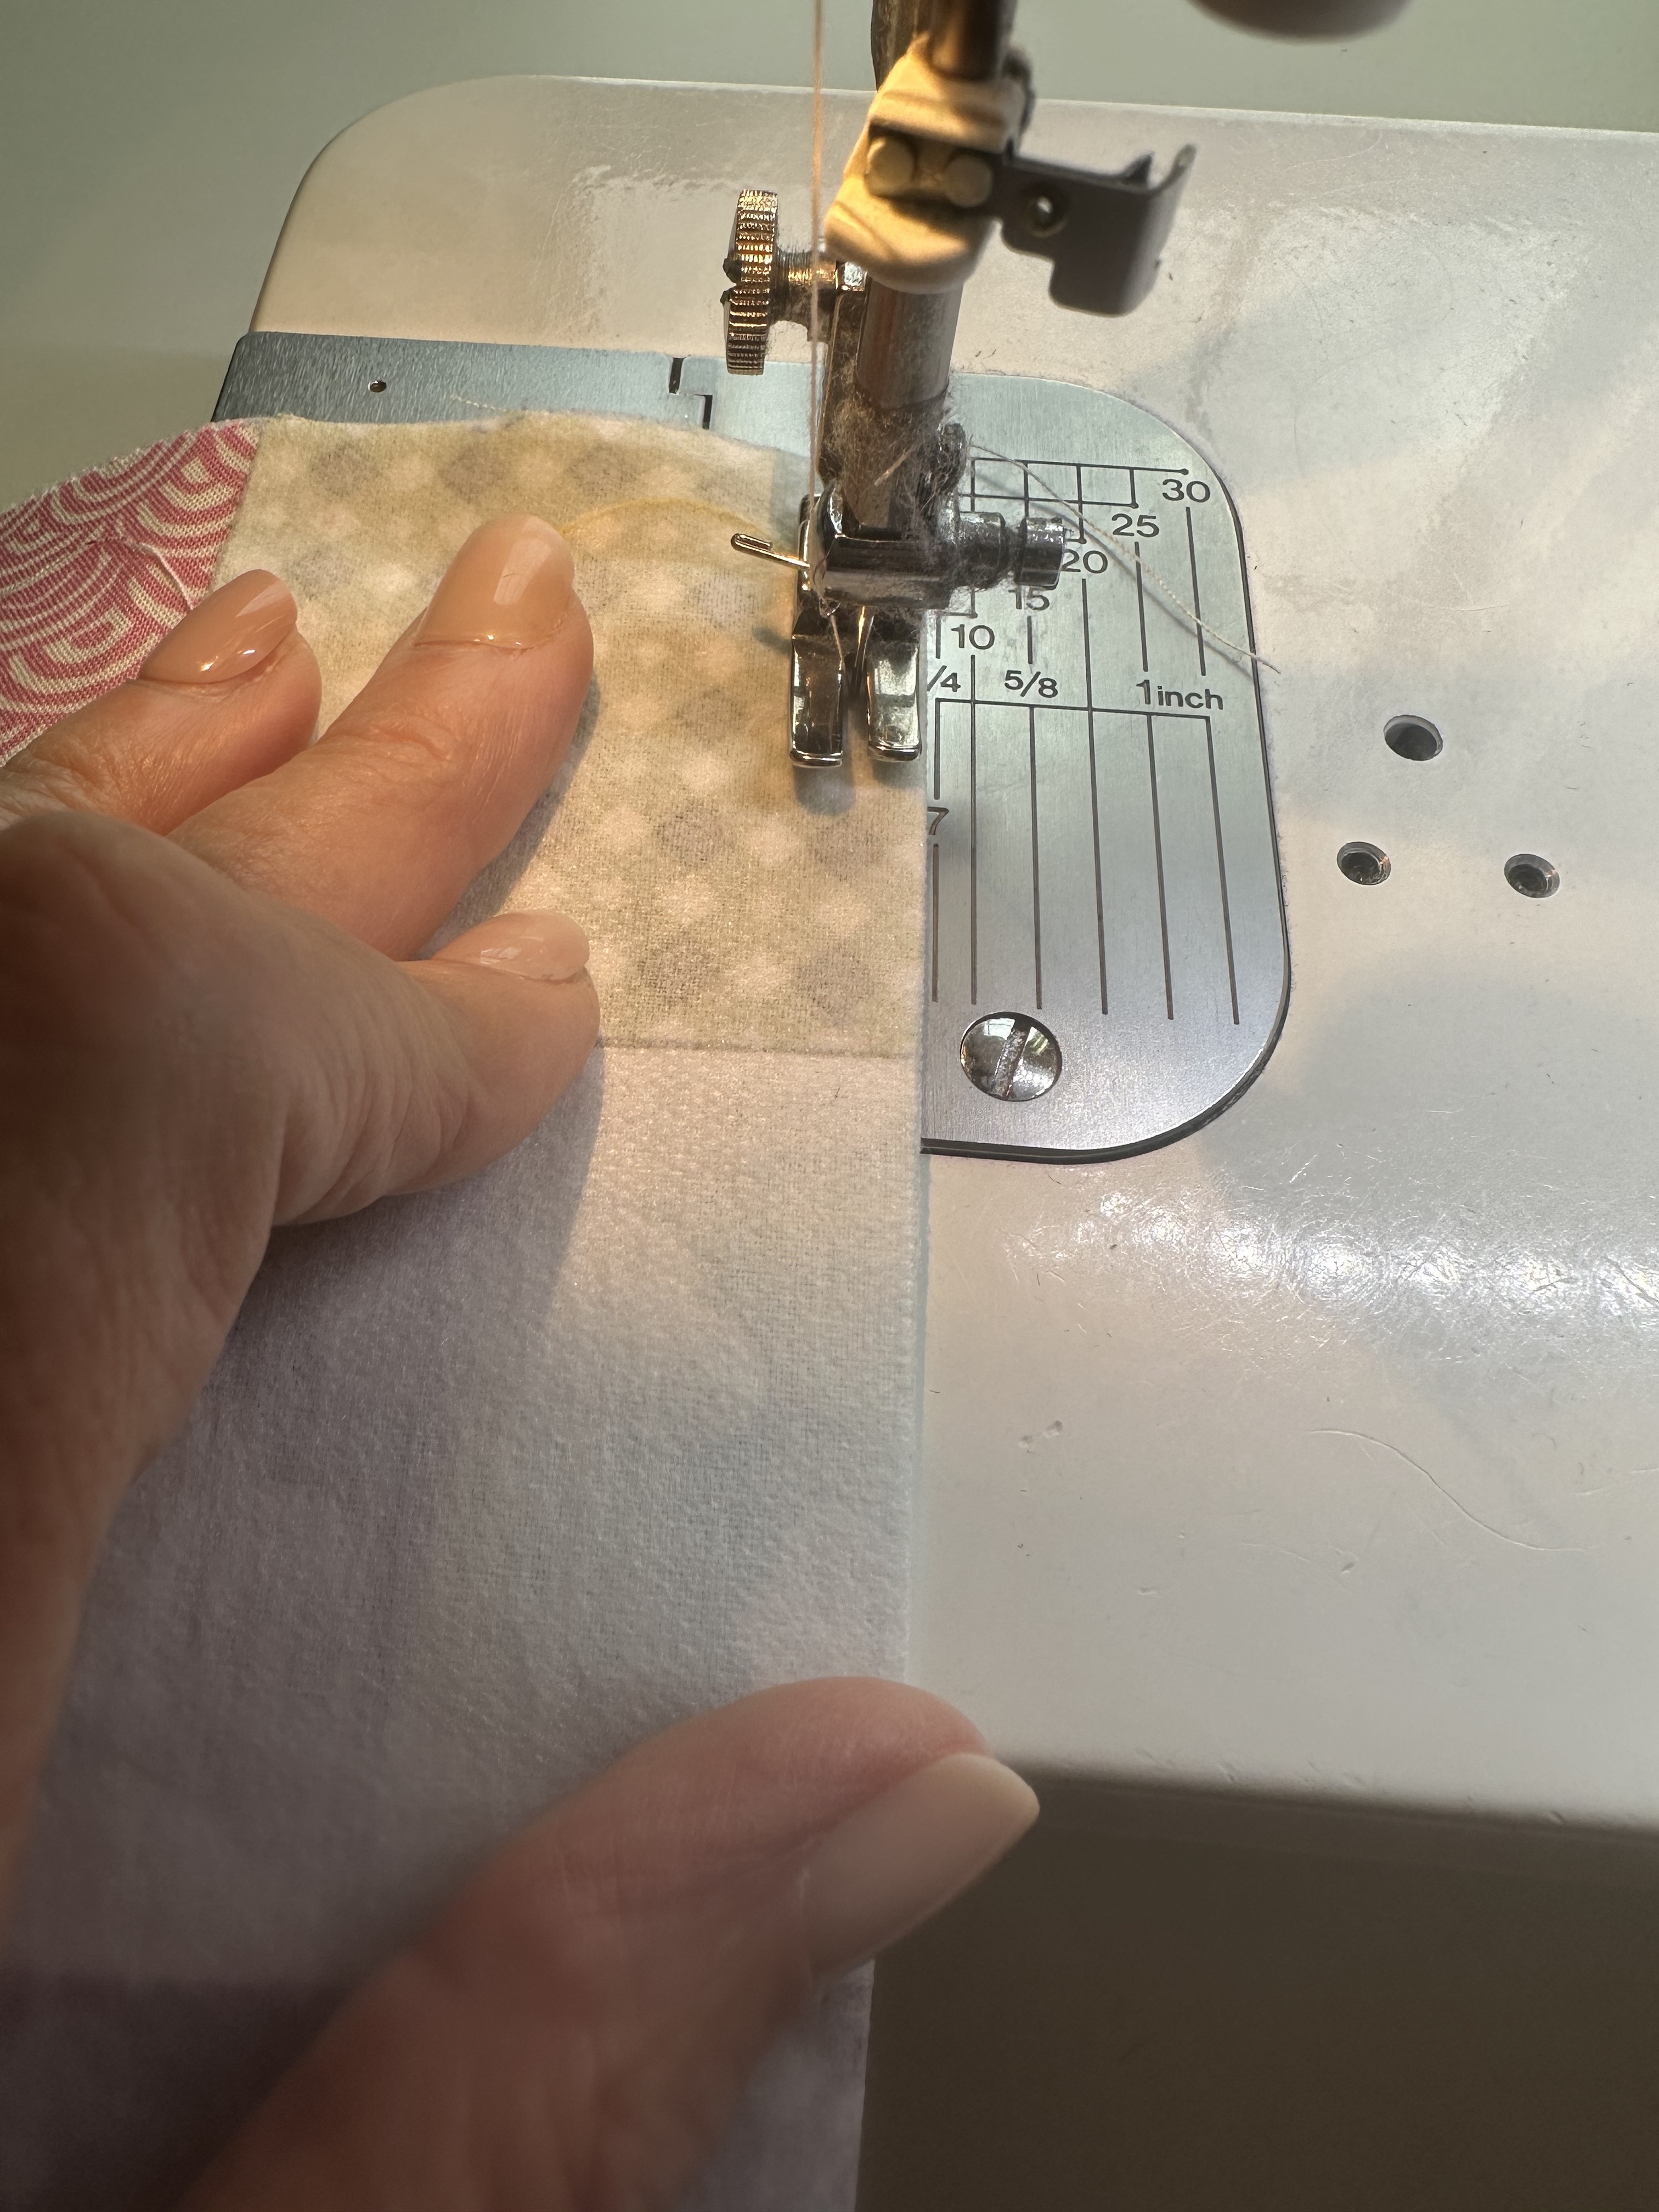
Sew a 1/4" seam just as you normally would. Repeat for the parallel seam.
Your piece should now look like this. Grab a pair of scissors. Ones with tiny blades will be the easiest for this purpose. I like my curved embroidery scissors!

Put one of the blades inside the fold of the seam you just stitched and clip that seam open. Repeat for the other seam.

Press the seams open. Repeat for the seams that cross your first set of seams, folding, stitching, cutting the seams open and pressing.

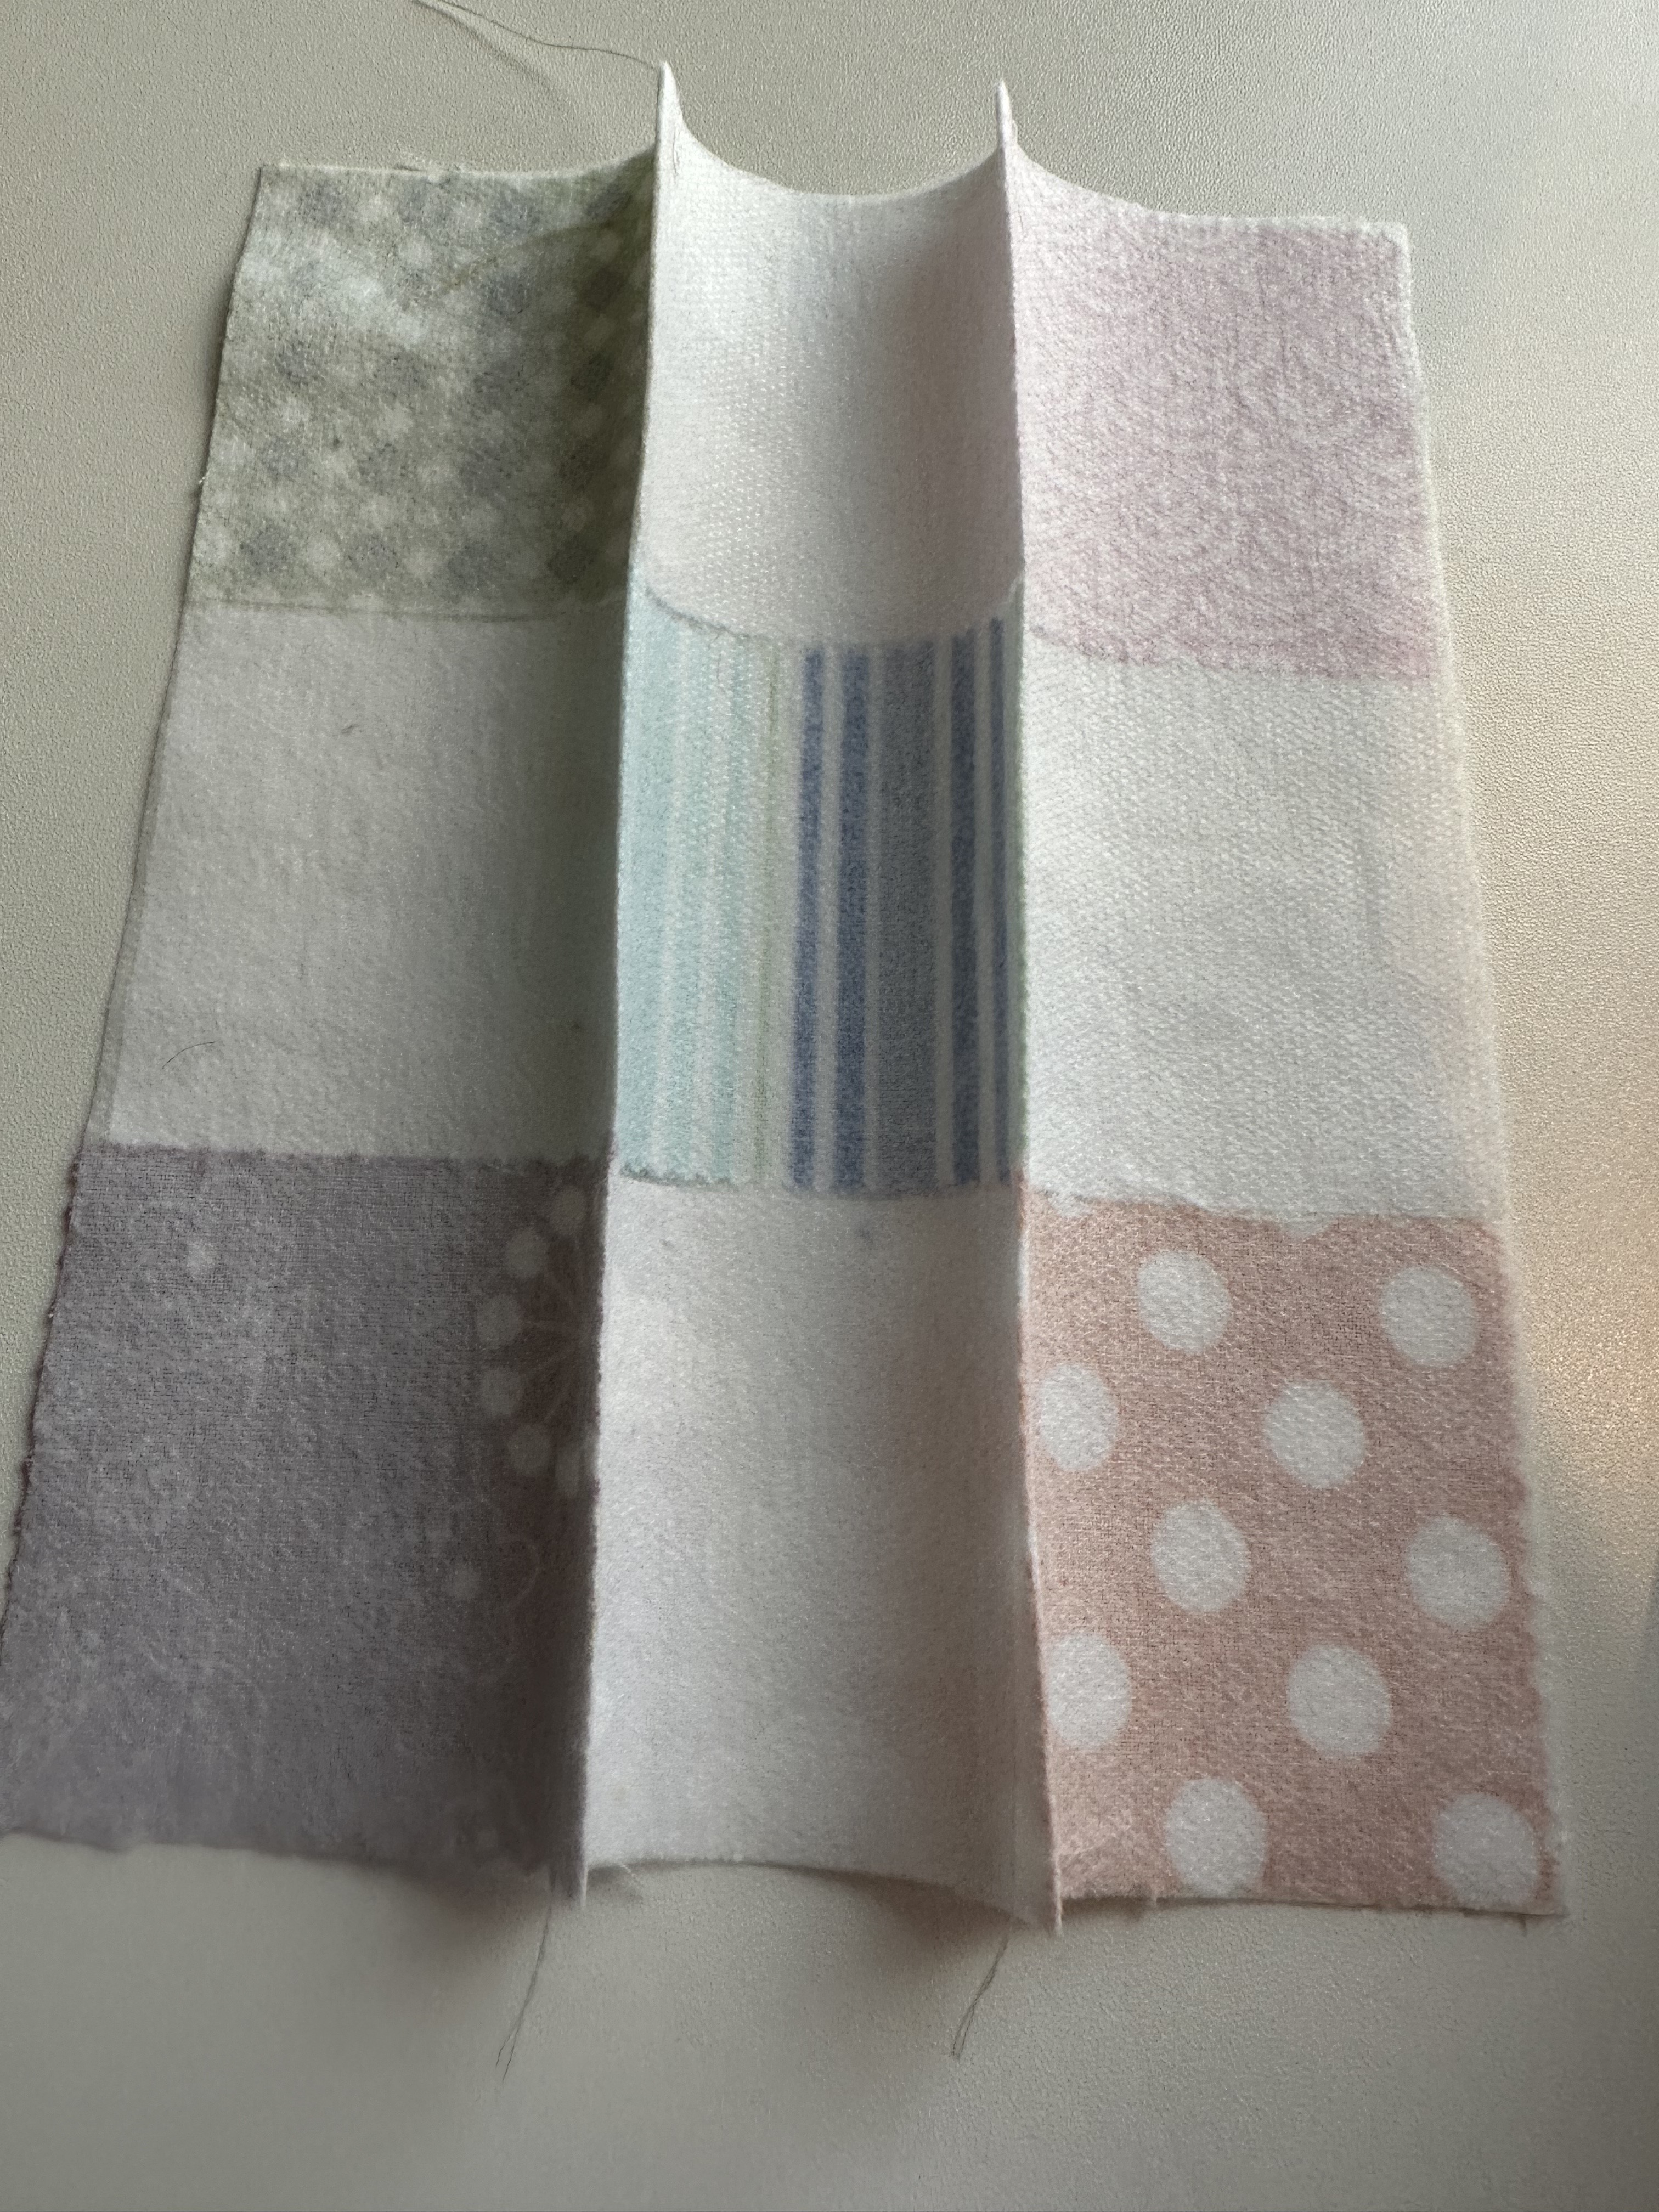
Once pressed, the back of your block will look like this. But wait! Flip that baby over....

...and you will see that every intersection on the block is perfect! No pins, no patching, no nesting of seams. And it works every. single. time!
Now that you know the technique, make twenty-five (25) of these 9-patch blocks. Using the same technique, make sixteen (16) 16-patch blocks.
You will also need sashing blocks. These are simple - sew four 2.5" squares together in a line. Then, on each long side of that strip, sew a 2.5"x8.5" strip of white. Press the seams toward the white strips. You will need forty (40) of these sashing blocks.
Once you have made all of the components, it's time to lay it out. Here's the layout I used...

There's a little bit of matching in the sashing rows, but you will find that it goes together really quickly. The finished quilt measures 62" square, and can be easily adjusted to a different size by either using a smaller square (i.e. 2") for the blocks or increasing or decreasing the number of blocks used for the quilt.
Here are the fabric requirements:
1 3/4 yards of white fabric at least 42" wide.
From this, cut: 100 2.5" squares and 80 2.5"x8.5" strips
Approx. 6 yards of 20" wide sheer weight fusible interfacing
541 2.5" squares of assorted fabrics
For backing: 3 2/3 yards of fabric
For binding: approx. 1/2 yard depending on your choice of width
Once you've assembled your quilt top, you'll have something that looks like this....
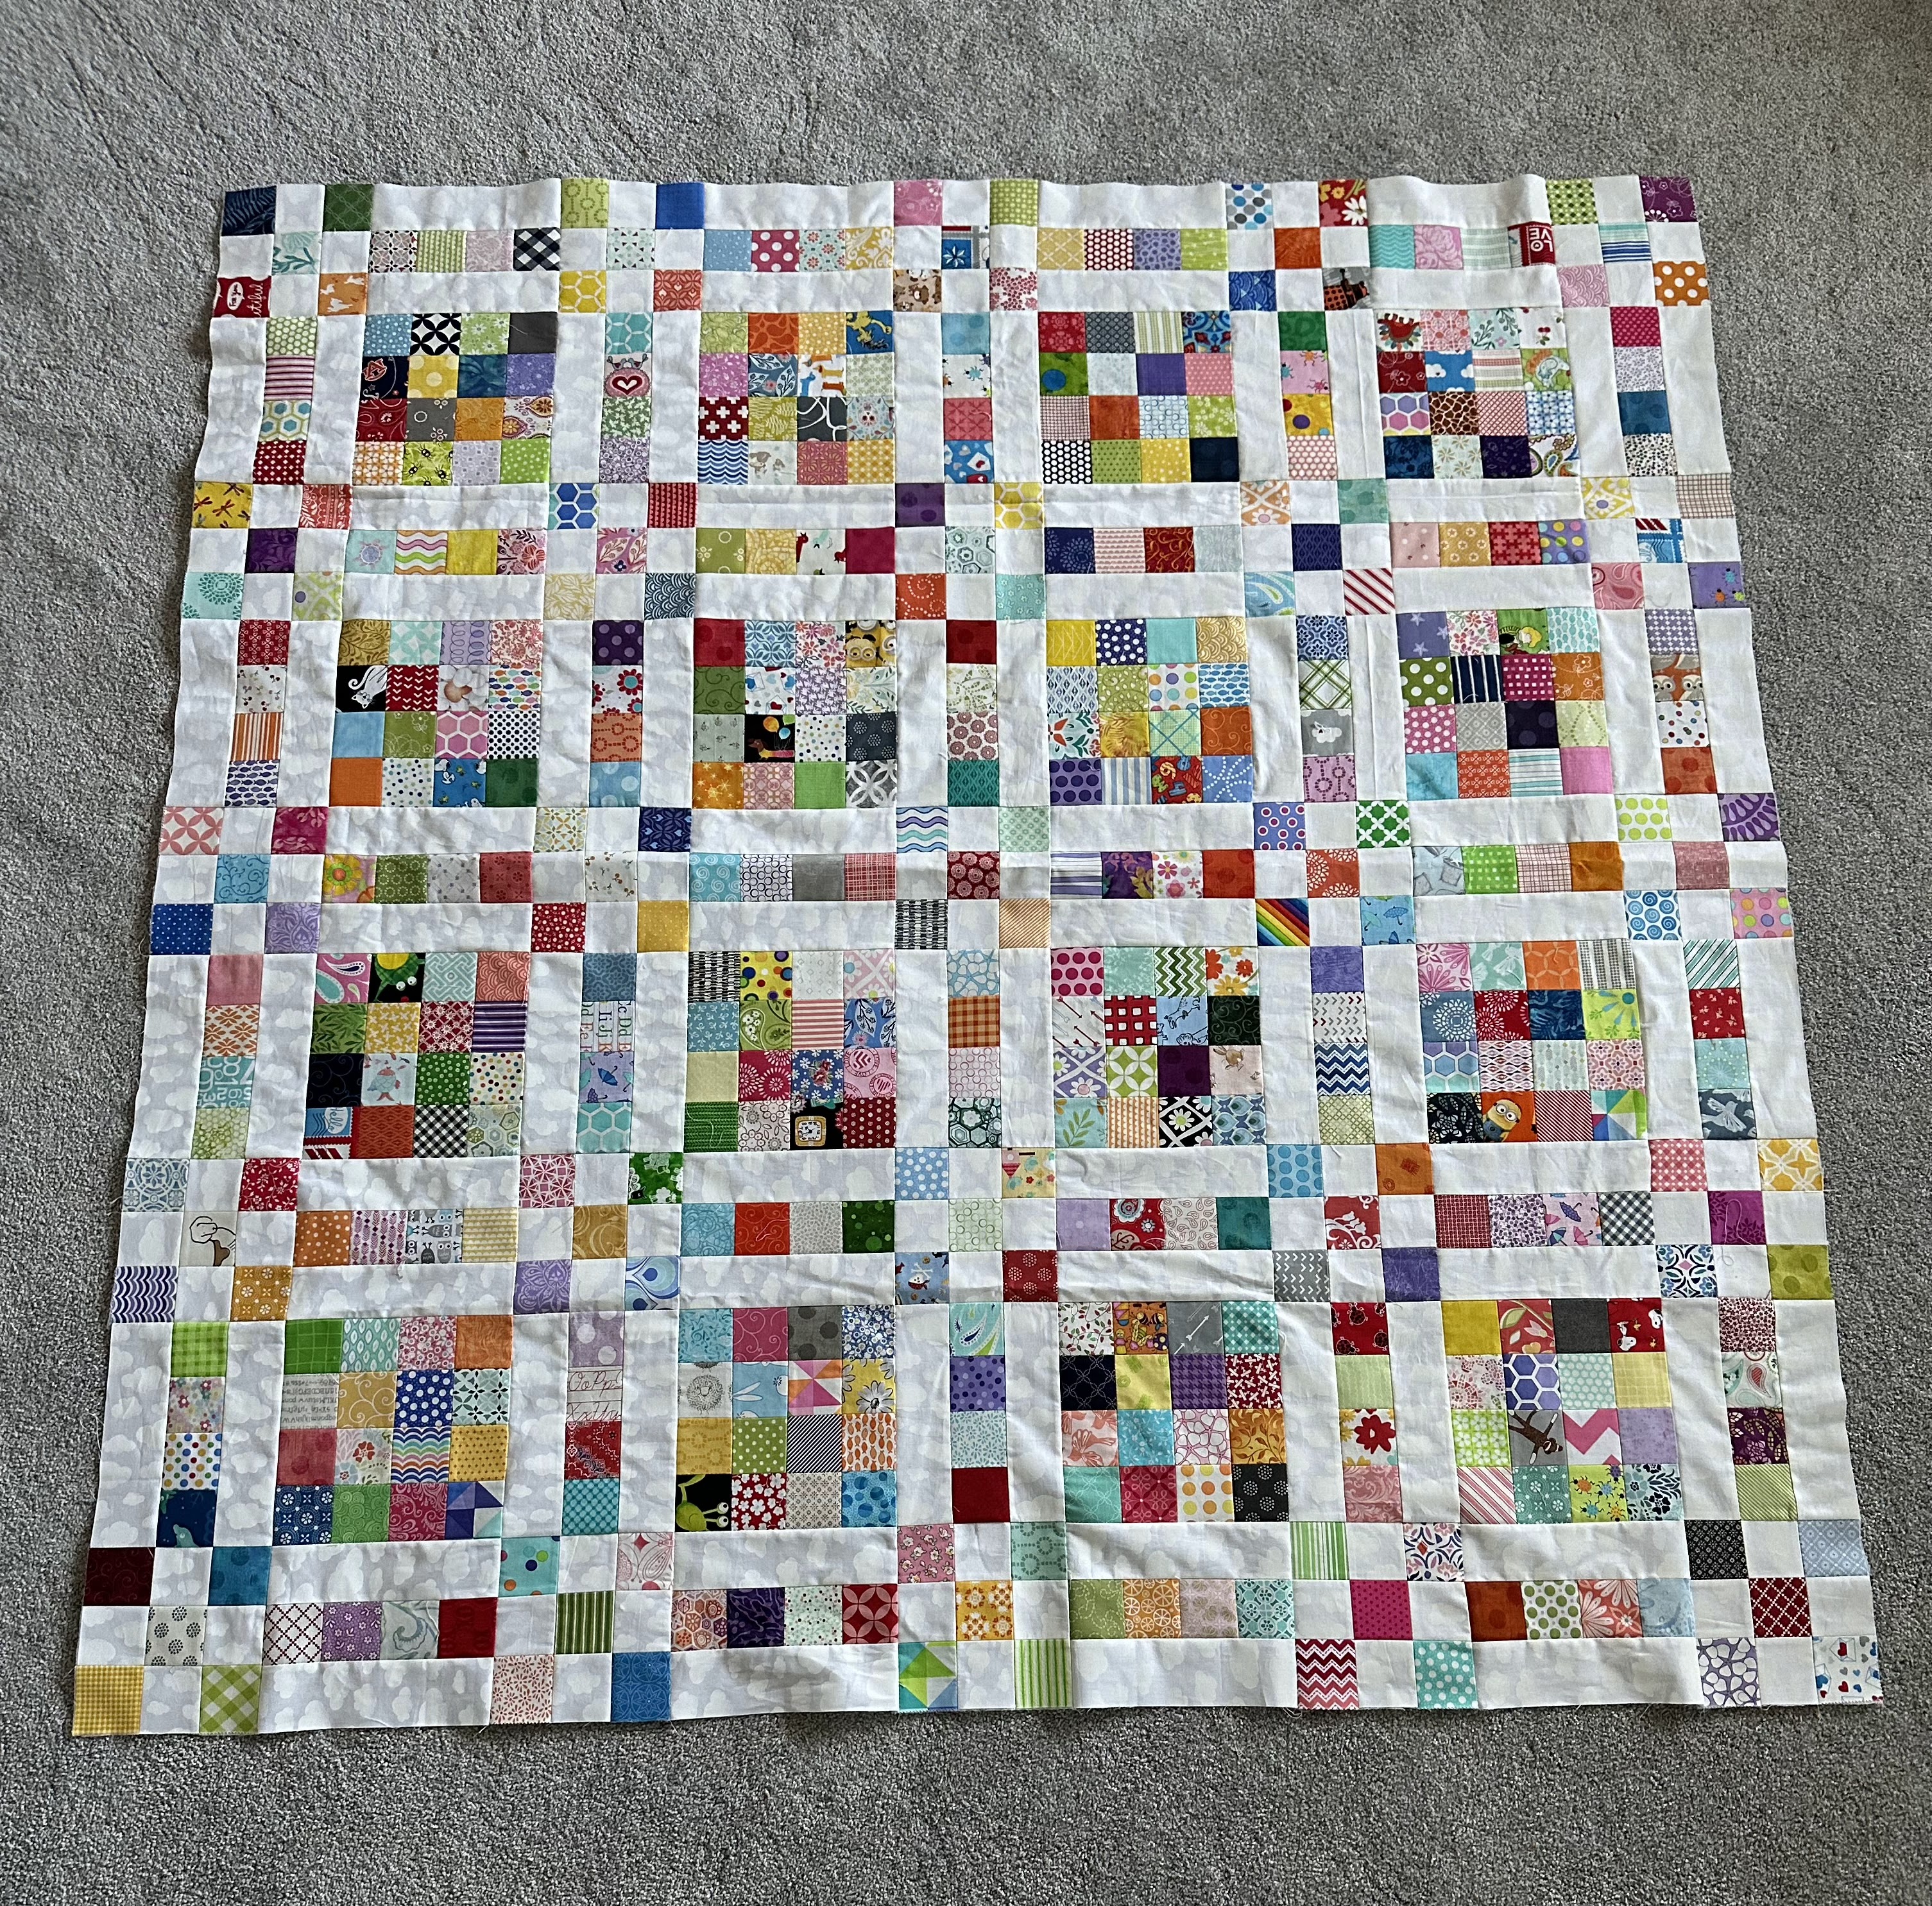
Isn't that a lovely riot of scrappy goodness?

Bree was keeping a close watch on this photography session to be sure I did it right...

...and even stepped over to put in her two cents worth!
I hope you'll find this a useful technique and design! It's certainly a great way to use up lots of small squares without a lot of nitpicky seam matching. Can you tell I'm a lazy quilter? LOL!
See you next week with another quilt tutorial - and this one's going to be super simple - so simple you could make it in an afternoon!
Hugs!
Sarah
I made the same quilt last year as my leader ender project. Loved how it turned.
ReplyDeleteWhat a great idea, need to try it out. Thank you for this recommendation. If you have a pdf from the layout, I really like to have one. Thank you
ReplyDeleteThose 16-patches could be replaced with a large-scale print or panels for a completely different look.
ReplyDeleteI've been sitting for nearly a week (after a leg injury with an appt tomorrow w/ an orthopedic surgeon), cutting my scraps into appropriate sizes. Thank you for such a wonderful tutorial to make use of these scraps. If surgery is required, sewing these up on Rose (my featherweight) will be a good activity (with leg propped up, of course). Luckily it's not my right, as it would impede my 'driving'.... : ) Thanks so much! Deb E.
ReplyDeleteMay I also have a PDF of the pattern? Thanks so much, again! Deb E mdenders@msn.com
ReplyDeletethere's a tab for the pdf right at the bottom of the post. :-)
DeleteA lovely start, Sarah! Hugs :-)
ReplyDeleteLove the scrappy quilt. I don't mind sewing squares together- it's therapeutic for me. How did you put the little green print/pdf rectangle at the end of your post? I would love to do that.
ReplyDeleteLove this! How do I subscribe to your blog?
ReplyDeleteThanks for the tutorial for this cute scrappy quilt!
ReplyDeleteSo glad to hear you are hosting H2H again, I have been working on some quilts already for it. Thanks for the tutorial today!
ReplyDeleteLooking forward to H2H 2023. Thank you for the tip about fusible interfacing on backs of 4 and 9 Patch blocks. That is genius!
ReplyDeleteThat one looks really nice. Thanks.
ReplyDeleteReally like this one and have all those squares already cut!
ReplyDeleteThis is a great tutorial. The block turned out perfect.
ReplyDeleteA striking design for 2.5 inch squares. Well done.
ReplyDeleteI can't wait to get started!!!! I can picture this in several different colorways! Thanks!
ReplyDeleteI really want to make a quilt like this!! Great idea!
ReplyDeleteThanks for the tutorial, i love this scrap quilt!
ReplyDeleteI'd probably just piece it traditionally, having done thousands of squares in blocks like these. That's a good technique for matched corners, though, and would be ideal for many people. I like the overall look of it, and am glad you shared this one.
ReplyDeleteWhat an interesting technique and a lovely quilt, Sarah!
ReplyDeleteThis quilt is beautiful and a fabulous way to use up scraps! Thank you very much for sharing!! And yes, I would love the pdf pattern. machele.trachier@gmail.com
ReplyDeletedilzi.mody@gmail.com
ReplyDeleteThis is awesome! I have 2.5” squares and always more coming. Is there a difference in the light and the sheer. Did I read your description correctly. I’ve used this method before and love it! I too would love the PDF sallyt13@gmail.com
ReplyDeleteI hope I’m not too late! Thank you!
I can’t wait to get started. Would love a pdf.
ReplyDeleteSrgreen2009@live.com
Michael Small
ReplyDeleteThis was so interesting! Thanks. And I'd love a pdf of the quilt. kathyrawlsbyrd@yahoo.com
ReplyDeleteyes please for pdf pattern! memailloux13@gmail.com
ReplyDeleteCan I get a PDF pattern for this beautiful quilt? Email: mlmfmjr@gmail.com
ReplyDelete