

Friday has rolled around once again, and you know what that means - it's time to get our whoop whoop on!! Are you ready? Well, then, let's get started!
*&*&*&*&*&*
Last Wednesday night, we were talking at church about a quilt design several of us had seen on Facebook...

The comment that went with the picture said, "Fun jelly roll quilt that I found today and had to share! Start with 2 1/2" strips. Sew end to end, then together. Approximate finished size 44" x 84". Cut finished piece in half, then once diagonally. Sew four triangles back together and it finished around 60" x 60"." Sounds simple, and a couple of our ladies went home with fabric and an intention to make one. (FYI - Don't follow those instructions!)
Then this morning, I was putting something away in my studio and opened a drawer and found a jelly roll I had forgotten about.
SQUIRREL!!!

Armed with a picture of the quilt and description and a jelly roll, I set out to put one of these lovelies together. But as I got into putting my jelly roll quilt together, using the traditional jelly roll race method, I realized that my top wasn't going to end up at 44" x 84" at any point in the process. Oops! This called for some regrouping.
When completed, my top finished up at 51" x 69.5". I did some quick math (actually I texted my math-genius nieces and asked them to figure up the measurement for me) and figured that I could cut two squares about 34.75" square from this piece, which would yield a 48" finished square. That was a start, and I could add borders to make it larger.
So I folded the quilt top in half with the seams outside, pinned the edges together, and folded the piece over at a 45 degree angle to find the bottom of the square. (I did it this way because I don't have a straight edge 35" long.) I then used my straight edge to cut along that folded over edge, yielding two pieces - one approximately 69.5" x 34.75", and the other approximately 69.5" x 16" (the section you can see at the bottom of the picture below). Set the 16" piece aside for later use.

Take the larger piece and remove the pins. Unfold the diagonal fold. Using your trusty seam ripper (I call mine Jack - Jack the Ripper) rip out the seam on the fold, leaving you with two 34.75" squares.
I can see you now - you're saying, "Why didn't she just stop sewing when the piece was 34" wide by 140" or so?" Well, I thought about that too - but I wanted that 16" x 69.5" piece that we cut off earlier for a special finishing touch. So I left it sewn together and picked out part of it afterwards.

Now take the squares and fold them in half diagonally. Lightly press on the fold (don't iron - just press! You don't want to stretch the bias.) Cut the two squares on the fold lines to create four triangles.
Arrange the four triangles on your design wall (or floor) with the longest edges to the outside of the square. Be careful not to stretch those edges - they are bias edges. Stitch them in pairs, then join the pairs matching the center seams. Stay stitch the outer edge, being very careful not to stretch the edge. Allow your machine to feed the fabric through, simply holding it enough to feed it straight. This square should measure about 48" square.
Next I put a stop border around the center block. I cut five 2.5"wide WOF strips and sewed them together into one long strip. Measuring across the center of the piece from top to bottom, I then cut two strips to that measurement and sewed them to either side, pinning from the center to the ends, being careful not to stretch the fabric any more than needed to make it fit. Press the seams toward the border. Repeat the process for the other two sides.
Now take that long piece of the original jelly roll quilt that we set aside earlier. My piece was about 16" wide, so I cut it into four approximately 4" wide pieces, and sewed them together into one long "piano key" piece. (FYI, this is a great cheater way to make a piano key border for any quilt, and makes it easy to use up a lot of scraps - just sew them together into a jelly roll quilt and cut it into long strips!) Measuring across the middle of the quilt as you did for the stop border, cut two strips from your "piano key" piece to that measurement and sew them to each side, matching the centers and ends and easing as needed to make it fit. Repeat the process for the other two sides.

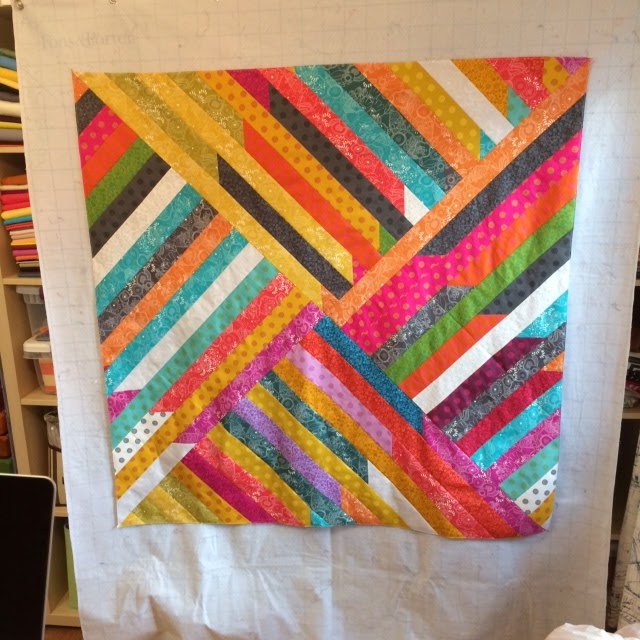
And here's the finished top! I've got a small piece of the piano key border left that I'll probably work into the back, but even if I didn't, it's just a small amount of waste from that jelly roll. This quilt finished up right at 60" square - a great lap size!! One jelly roll, 3/4 yard of a solid for the stop border and binding, and about four hours - not too bad!
So - - - can I get a whoop whoop??
*&*&*&*&*&*&*
And now it's your turn!
What are you whooping about this week?

What's got you dancing a little happy dance?
Share - we want to dance right along with you -
And it's always more fun to dance with friends!
The party will stay open until Sunday midnight -
Hope to see you there!
Hugs!
Sarah
Wow, what a creative way for a jelly roll. Thank you. Can't do it right now, am trying to get my Bonnie Hunter mystery done--lots of pieces, which means--Pay Attention !!!!
ReplyDeleteI love what you did with that jelly roll. There are similar squirrels lurking in my fabric closet. I will be reading and re-reading this post to get the hang of it. Thank you for sharing and the resulting quilt is big and beautiful with the piano key border adding the right amount of pizzaz.
ReplyDeleteWhat a fabulous quilt....tx's so much for sharing your process!
ReplyDeleteWhat a neat quilt! I won't be trying this today, but maybe this month sometime. I really like it! Blessings! villacrestfarm@gmail.com
ReplyDeleteWhat a fun quilt! Thanks for sharing the how-to.
ReplyDeleteI've seen the quilt making the rounds on social media and really like it, but I like yours better. Thanks for doing the math, I need to read this all again to wrap my head around it.
ReplyDeleteWhat a great quilt. Definitely a pattern to file away for those times when the hubby or daughter drops an emergency quilt request on you. x
ReplyDeletethat sounds easy enough but I bet it would take me longer than a day!
ReplyDeleteVery clever! Thanks for the tutorial.
ReplyDeleteI may have to try this. I have a jelly roll race top completed and sitting in my stack of UFO's because I'm just not happy with it. This might do the trick. Thanks for sharing this! Wendy at piecefulthoughts@gmail.com
ReplyDeleteMe too. That jelly roll top has just been sitting there.
DeleteI love your version way better than the one I saw on FB. Your borders really set it off.
ReplyDeleteEXCELLENT tutorial... loved following this progress on fb and love that you figured it all out for us!!! Thanks :) Kathi
ReplyDeleteSweet! I love the piano key border you added. Great border additions!
ReplyDeleteThat is so cool!!! I have added it to my list to make :)
ReplyDeleteWhat a great quilt!
ReplyDeleteWow! Thanks for that tutorial! That is a great looking quilt and will go on my "to-do" list.
ReplyDeleteWhat a process! It turned out great!
ReplyDeleteI made a version of this with rectangles and a square in the center, but I really like your triangle version. I will try this the next time I get my hands on a jelly roll. Thanks.
ReplyDeleteThis comment has been removed by the author.
ReplyDeleteWhat a great tutorial, thanks!
ReplyDeleteThat's too cool Sarah!!! I'd love to do one of these one day soon - thanks for sharing how you did it :*)
ReplyDeleteawesome! i have made the race version a couple of times and they just are so blah .... THIS will be FUN to give a try (today since it is raining!!) thanks for sharing :D
ReplyDeleteNice tute, and a great finish, Sarah! I love the colors in that jelly roll. I've been playing around with striped fabrics, and the finished pattern of Squirrel mimics some of the blocks I end up with by cutting stripes. Just super sized instead :)
ReplyDeleteJelly Roll Race Quilts don't appeal to me but I love this twist to it. What a fantastic finish and only half a day of work!! Wonderful. Congrats on the finish. ;^)
ReplyDeleteOh my gosh....that's awesome! What a great idea.
ReplyDeleteWhoop, whoop. A very coloful top.
ReplyDeleteThe dark sashing really sets off the center - perfect! Thanks for doing the math and giving us a quick and easy project. Yours turned out beautifully!
ReplyDeleteYour jelly roll turned out great! What a great way to use up a jelly roll! Thanks for sharing.
ReplyDeleteOh goodness, that piano key border really makes this quilt dance! Adding the dark (could that be black?) inner border frames the middle so well--gives it a medallion feel. Love it, Sarah!
ReplyDeletevisiting from crazy mum quilts. What a great tutorial. I have a jelly roll sitting around and am going to do this. thanks heaps
ReplyDeleteI'm going to print this out when I get home, and use it to make a Quilt of Valor with all the RWB fabrics I have (no jelly rolls). Thanks! Great 'squirrel'!
ReplyDeleteThanks for the great tute! ?Thank your nieces for their math skills.
ReplyDeleteMakes the jelly roll much more interesting, love it, thank you!
ReplyDeleteI love the quilt that you made. What if I wanted to make a king size quilt with that same pattern how would I go about doing it. I know I will have to have some borders on it, but I do want to have that abstract look. I have made 2 jelly roll quilts using the jelly roll challange but they were straight rows of stips. I would like to do your take in a king size. Please advise
ReplyDeleteGet a metal yardstick (tool section) at Wal-Mart or Lowes and you have a long straight edge you can cut with. Love this quilt!
ReplyDelete