
I hope you're having a great Sunday! And since it's Sunday, it's time for another guest blogger for Hands2Help. This week we're welcoming Joanne, who blogs over at Everyone Deserves a Quilt. She's got something really different for us today - a two-fer! So without anything further from me, I'll let her get started...
*&*&*&*&*&*&*
When I'm not quilting, I substitute teach junior and senior high school for two area school districts. Many of my assignments are long-term assignments (maternity leave, medical, etc.), and that takes a chunk of time away from quilting. Not wanting to give up either the teaching or quilting, I've figured out a system that allows me to continue to be productive quilt-wise and still sleep :-) I'm going to share that system here, along with some actual quilt projects.
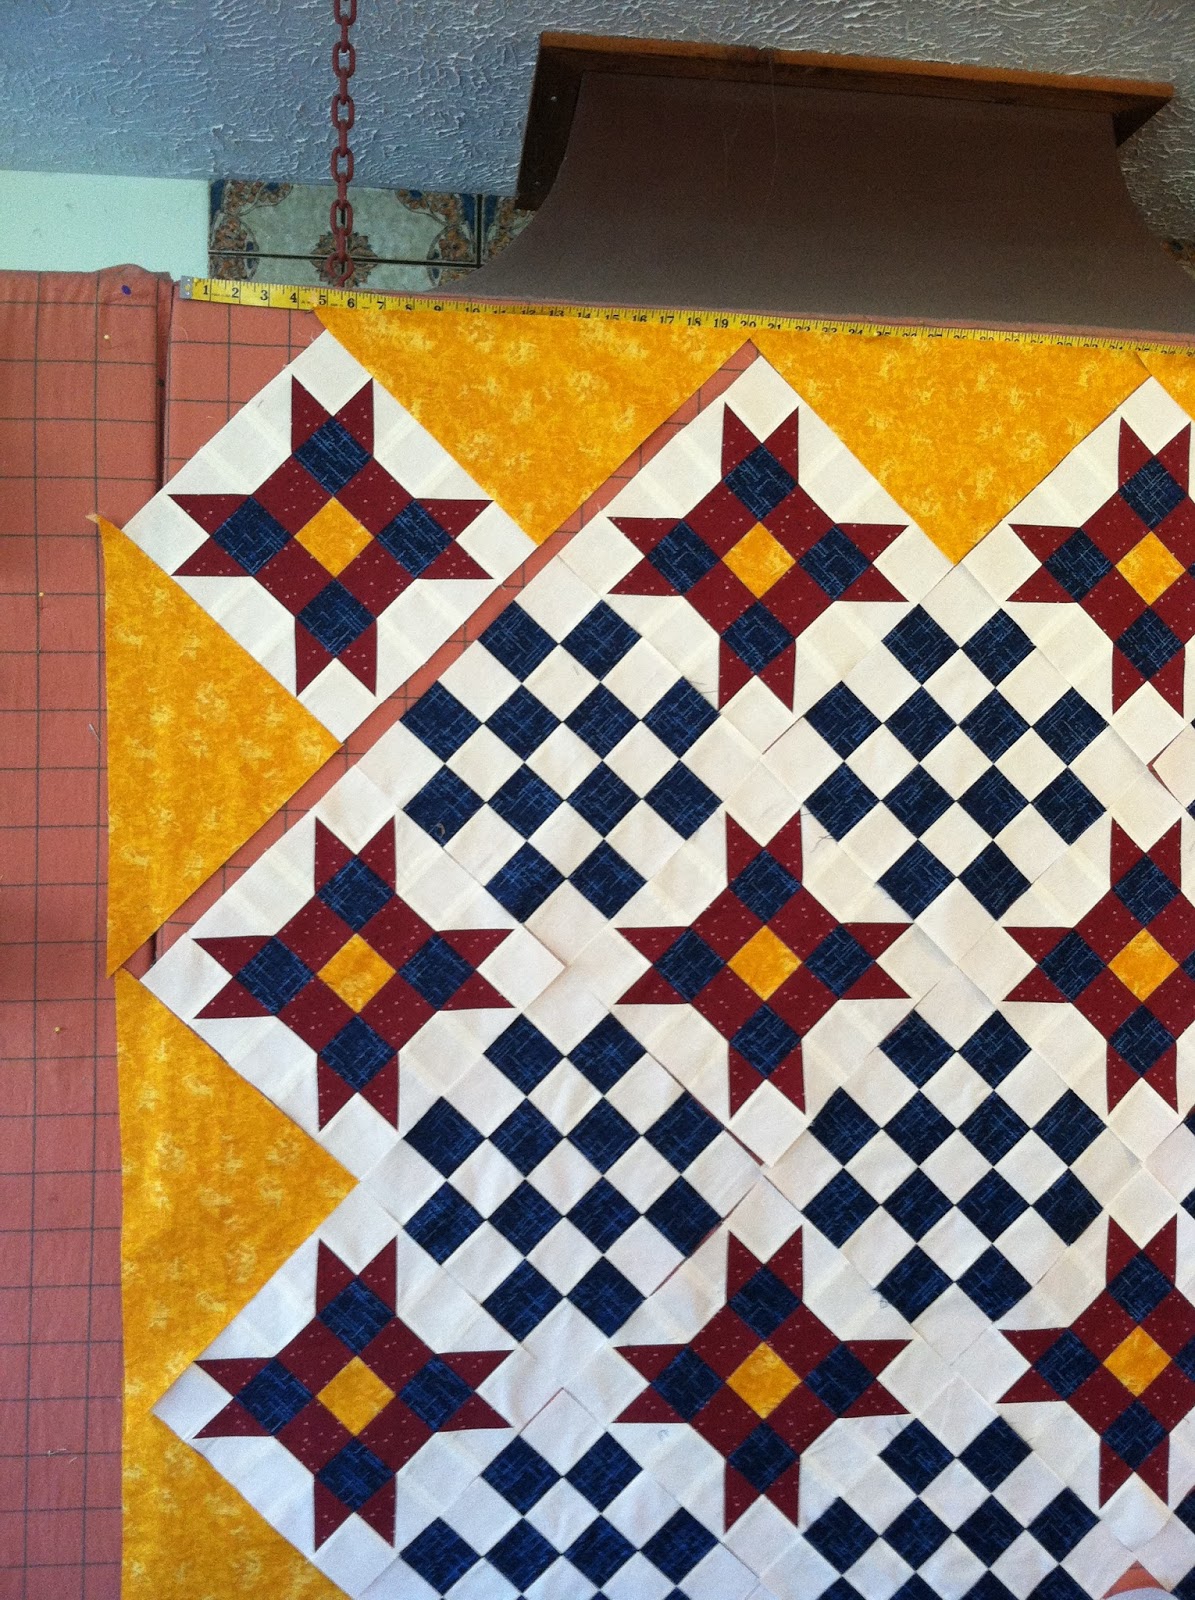
First I'll share a tutorial for this quilt. It's much easier than it looks because much of it is strip pieced. It's a wonderful quilt to make when you want something that looks so much more intricate than it really is. And, don't be afraid of the on-point setting. It really is a breeze and adds so much to the overall design. If you take the time to pre-cut some of your fabrics, this quilt can easily be made in a weekend.☺

The second quilt that I'll share is an easy peasy, lemon squeezy quilt! I made this quilt at the same time that I made the star quilt. Seriously! Two quilts made at the same time!
Some of the construction of this quilt will be intertwined with instructions for the star quilt. To make it easier to separate the two (in the event that you are only making one of the quilts), I'll write these instructions in green.

Two for the price of one! Actually, there will be some bonus half square triangles left over from one of these projects and they are just waiting to be made into a third quilt! I think that might be like hitting a trifecta!


I'll warn you now, I'm a visual learner and teacher so this post will be very picture heavy. If you need more information, please feel free to contact me.
I think most of us are familiar with the leader/ender concept made popular by Bonnie Hunter of Quiltville.com. If not you should seriously check it out. It has changed the way I quilt and has increased my productivity tremendously.
While I like the way Bonnie does this, I felt that I wasn't being nearly as efficient as I could. I didn't want to just randomly be making four patches, nine patches, half square triangles, etc. I wanted to have a project in mind and be working toward a goal and a finished quilt top. So, I decided to start being organized (YIKES!) and kit up a variety of projects so that I could be working on two quilts (or more) at the same time.
In order to do this, there are a couple of things I do before I even think about sewing. As I said above, I make kits for projects that I want to work on. When I say kits, I don't just mean putting the fabric and pattern together. I mean, I do some cutting and get things ready to sit down and sew, even if I only have 15 minutes to spare.
In order to avoid mistakes and mixing up pieces and parts, I make the two projects on which I'm working quite different - very different colors, fabrics, etc.. I also make at least one of the projects a very simple and "I don't have to think" project like the Big Block Quilt above.
Here's some general information that should be noted for both quilts in this tutorial.
1) All seams are 1/4", unless otherwise noted
2) To reduce bulk, I pressed all seams open
3) WOF = width of fabric
4) RST = right sides together
5) HST = half square triangle
Fabric Requirements for the Star Quilt (68" x 82")
Background (cream in sample) - 2 5/8 yards
Blue - 1 1/8 yards
Red - 1 1/4 yards
Gold - 2 1/2 yards
Binding - 2/3 yard
Fabric Requirements for the Big Block Quilt (56" x 74")
Blues - 1/3 yard of 6 fabrics
Reds - 1/3 yards of 6 fabrics
Background (cream stars and stripes in sample) - 1 7/8 yards
Binding - 5/8 yard
Cutting for the Star Quilt
When I cut my kits, I label everything, as I've done for you here. I then put each unit in it's own bag and pull it out when I'm ready to sew.


Draw a diagonal line from corner to corner on the wrong side of all the 3" background squares


Cutting for the Big Block Quilt
Oops! I forgot to get a picture with the labels. DUHHHH You will be sewing these blocks as leader/enders while constructing the other quilt.
From each 1/3 yard of the blues and reds, cut 4 - 10" squares (48 total)
From the background, cut 12 strips 5" x WOF. Sub-cut these strips into a total of 96 - 5" squares. (Each strip should yield 8 - 5" squares.)

On each of the 5" squares, you will be drawing two lines on the wrong side of the fabric. First, draw a diagonal line from corner to corner. Draw a second line 1/2" away from the first line as shown below (toward the corner). (If you are using a striped fabric, be sure to position the stripe going horizontally, and mark from the lower left to the upper right, as shown below. This will ensure that all of your stripes are the same and create a twisting effect once the blocks are put together.)

Let's start sewing strip sets - I like to chain piece these strips sets! As I approach the end of a strip set, I simply feed the next one in to chain piece. When I get to the end sewing all my units, I grab one of my HST units or a Big Block Quilt unit and sew that as a leader/ender. (See below for info on how to make the HST units and the Big Block Quilt units.)

To sew the HSTs for the star quilt, place a background 3" square RST to a red 3" square. Sew 1/4" on both sides of the drawn line.

To sew the Big Block Quilt blocks as leader/enders, place a background in the top left corner of a 10" square. Sew on each of the drawn lines. Be careful to orient the drawn line as shown below. Sew a second background square to the bottom right corner.


Back to the strip set sewing...
Make 2 full strip sets (40" long) and 1 half strip set (20" long)

Sub-cut into 36 - 2 1/2" segments. Each full strip set should yield 16 - 2 1/2" segments.

Make 2 full strip sets and 1 half strip set

Sub-cut into 24 - 2 1/2" segments

Make 2 full strip sets and 1 half strip set

Sub-cut into 40 - 2 1/2" segments

Make 1 full strip set and one half strip set

Sub-cut into 20 - 2 1/2" segments

Constructing the Checkerboard Block
Lay out the strip set segments as pictured below. With RST, sew rows together. Pinning will help create perfect intersections.

Make 12 of these blocks - press seams carefully

Constructing the Star Block Nine Patch Centers
Using the segments cut from the strip sets earlier, lay out the Star Block centers as shown below. Pin as desired and press carefully. Make 20 of these units.

Sewing HST units (Make 80 HSTs)
To sew the HSTs for this block, place a background 3" square RST to a red 3" square. Sew 1/4" on both sides of the drawn line. You may have already sewn many of these while chain piecing the strip sets together.


Trim HST units to 2 1/2" x 2 1/2". Place the 45 degree angle line of your ruler on the sewn line to ensure accuracy. You will trim one side of the unit and then turn it to trim the other.


Cut on the drawn line and press units open.

Trim HST units to 2 1/2" x 2 1/2". Place the 45 degree angle line of your ruler on the sewn line to ensure accuracy. You will trim one side of the unit and then turn it to trim the other.


Using HST units and 2 1/2" background squares, make 80 of the following units.

Sew 40 of these star point units to the sides of the center nine patch.

Pressing seams open will help reduce bulk and make the block lay flat.

Using the remaining star points units and background squares, make 40 of these units.

Sew these units to the top and bottom of the star blocks. Make 20 Star Blocks


It's time to cut the side setting triangles and sew the blocks together! Have you been making the Big Block Quilt units as you've been working on this quilt? If not, that's ok. You can start now! As you sew blocks together, use the chain piecing and leader/ender concepts to be super productive here.
Cutting the Side Setting Triangles (these are purposely cut oversized to allow for trimming later) I do NOT cut these until I am ready to sew them. I worry that cutting them early may cause them to fray or stretch.
Cut 4 strips - 8 1/8" x WOF. Open strips so they lay flat and not doubled up on themselves. Even though it doesn't look like I did it, I like to press the fold line out to make cutting more accurate.
Using a square ruler that is at least 12", line up the bottom edges of the strip along the 11 1/4" lines on the right and left of the ruler.


Cut up both the right and left side of the ruler. Do not move the fabric.

Rotate the ruler so the 11 1/4" marks are now along the top edge of the fabric. Carefully cut along the right side. The left side is already cut for you. Continue cutting along the entire strip. You will need a total of 14 side setting triangles.

Lay out the triangles and blocks according to the picture below. Starting at the top left corner, sew into diagonal rows. You will be adding the corners later.

Sewing Tip: Sewing with the star block on top will allow you to avoid cutting off the star points. Notice how I have pinned the star points in this picture?

As I approach the intersection, I can adjust my seam allowance to be sure to hit just the right point.


Ahh, a perfect point on the front!

Sew each diagonal row and then put it back in place to verify that you have sewn it correctly. Carefully press each row after it's sewn.
I like to sew the quilt into two halves and then put the halves together. I find it makes handling the quilt much easier.

And now for the corners...
Cut 2 - 8 1/2" squares. Cut each of these one time on the diagonal to create 4 triangles. Lay out the corners as shown below.

Flip the corner triangle over so it is RST with the star block.

You'll want to trim the excess off the sides to avoid it getting caught when sewing, especially if you use a 1/4" foot with a guide on it.

Sew on all 4 corners. The inside is done! The top should measure approximately 58" x 72" at this point and you can stop here, if you'd like. If you are going to stop here, you can quilt and bind it at this time. When I choose to stop here, I do NOT trim the quilt until after it is quilted and I'm ready to bind. I find that the quilting sometimes causes the top to gather a bit and I want to be sure that I have plenty of room to "fudge it" if I need to in order to get great points along the edges.

When it's time to trim (after quilting or before adding borders), I use the following method. I use a long ruler and align the 1/4" mark with the intersecting points along the edges of the quilt.

Using the 45 degree angle on the ruler also helps with accuracy, as shown below. Can you see that the 45 degree line runs along the seam line of the star block and the side setting triangle?

It's Border Time (Darn it! I forgot to take pictures while adding borders! I must have been so excited to see this done that I never even thought about taking pictures.)
Border 1 - cut 7 strips, 2 1/2" x WOF.
Diagonally sew all strips together into one long strip. Measure the length of the quilt, cut two border strips to that measurement and sew them to the sides of the quilt. I like to sew with the border strip down towards the feed dogs so I can maintain accurate points. (I pin my border strips, starting at the center point and working out towards the ends.) Press seams open or towards the border.
Measure the width of the quilt, including the newly added side borders and cut two border strips to that measurement and sew them to the top and bottom of the quilt. Again, I sew with the border strip down towards the feed dogs so I can maintain accurate points. Press seams open or towards the border.
Border 2 - cut 7 strips, 1 1/2" x WOF.
Follow the same procedure as above to add this border.
Border 3 - cut 8 strips, 2 1/2" x WOF.
Follow the same procedure as above to add this border.
It's time to quilt and bind! Woo Hoo!!

If you've been sewing the Big Block Quilt blocks, you should be ready to trim the corners and sew the blocks together.
Cut in the middle of the two sewn lines.


Press seams open.

Look at all those bonus HSTs just waiting to be made into a quilt!

Lay out the block as shown below and sew together. Press all seams open.


Make a total of 12 blocks - 6 blue and 6 red.

Lay the blocks out in a pleasing order and sew them together, pressing after each addition. Sew into rows and then sew the rows together.
And now you have a second quilt top that is ready for quilting! Yay!!

Thanks for reading along and trying it my way! Don't feel bad if this was a bit confusing. It may take some time to get the hang of multi-task sewing like this; and if it just doesn't work for you, that's ok too.
No matter if you sew one quilt a year or 100, whatever you can do to help someone in need is awesome. Thank you Sarah for organizing such a wonderful project, and letting me share my process with others.
Happy Quilting Everyone!
*&*&*&*&*&*&*
What a great idea - two quilts at the same time! That's a super way to make lots of quilts for charity, isn't it? And two such great looking quilts, too - I think this will be on my "soon-to-make" bucket list, for sure!
Be sure to come back next week for another great guest blogger and our final check-in link-up. The end of this year's Challenge is only three weeks away - can you believe it? Time flies when you're having fun....
Hugs!
Sarah
Two very pretty quilts. I love both patterns. Thank you for such detailed instructions, and with photos :)
ReplyDeleteI'd like to thank Joanne for such a clear and detailed tutorial. Beautiful quilts
ReplyDeleteI just made a table runner yesterday like Joanne's big block quilt but I used 5" and 2.5" sqs. Great tute's Joanne!
ReplyDeleteGreat tutorials! Planning ahead really does save some time. I would need that labeling to help me not get confused with the steps....confusion is easy for me ;-)
ReplyDeleteLovely quilts!
Thanks for the tutorial!! I find that I get consumed by one project or the other when I try to work on two projects at once. LOVE the idea of it, though!!
ReplyDeleteWhat a great tutorial Joanne, Thank you! I used Bonnie's leaders & enders technique to make a bunch of rectangle blocks but originally had no plan for them...until H2H. I like your idea...having a plan in place before starting is even better!
ReplyDeleteWow, those are both wonderful quilts, great to do two at once.
ReplyDeleteGreat quilts, thanks.
ReplyDeleteThanks for the helpful info! I'm looking forward to giving these a try.
ReplyDeleteGreat tutorial and beautiful quilts Joanne
ReplyDeleteVery productive way to get things done. I particularly like the idea of using fabrics that are totally different for each quilt to keep from confusing them. Thanks for all the details!
ReplyDeleteWhat a great tutorial - it takes a lot of time to do this. I think you deserve a big Thank You! Pretty Star quilt!
ReplyDeleteThanks, Joanne! I really like the checkboard star pattern, and think it would be really fun all scrappy :)
ReplyDeleteWhat a great tutorial and post - thank you!
ReplyDeleteJoanne ~ First I want to thank you very much for taking the time to write this entire tutorial. I'm sure it was a lot of work for you to complete. I really like both of these quilts. You've created an amazing tutorial for us to use, and like you, I am very much a visual learner as well. Your details were really great so thank you.
ReplyDelete