

Hi, all!
*&*&*&*&*&*&*

Make an Explosion for Comfort Quilts!
Today Sarah has given me permission to share some ideas with you. I
love color. I love creating things. I love lots of variations and
possibilities. As an artist, I am always trying to rearrange what is to make
something else in a new way. I quilt and paint, but I don’t paint fabric. I
will leave that for some other artist. Why quilts? They are physical and
tangible artwork made from lots of disparate pieces carefully stitched with
threads, melded with batting and backing, that bring comfort, warmth, and a hug
to its owner. Even wall quilts beg to be touched.
I
am always searching for patterns and ideas to use the fabric I have, most of it
scraps donated by others, to create beauty for those whose hearts and bodies
need it. I started making comfort quilts with a group that was trying to
establish a new offshoot north of the city. While this offshoot folded, I
continued on my own making comfort quilts for cancer/chemo patients. The quilts
are lap size, usually 48 x 60 or so, given in a carry tote bag with a handmade
card and the book, When God and Cancer Meet by Lynn Eib. When someone gives me a referral, I
give the quilt package. I average about one per month. I have enlisted my mom,
a non quilter, to just sew straight seams on strips and around squares that I
prep for her and I make the blocks and quilts.

One
of my favorite patterns I found on the Quilting Board shown by Gerbie. When I
wrote to her, she told me it was based on a block by Karin Hallaby. You can watch her
tutorial at http://www.youtube.com/watch?v=JJQaTBpZa9g.
Recently, the Missouri Star Quilt Company made a tutorial on this block using
charm packs. However, I use the scrappy method because that the fabric I have.
Whatever size squares you cut, divide them into light and dark piles to get a
great result. I have tried many sizes and will give them to you so you can just
start.
 |
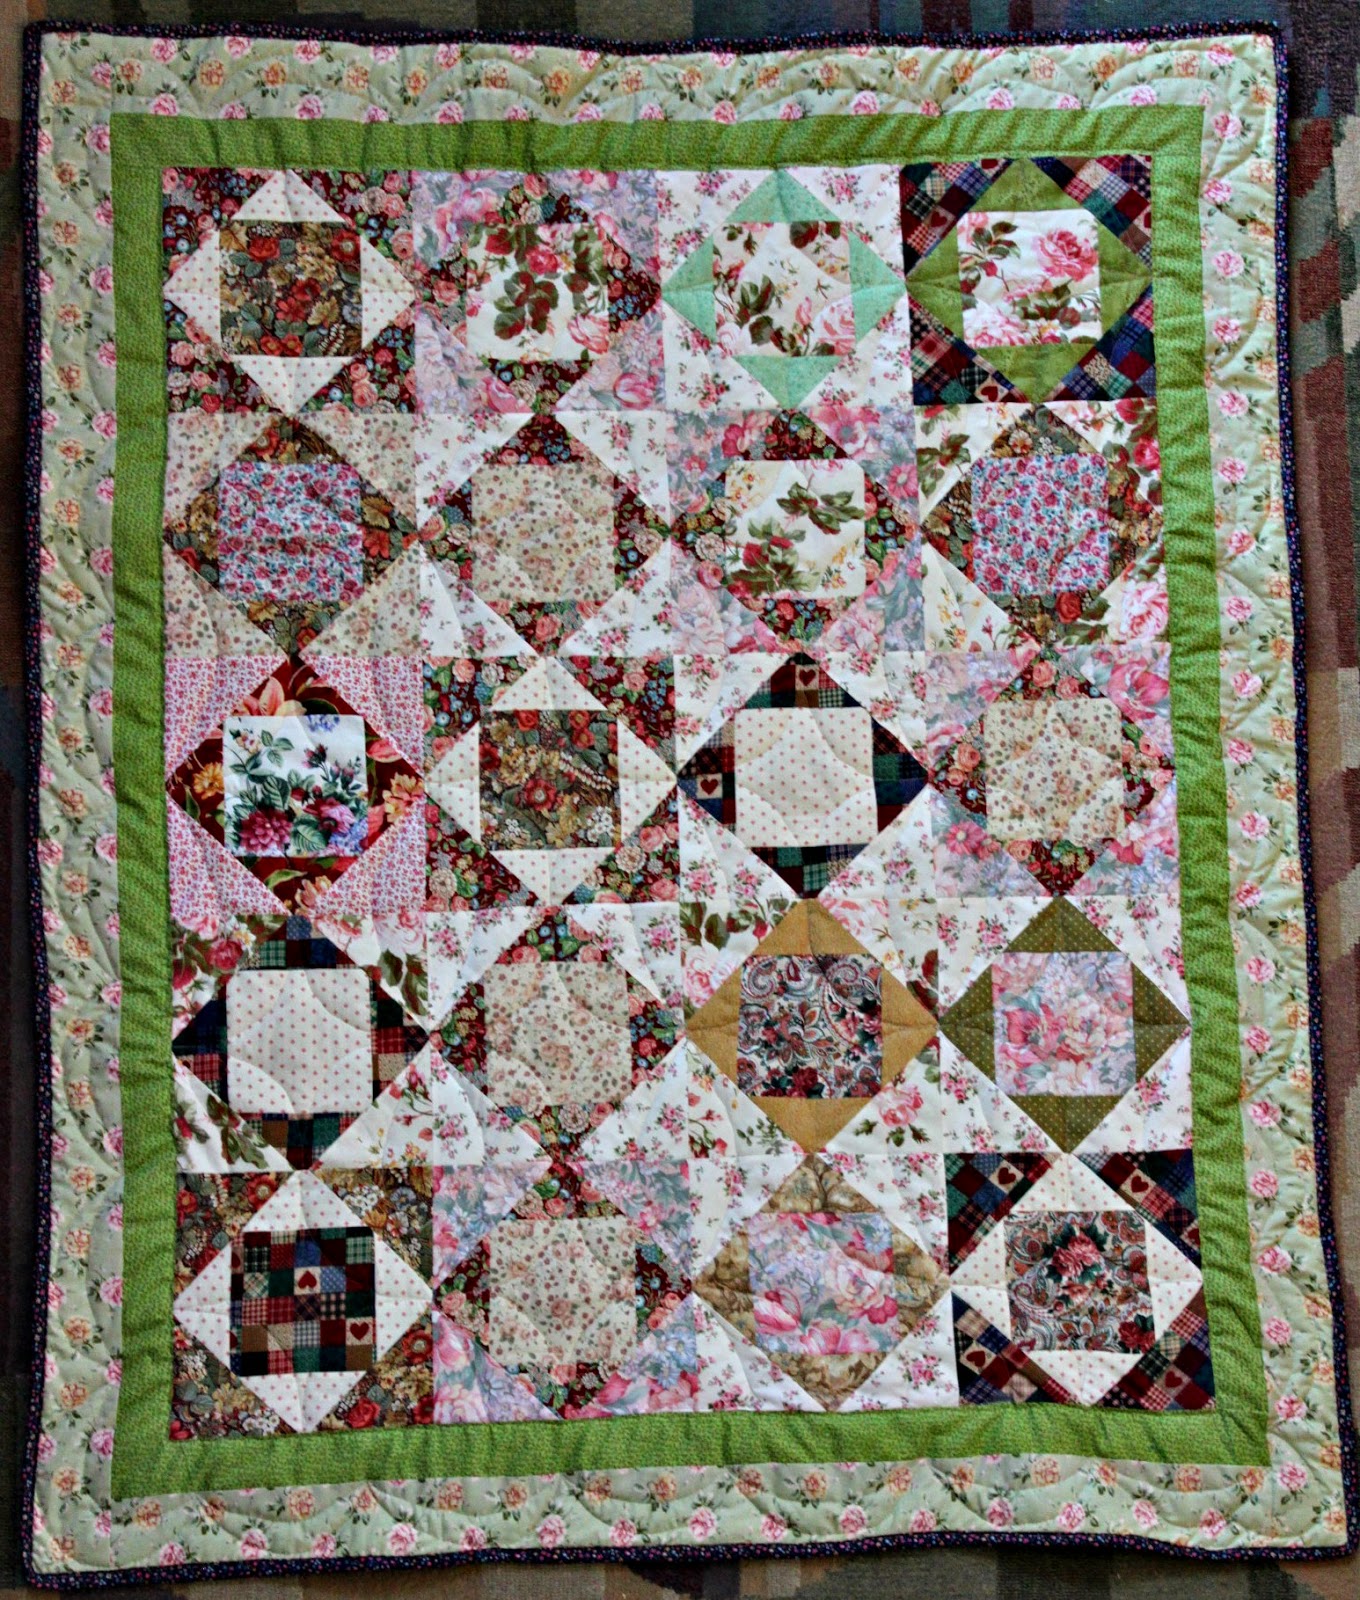
| All of the Comfort Quilts shown above start with two 6" Squares, then a 7 3/4" square and are about 48" x 60" |
 |
| 6" center blocks, 7 3/4" next |
 |
| 5" center blocks, 2 more rounds |
Now I am making some starting with 4” so
I can add extra rounds. Here are some sizes I have tried:
If starting with two:
-3”, then one 3
½”, then one 4 ¼”, one 5 ¼”
-3
½”, then one 4 ¼, one 5”, one 6 ¼” gives an 8” block
-4”,
then one 5”, one 6” (makes 7 1/2" block), and can add one 8 ¼”
-4 ½”,
then one 5 ½”, one 7 (about 9" block)
-5”,
then one 6 3/8”, one 8 3/8” for about an 11” block unfinished
-6”, then one 7 ¾” for about an 8 ¼” block
-6”, then one 7 ¾” for about an 8 ¼” block
Whatever size your first two blocks are, you can always measure your ironed one for the next size.
Here's how you make this block: Sew the first two identical size squares (I make one dark, one light) all
around all 4 sides, ¼” seam. Pivot in the corners, don't do a curved seam. Draw an X from corners to corners on the side you
want to look like triangles.
 |
For my quilts, I choose
half the dark blocks for the center, and half the lights for the center.
|


Add
the next size square (alternate light or dark based on which the new triangles are,
i.e. dark triangles, light new square), sew all around 4 sides, mark the X on
the new square size. Pinch the center, clip, cut to corners, press to set, roll
back triangles, press. You can add another size square, alternating darks and
lights, and keep going as much as you want.
This is totally customizable by you. Remember that the square’s corners on the front are nipped by the sewing. It doesn’t bother me. Since there is a bias, I find I can ease the blocks together as long as they are not real distorted by ironing or cutting. I usually add a skinny and wider border. I do machine quilt these. I always make 2 extra blocks and sew one of the blocks on the outside of the tote bag, one on the inside.

Since I demonstrated this technique at my quilt guild, many people have taken off and put their own spin on the blocks. You can really go crazy. Here are two ideas for using leader/ender scraps.
 |
| Using 4 patches made as leader/enders from 2 1/2" squares, I started with one 4 1/2" 4 Patch and one 4 1/2" square sewn together. |
 |
| A block made from a 4 Patch of 2" Squares, see post it note in photo for size
All my sewing is done on vintage Singer sewing
machines. You are welcome to check out my blog, Art In Search. Thank you for reading this today
and I hope it encourages you to make a comfort quilt for someone who needs what
you have to give.
*&*&*&*&*&*&*
Thanks so much for sharing with us, Linda! This looks like a great technique that I will definitely be trying out!!
And for all the rest of you H2Hers, remember that next Sunday begins the final linky party for the challenge! Sometime between Sunday, June 1st, and Saturday, June 7th at about 5 pm, link up your Hands2Help quilts to be eligible for the giveaway drawings. You can link up to a new blog post or an old one, or if you don't have a blog, you can upload your picture to Flickr and link to that. If you are technologically challenged, feel free to send me pictures of your quilt(s) and I will upload them to Flickr for you and link you up for the giveaways!
Let me know, too, if you've run into a little "life" during the challenge and won't be able to finish your quilts - I'll be glad to help you as much as possible!
Hugs!
Sarah
PS - Remember to stop by here on Wednesday for Tennessee's stop on the AMB Blog Hop - there will be a giveaway!
 |
looking forward to seeing the link ups - quilts of compassion got my quilts yesterday, so glad they can use them
ReplyDeleteThat is an amazing tip!! I've can't wait to try this technique. Thanks!
ReplyDeleteSuper tutorial. Will definitely give it a try. Thanks so much for sharing it with us.
ReplyDeleteThat is a very neat technique! Thanks for sharing it.
ReplyDeleteLove that technique! The quilts shown are wonderful, too. Thanks, Sarah, for inviting Linda! ...and thank you, Linda, for sharing your fun find.
ReplyDeleteHugs