
Hi, all!
Welcome to my little part of the Christmas in July Pattern Parade Blog Hop! I'm so happy to be here with you, and I hope you'll enjoy what I and all of my fellow contributors have come up with for you.
It's been a strange journey this year, hasn't it? You may recall that I usually have a twelve day Christmas in July celebration on my own blog, but this year that just didn't work out. So I was tickled to death when Carole of From My Caroline Home asked me to be a part of her one-day hop! But even that has been quite a journey - I originally planned to do a table runner, but couldn't figure out quite how to do what I wanted to do in a way I could explain in a tutorial. While I was trying to suss that out, I grabbed a Moda scrap bundle I had sitting around....

...and started playing. I sewed the strips together into a panel of fabric, then cut out 22" long 9 degree wedges. It takes 40 to make a complete circle, and I had enough fabric to cut 20. OK, grabbed some white solid and cut 20 more wedges...

...and ended up with this! Ooh, I'm loving it! But best laid plans and all that, when I sewed it together I was not as careful as I should have been, and ended up...

...with four quarters that were not the same size! Oops! It was also really packed with seams at the center. So back to the drawing board. And I did end up with a fun creation that was a lot less hassle in the end. But if you see pictures of the above version in the process shots, now you know why - because I failed to take some of those shots over again when I was making the second version. And never fear - the Oopsie version has redeemed itself in a second project that I'll show you at the end. So let me show you how to make a much more reliable version of this scrappy tree skirt!!

Here's a picture of my finished version. I like that it has a drawstring at the top, making it easy to fit whatever kind of tree I happen to have it under - live or silk. I chose to make mine a simple round, but you could also scallop the edges before binding to give it a little "character". You could also embroider something in the ends of the solid panels to make it your own!
Here's what you'll need (roughly) to make one for yourself:
**A 9 degree x 22" wedge ruler. NOTE: if you have a long wedge ruler that is a different number of degrees, you can just adjust the pattern to accommodate the ruler you have - no need to buy another! And if you don't have a long wedge ruler, you can always make your own template for cutting, although once you learn to sew wedges, they are a lot of fun! You'd probably get a lot of use out of one. I know I have!
**Enough strips of fabric (any width, or multiple widths) and approximately 32" long to make two 24" wide chunks of "fabric".
**At least 30" yardage of a solid for the pieces that are white on my version.
**20 1.5" x WOF (width of fabric) pieces, cut in half at the fold to yield 40 pieces approximately 1.5" wide by 22" long. This took about 30" of yardage in my contrast fabric (deep red).
NOTE: You really want these strips to be a little longer than your wedge strips. Kona cotton tends to be a little wider than most other fabrics, so mine worked out well. If you are using something narrower, you may need to make your wedges a little shorter.
A piece of fabric large enough to back your round piece. Mine ended up just shy of 60" wide, so I bought wide muslin to serve as the backing.

OK, let's get started! Sew all your strips as shown above, into a long piece of "made fabric". You can either sew two 24" long pieces, or make one and split it apart afterwards.
Now is when those markings on your cutting mat will really come in handy. Lay your made fabric with the stripes running horizontally and even with the bottom line of the mat. Lay your wedge ruler on the fabric with the large end at the bottom of the fabric and touching the left bottom corner. There should be a "mid-line" marking on the ruler. Line those up with the same measurement top and bottom of your cutting mat to be sure that you are cutting a straight wedge (not off-grain).
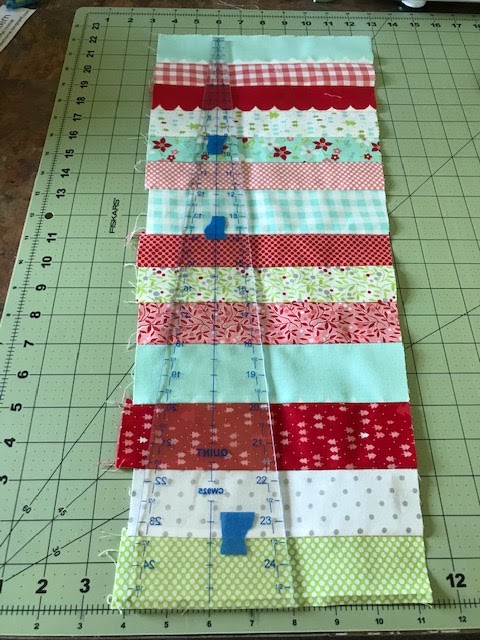
Holding the ruler carefully as you cut, and walking your hand up the ruler as necessary to keep it steady, cut your first wedge. (This is the only time you will cut two sides.) You may want to cut again to be sure you got a clean cut. (A new rotary blade is really helpful here!) Without moving the large fabric piece, lift your ruler, turn it upside down (large part to the top) and align it with the edge you just cut.

Cut on the right side of the ruler, lift your ruler, turn it upside down again (large part to the bottom), and align it with the edge you just cut. Repeat all the way across the large fabric piece until you have ten wedges. FYI - I had extra fabric left over after getting ten wedges, so if your ruler moves on you and you mess one up, you will have some "oops" room to redo!
Be sure your wedges are all the exact length of the ruler. I found that with the made fabric it was sometimes a little longer in spots, and I just trimmed that off so they were all the same size.
Repeat the cutting process with the second strip set.
Press your white fabric, being sure that both selvage edges are aligned before pressing. This may change where the fold is, but that's good - you want both sides to be the same size. Split the yardage for the white wedges on the fold. Cut twenty wedges using the same process as above, and check to be sure they are all the same size as the ruler.
Cut the 1.5" by WOF contrast strips, and split them in half at the fold (once again, be sure they are the same length, AND longer than your wedge pieces).

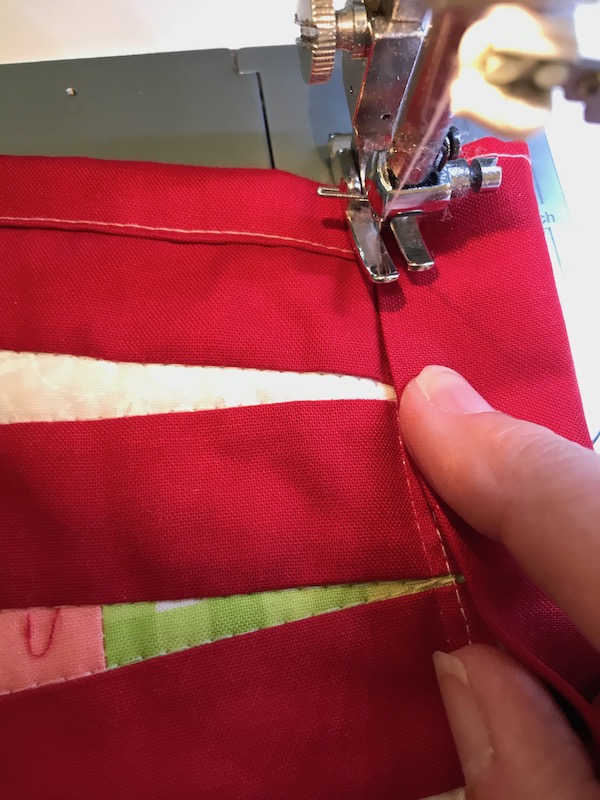
Now take the contrast strips and sew one on each side of your white wedge pieces, starting at the narrow end of the wedge. At the narrow end, the corners can match up, but you'll want some extra contrast strip at the bottom so that you can trim the bottom of the wedge straight. I'll tell you a little secret - they're still 9 degree wedges, just wider than the pieced wedges! And that extra width is going to make it easier to piece your circle accurately. Press the seams towards the contrast strips. This will help avoid seam bulk later.

After pressing, line up a ruler across the end of your wedge and trim off the overage from your contrast bands.

On your design wall or floor, lay out your pieces as you make them - a pieced wedge, a banded white wedge, a pieced wedge. Stand back and look at how pretty it is! Now it's time to join those wedges together. Pin the wedges along the length, matching the ends and easing in any excess. Be careful not to stretch the strips as you sew them (I'll show you why in a minute). Do it in sets of five, which will give you a piece with a 45 degree angle (5 strips x 9 degrees = 45 degrees).

Now, lay your 45 degree piece on your cutting board, with one edge against the bottom ruled line and the other against the 45 degree line. You may see, as in this one, that you can't line it up exactly. I kept this picture because I want you to see where I erred on my first version. You can see the white strips are kind of curved? In this version, I didn't pin the strips at each end and ease as I stitched, and I didn't really care if they ended up the same length or not, as I planned to cut out the center. I also stretched as I stitched, which gave me that nasty little curve. As I made the second version with pinning and no stretching, I found that my 5-wedge units were much straighter and I only had to trim off tiny bits along the line.

You can see how much more accurate my second version is. This is pre-trimming. It also doesn't go all the way into the corner like the first version did, because of the additional width the red strips add. And regardless of how much you want to get it put together fast, don't skip the trimming step! Even an 1/8" difference will add up as you assemble all the sections. 1/8" x 8 sections is an inch! So trim these sections of five wedges to an even 45 degrees.
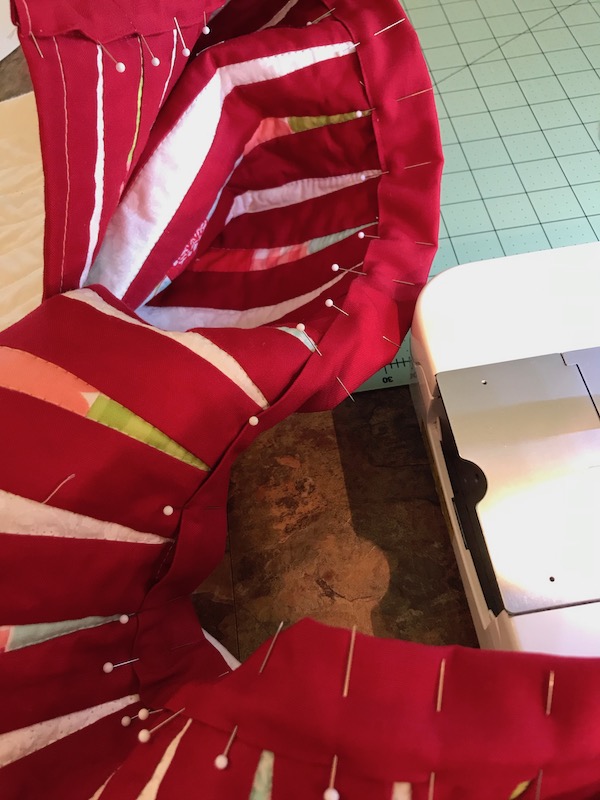
Once you have all eight 45 degree sections together, join them together in pairs and square those four ten-wedge units to 90 degrees just like you did the earlier sections. Join two ten-wedge units to make a half circle. It should be pretty straight if you've been squaring up as you go! Once you have your two half-circles, sew one, and only one of the seams so you have an open circle. Lay it out somewhere, step back, and look at how beautiful it is!! Nice work!!! And if it doesn't quite meet on the other side, or overlaps a bit, no worries - we're going to leave that side open anyway and you will be overlapping it under the tree.

The next step is basting. You can use your favorite method, but I choose spray basting. It secures the round piece to a square backing and batting, and from there, you can either quilt it on your domestic machine or pin it on a quilt frame for free motion quilting. In my case I originally planned to do both - I stay stitched around the edges and then stitched in the ditch on either side of the red contrast strips. My intention was then to load it on my long arm machine and do free motion quilting in the white strips, but Jolene (my long arm machine) was not cooperating and I didn't have time to argue with her, so I let that be sufficient quilting for this one!

I really love my Juki TL98-Q, so it wasn't too much of a chore to do the ditch stitching on her! After quilting, you'll need to trim the excess batting and backing away. I find this easiest to do with scissors rather than a rotary cutter, but you do what is best for you. Trim around the outer edge, up the open side, around the inner circle, and back down the other open edge.

Then lay it out and look at it again! Do a little happy dance - you're in the home stretch. Isn't it pretty?
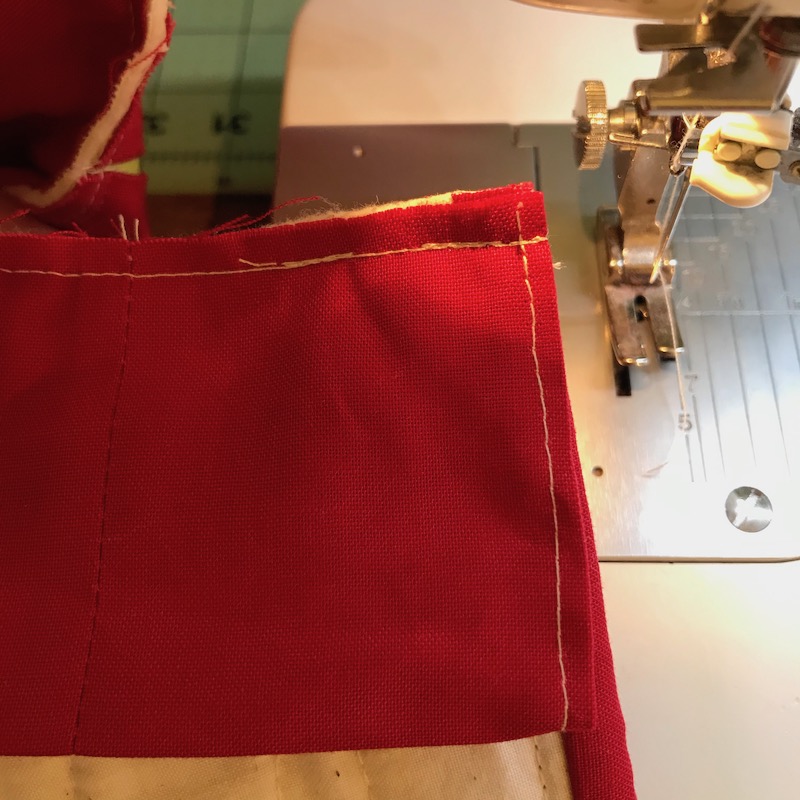
Now comes binding. You are going to put regular binding on the two long open edges and the outer circle. Don't bind the center yet - we're going to do something a little different there. And you don't really need to use bias binding, as this is a really gentle curve. If you feel you need more stretch to your binding, you can just cut your strips slightly off grain - it will give you a little more stretch, and it's infinitely easier than cutting bias binding! Just line the edge of your binding up with the edge of the curve. I sew mine to the back of the piece, then wrap it around and machine stitch it to the top over the seam line. The two outer edge corners work just like the corners on a quilt!

And now for the center. Cut two 5" x WOF strips of your binding fabric, and sew them end to end. On one end, fold 1/4" to the back side of the piece (the seam side) and stitch down. Now fold in half lengthwise and press the fold along the length of the pieces.
Stitch this strip, just like your binding, to the back of the center circle edge, starting at the opening. Line up the finish-stitched end with the bound edge at the beginning of your seam, and stop when you get a few inches from the other end. Backstitch and cut your thread. (Do as I do, not as I say - I sewed a little too far and it was a PITB to turn under the end!)

Take your piece and fold the excess wide binding back flush with the bound edge. Finger press it so you have a good crease.

Trim the wide binding 1/4" beyond the crease (it should be LONGER than the edge you need to cover. Turn the 1/4" under (to the inside of the wide binding) and, opening up the 5" strip, stitch it down.

Finger press the edge, refold the strip, and stitch it to the remainder of the inner circle, matching the ends.
Trim off any excess narrow binding. Turn the wide binding to the front and pin it in place JUST OVER the stitching line you just made. Pin by pinning each end and the middle, then going halfway between those pins and pinning, continuing that way until you have the entire piece pinned down. Trust me - if you try and do it without pinning, you will end up with a curly mess. I'm not sure why, but I do know the pinning took care of the problem.
Stitch the wide binding down close to the edge. Be sure you cover up the previous stitching line (although if you don't, only nosy children poking around under the tree will see it!).
Once that is done, you will have created a casing. I ran a piece of twill tape through mine, but you could make a matching piece of sewn binding or use a piece of ribbon. Whatever you have on hand will probably work, as it can be hidden underneath the tree skirt! The ribbon will allow you to gather up the inner circle to whatever size you need to fit your tree or base. Below you can see how it pulls that center in and gives it some nice dimension!

And now for the glamour shots, which you almost didn't get - I had to drag my tree (or at least half of it) out of the attic, which was about 110 degrees! It's hot in Middle Tennessee....

Doesn't that look nice? Bright and cheery, and with the Christmas sign, I could almost imagine snow falling outside my window and tons of Christmas presents waiting to be wrapped up!

And here you can see the building blocks for my next Christmas project - I've been collecting wooden spools for a while now, and I think they will make a most excellent Christmas tree garland! I have wooden beads and pretty buttons to put between them, too. I can't wait to get started on this project. I'll be sure to keep you updated on my progress!

Whoops! Looks like Capt. Christmas has stolen one of my spools. He's always been a little sneaky, but he's a favorite at our house, so we let him hang around.

Never underestimate the creativity of a young mind! Apparently this tree skirt makes a good Emmy skirt, too - and it looks really cute on her. It reminds me of the old movie Seven Brides for Seven Brothers, where they made dresses for all the brides out of old quilts. I may actually have to make her a real skirt this way!

And now for the rest of the hop! There are so many other places to visit, and each will have a great Christmas tutorial for you to see. Be sure to check out each one! Here's the line-up....

Table Toppers, Home and Kitchen
Small Projects
Traditional and Modern Quilt Patterns

Hugs and Happy Hopping!
Sarah
Want a PDF of this post to print or save? Just below where it says "Posted by Sarah Craig" at the bottom of this post you should see a green button.

If you don't see it, go to the top of this post and click on the title of the post (Christmas In July Pattern Parade Blog Hop!). That will open this post alone, as opposed to one of a series of posts, and the button will appear at the bottom. Click the green button, and you will be redirected to printfriendly.com. Hang tight for a minute, and it will create a PDF version of the post for you to print out! If you'd rather save it to your computer, click the PDF button that's next to the PRINT button at the top of the document. When the pop-up window tells you to download your PDF, click the green button and it will open up a PDF on your computer. You can then save that document for reference at a later time!
Wow, fabulous project!! Thanks for being a part of the Pattern Parade!
ReplyDeleteThe Christmas tree skirt turned out beautiful! Emmy looks so cute, she might start a new fashion trend! Thanks for the tutorial and Merry Christmas!
ReplyDeleteA fun and festive tree skirt, and you are all set for this Christmas!
ReplyDeleteAwesome tree skirt, Sarah!!!
ReplyDeletethe tree skirt is so awesome but oh i love that runner!
ReplyDeleteAfter all of the design struggles, it's amazing you ended up with 3 great finishes. I'm counting the tree skirt twice because it is fit for a princess. If you need more wooden spools, I'll be happy to send some. I have spools left from my mother's thread collection that could play nicely with yours.
ReplyDeleteWow!
ReplyDeleteMy mouth actually dropped when I saw The Emmy Skirt. PERFECT. Don't tell anyone that you didn't intend the runner to be just like this! I have a couple wedge rulers and didn't know it at the time but they have come in very handy! Easier than using the angles on the cutting mat. Thanks for these lovely ideas.
ReplyDeleteI love how you "redeemed" that first attempt. It makes a great little quilt that way. Thanks for your detailed tutorial on how to make the tree skirt too.
ReplyDeleteThank you for the tutorial. I love your daughter dressed in the skirt. Love the table runner too.
ReplyDeleteBeautiful job, Sarah! The OOPS project is just as cute as you "real" project. LOVE that you put that piece to work, too!
ReplyDeleteThank you for a great tutorial, possibly made even better by the OOPS moments since you didn't want us to make the same mistakes. :) Both your tree skirt and table runner are wnderful. Remind me of candy canes.
ReplyDeleteI love this one so much!! Great job!!
ReplyDeleteWhat a unique design for a tree skirt. Thank you for the tutorial.
ReplyDeleteIt is fun to see how well your project turned out when you saved it. Great to see your creativity solving the problems. I love that in the end you came out with a tree skirt and a table runner. Not to mention a skirt to be worn as well. Lovely to share the hop with you.
ReplyDeleteYour tree skirt turned out so great! Sometimes the best finishes have to go through a major Oopsie first, but that makes the final results that much sweeter, doesn't it? Thanks for sharing your tutorial :)
ReplyDeleteLove your tree skirt - and what a great way to use strips!
ReplyDeleteWhat a fantastic idea to reality! Very pretty--the pink one looks like a peppermint candy! The 'skirt' on your grand is pretty cute, too!!!!
ReplyDeleteThanks for the wise tips.
So very pretty! I haven't started mine for my customer yet - I am worried that it won't sit flat and it needs to be a tablecloth... but I do have your hints and tips to help, so thank you for this tutorial! I actually love it as a skirt lol!!You may need to make another one!! xx
ReplyDeleteSuch a pretty tree skirt (and little girl skirt too!). Thank you for sharing and for also sharing your process tips as well.
ReplyDeleteWhat fun that was, and a rescue of the mistaken pieces, too. It looks so cute on Emmy, as well. I like the idea of gathering the center, because I never know what size tree I'll have. =)
ReplyDeleteThe wedge circle would also look good on a quilt, with 1/4 wedges in the corners.
ReplyDelete