

Hi, all!
Friday has finally arrived once again, and that means it's time for us to get our whoop whoop on! Please bear with me as I prepare this blogpost, as Blogger has finally forced me to go to its new format, and I have no. freaking. idea. how this is going to look. But we'll pray for the best, right? It's always good to learn new things (she says with gritted teeth) so let's prepare to whoop on!
*&*&*&*&*&*&*

I've been promising a see-through mask tutorial for about a week now, and today is the day! When my daughter requested a see-through mask to use when she went to dentist appointments with our youngest grandchildren (who are both deaf), I started researching and looking for a good pattern. There weren't many available at the time, only adaptations of existing patterns, and I made many prototypes trying to find one that worked well, didn't suffocate the wearer (FYI a completely see-through mask does NOT allow for breathing!) and actually looked like something I would want people to think I made. Some of the problems I ran into (other than suffocation) were the vinyl being too close to the lips, creating a feeling of claustrophobia and causing too much fogging, and just fogging in general.
The other day, though, my son-in-law, who works for a local audiologist, requested that I make some masks for their employees. As I was preparing to do that (actually procrastinating, as I still hadn't found a pattern I liked), I scrolled through Instagram and saw an ad post for a 3-D face mask pattern on shop.chezvies.com...

I liked the fact that it didn't have pleats on the side, and thought that the center panel could be easily adapted to hold a vinyl piece, so I checked out the site. The pattern was only a little more than $2, and a PDF download, so I ordered it and gave it a whirl. A little minor pattern adaptation, and I had a winner! Photos I posted on IG and FB generated lots of questions about the pattern, so I contacted the designer, Elvira Threeyama, and asked her if I could post a tutorial about the adaptation to her existing pattern, and bless her, she agreed! So that is happening today. I will not be posting PDFs of her actual pattern, but would direct you to her site to purchase the pattern for yourself. It is a small amount to pay and she has done a wonderful job, providing three different sizes for your varied needs. So please support this designer before using this tutorial! You can find the pattern by clicking
So now for the actual tutorial. Once you receive your pattern, choose the size you want to work with and cut out the pattern pieces. On the large center piece, measure 2 3/4" from the "center fold" side, and mark a straight line parallel to that side.

Cut on that line.

Next, trace the piece on a piece of blank paper (I found that the remnants of the page I cut the pieces from had sufficient blank space to do this step.)

Add 1/4" to the narrower end of the tracing, and draw a straight line, top and bottom, from the end of the piece to the 1/4" line.

Repeat the process for the side center, adding 1/4" to the inner (wider) edge that will be joined to the vinyl insert.
Mark the "Fold" line on the center piece and mark both pieces with its designation, fabrication, number of pieces, and size. You will need only one vinyl piece, but four of the outer side pieces. This makes life easier if you make more in the future, and also reminds you which side is up!

Because I was making multiples (20 in one size, 10 in the other), I traced my patterns onto cardboard so they would last longer. If you do this, save your paper copies, and mark the cardboard copies as you did the paper ones.

Now on to fabric and cutting. I highly recommend making these masks from solid fabrics for two reasons. The first is that solid fabrics are less distracting for those who need to read the lips of the mask wearer. The second is that you won't have to worry about the right or wrong side of the fabric, as all of the pieces are symmetrical - and that makes your job easier.

Because I was making multiples, I layered my fabrics and traced the pieces on multiple times, then cut them all out with scissors. However, when I was making individual masks, I simply used my templates and carefully rotary cut around each one.

And here's what you will need for each mask - one center vinyl piece, four top and bottom pieces (2 each), and four side center pieces. Be sure your top and bottom pieces have a good crease at the center fold line - it will be useful later.
I also highly recommend having a very good light (I use an OTT light on my countertop) because it's hard to see that vinyl piece when you are sewing, and light reflection really helps. I also recommend the use of craft clips, as you can't pin the vinyl - it will leave a permanent hole (not a very useful thing in a face mask!)
The first step is to take the vinyl piece and sandwich a narrow end between two of the side center pieces. I used a craft clip to hold it together and aligned at the bottom before sewing.

Line it all up (your fingertip can help tell you if the vinyl is aligned with the fabric pieces) and stitch 1/4" from the edge.

Fold the edges back from the vinyl (do NOT press with an iron!) and pin in place. Finger press as much as possible.

Repeat for the other side of the vinyl.

Now take your top and bottom pieces, and laying the paper pattern over the pieces, clip in at the mark on the straight edge.

Fold at the clip mark, aligning the top (straight) edge, and place a pin 1" from the top.

Now place the folded edge next to the 1/4" mark on the needle plate of your sewing machine, and stitch an angled line from 1/4" in, down to where the pin enters the fabric.

Repeat for the other side. Your stitched piece will look like this now. There is really no need to finger press these darts. Repeat for all four top and bottom pieces.


Now take the vinyl center unit, and matching up the seams on the side pieces, pinch the top to make a small "mark" to indicate the center. Try not to do it more than 1/4" down. The fewer creases in your vinyl panel, the better!

Take one of your curved, darted pieces and match the center fold on the curved side to the pinch mark on the vinyl panel.

Clip with a craft clip to the right of center.

On the left side, match up the end of the curve to the end of the side piece, being sure to keep the two side pieces directly overlapping each other, and place one pin to hold them aligned.

Carefully and s.l.o.w.l.y, sew the seam (1/4"), easing the fabric and matching the edges as you go. As you get closer to the center, you can release the craft clip and work your way across the top.

After you get past the center and broadest part of the vinyl mask, you can match the lower end of the seam and place a pin to help keep it aligned as you proceed to the end of the seam, once again aligning the edges of the curved piece with the center piece.

Remember, slow and steady wins the race!

Once you finish this seam, your piece will look like this...

Take a second curved darted piece and match the center fold crease to the same on the other curved piece. Place a craft clip to the right of center, pin the left side as you did for the first piece and stitch. You may find that you need to invert the vinyl piece (concave to convex or vice/versa) as you sew to make the pieces easier to align. Trust me, this feels awkward at first but you will get the hang of it!

And here's what your piece will look like after finishing that seam. Isn't that nice and tailored looking?

But wait - you can make it look even better. Choose which side you want to be the outside of your mask (the good side) and flip the mask if necessary so that is inside the curve. Now topstitch "inside the bowl" right next to that seam. Pull the darted pieces even and flat away from the vinyl, aligning them with your right hand as you stitch. I found that placing the vinyl to the left side and placing the left center edge (the opening) of my foot on the place where the two fabrics came together, I could get a lovely close topstitch. Don't worry too much about the backside - you've already decided that will be the interior of the mask, remember! Once you have finished top-stitching, flip it over and be sure you didn't catch any "pinches" in the stitching. If you did, clip your stitches and pull out enough to fix the problem, and restitch the section you removed. This step is tricky, but you will get the hang of it, I promise!

See how nice that looks!

Now repeat the whole procedure for the bottom of the mask.

And when you get ready to do the topstitching on the bottom pieces, be sure to determine which side was your "outside" the first time, and roll that to the inner curve so that your nice stitching will be on the same side.

Now let's start preparing for the binding and casings. You're in the home stretch now! Peel back the curved darted pieces on each end...

...and trim the inner pieces at an angle, coming very close to the seam line at the end.

Now go around your mask, trimming off any extra on the ends (make the top and bottom pieces even with the side centers) and trimming any threads that may be hanging out.

At the darts, you will want to place them so that one goes right and one goes left at each meeting spot. It doesn't matter which goes which way. You just want to make it so there's less bulk here.

Place a pin to hold them in place.

Say hello to your little friend! Double fold 1/4" bias tape is wonderful stuff.

And it's folded in a way that one side is a little bit narrower than the other, which is very useful for making sure you catch both sides as you sew.

A note here: When I went to the store to buy more bias tape in different colors for subsequent orders, I found that (once again) we have supply shortage. (I sure will be glad when things get back to normal!) But if you can find single fold 1/2" bias tape, you can fold and press it yourself to get the same result. Definitely better than making it yourself!

Important step here. Find the "outside" of your mask - the side with the best topstitching - and flip the mask so it is on the inside of the "bowl". You will be working inside the "bowl" for the next step.
Take your binding and, with the narrower edge on top, sandwich the edge of your mask, pushing the fabric all the way into the fold. Use a fabric clip to secure it about 1-1 1/2" from the end of the seam. Start stitching very close to the left edge of the tape, being sure to push the mask fabric all the way to the fold as you go. Be sure to backstitch at the beginning of the seam! Once you have secured the tape to the mask, release the craft clip. Going slowly and carefully, place the binding around the edge and stitch it down, removing the pins at the darts as you get close. Tuck in any loose threads as you go, or you can clip them afterwards if you miss some. Backstitch as you reach the end, and cut off the excess binding, leaving a little bit of excess binding at the end (just in case!)

Flip the mask over and look at the binding you just put on. You are checking to see if you missed getting any of the mask fabric inside the binding (this happened to me multiple times) or if you had a binding mishap like this one...

For either problem, just clip out your stitching on either side of the problem and pull it out...

...put everything in its proper place and restitch over the gap. Be sure to backstitch a little on each end!

Repeat the process for the other side of the mask (be sure you are working in the "bowl" with the right side inside) and there's your mask, with nice neat edges. Now on to the casings!

Trim the ends even with the side center panels. Be sure the "good" side of your mask - the part you want to show to the world- is on the outside of the bowl now. Turn under 1/4" on the end and stitch it down (sorry I didn't get a picture of this step!) I found it easiest to hold it with my fingers, as the part I was folding under was too narrow for pins. Be sure to backstitch at the beginning and end of each seam. Repeat for the other side center panel.

Now you want to fold that finished edge in to the inside of the mask, about 5/8", or visually halfway to the vinyl panel. Place pins in the least bulky part of this to hold it securely. Stitch in place, being sure to backstitch at the beginning and end to secure it well.

Repeat for the other side.

And there's your mask! Home stretch now...

Cut two 12" pieces of elastic. I used 1/8" because it's easier on the ears. In a pinch, if you can't find elastic you can use 1" strips of t-shirt fabric cut cross-wise and pulled hard to make it roll up.

Place a safety pin in one end of the elastic....

...and thread it through the casing....

...push that puppy through! Grab at the other end and pull it through.

Repeat for the other side..
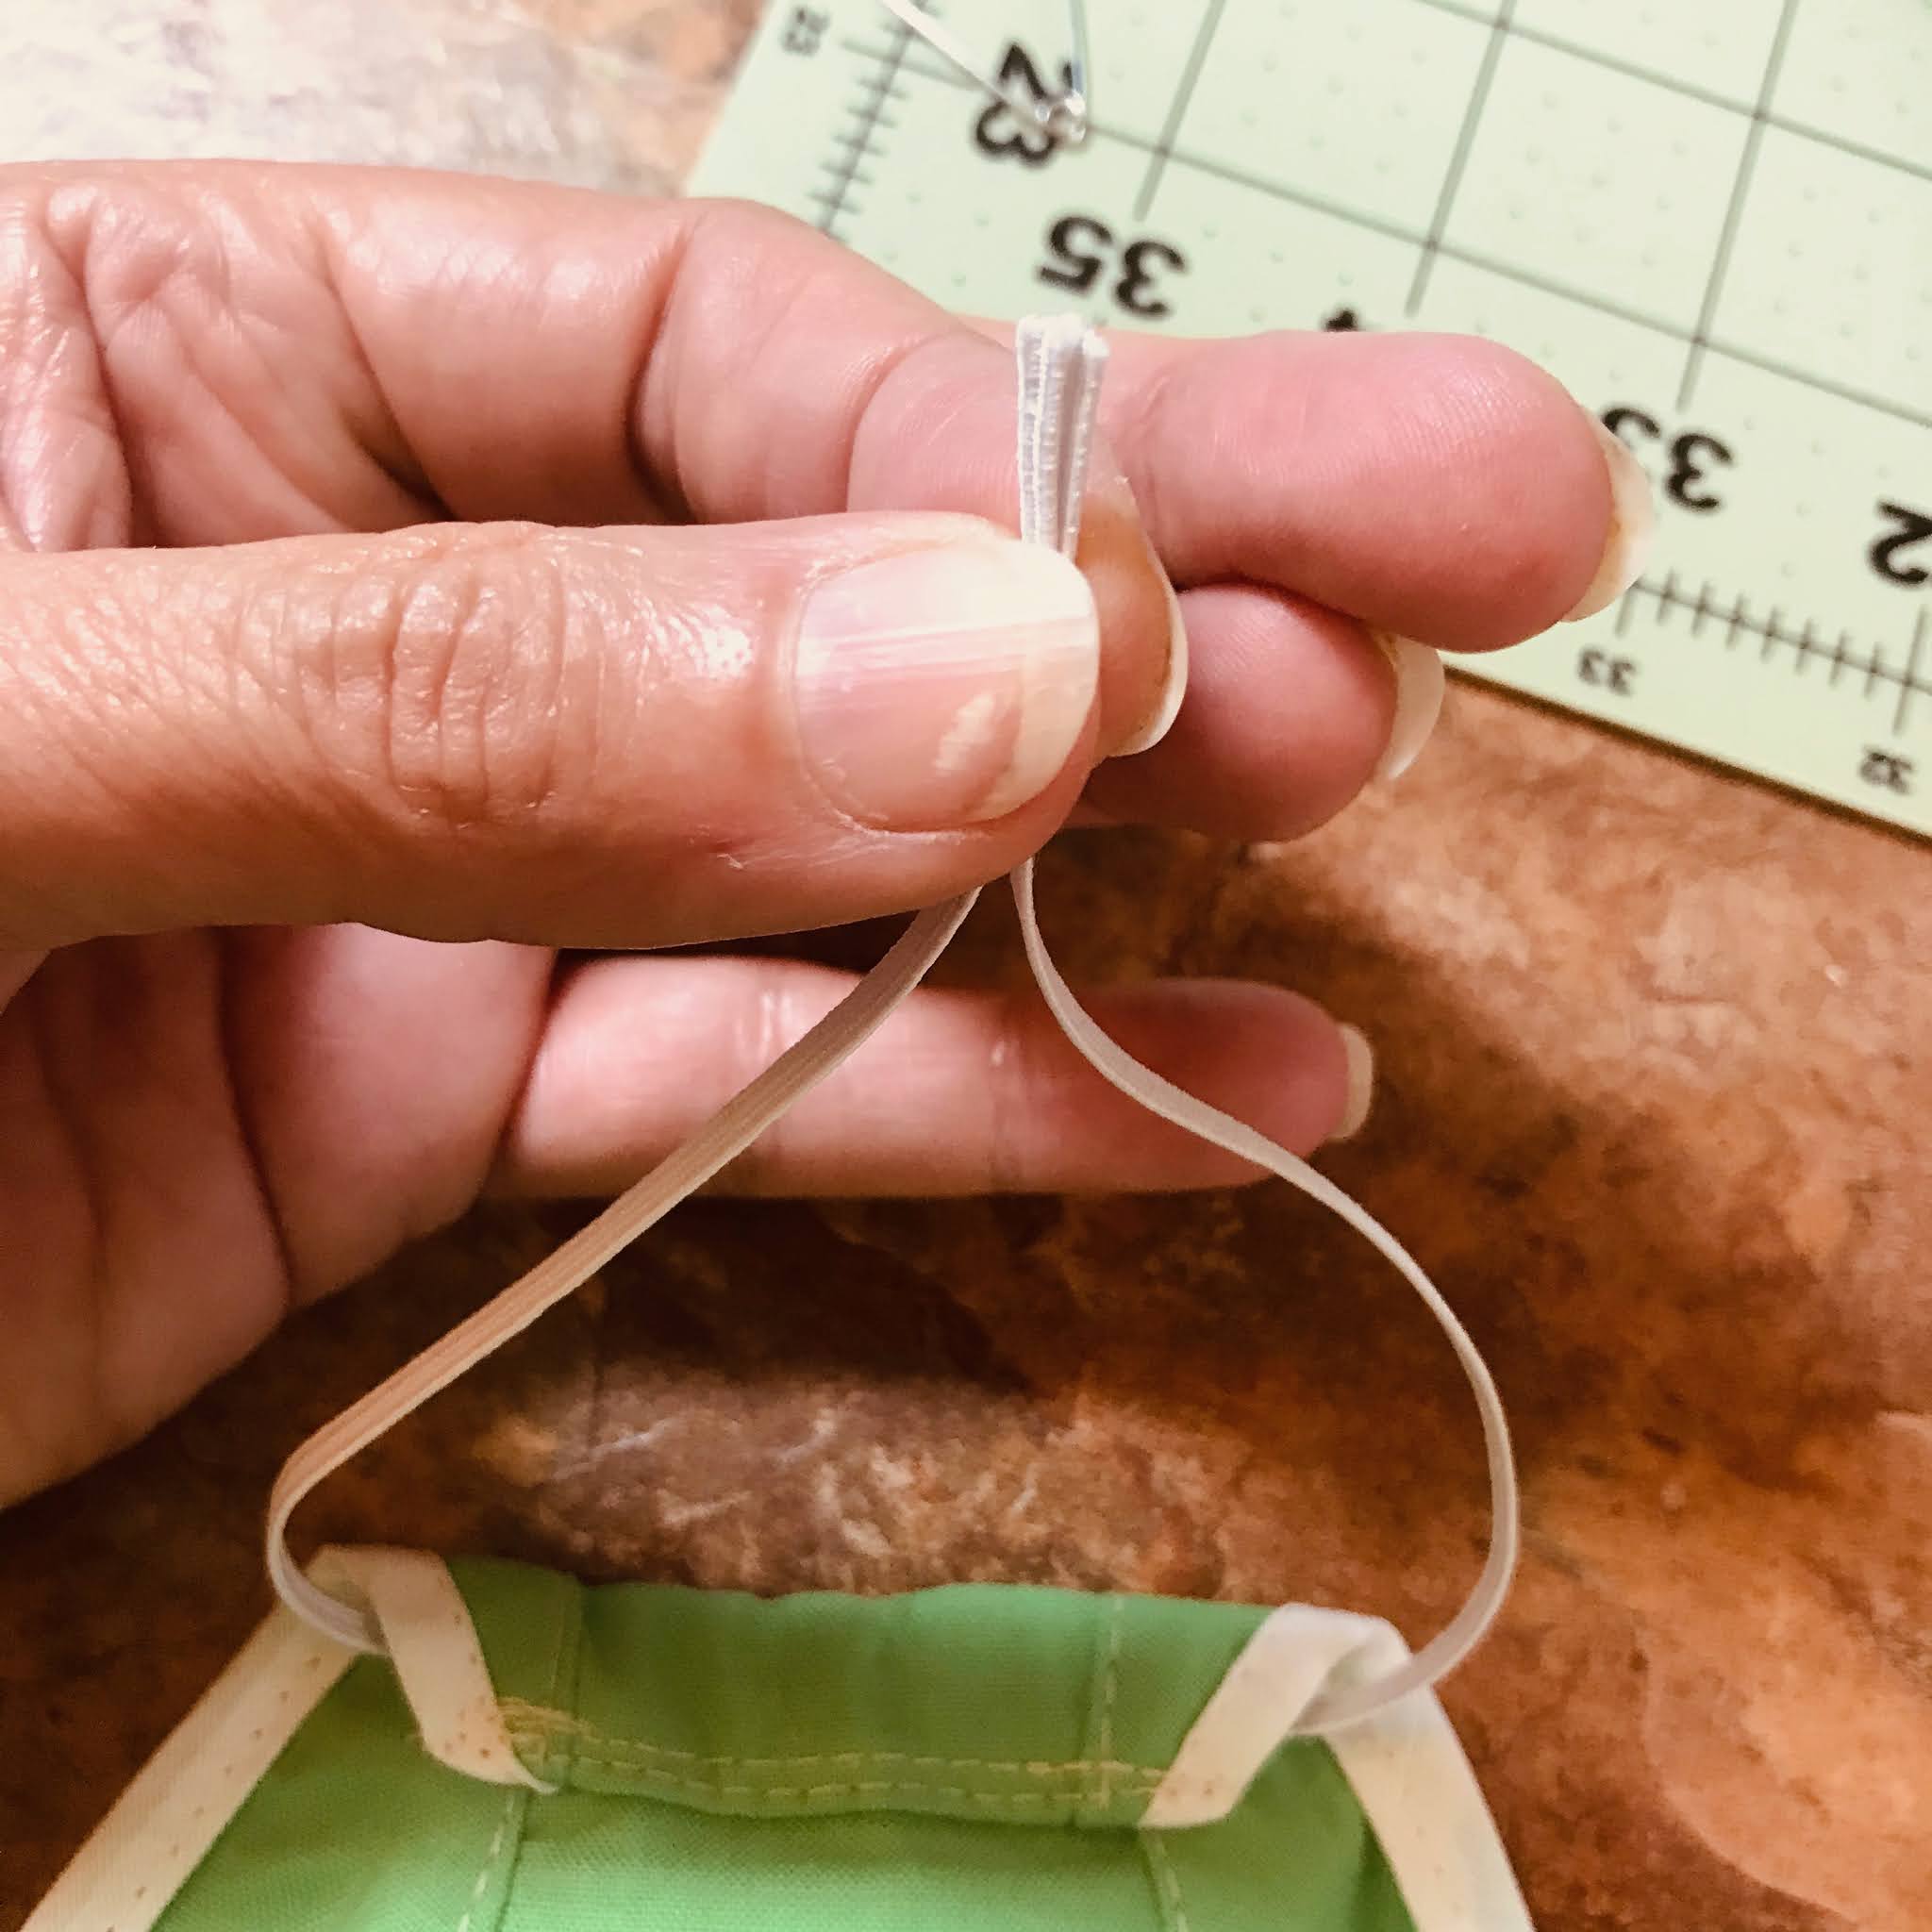
...bring the two ends of the elastic together...

..and tie a knot! Repeat for the other side...

...give the loop of elastic a tug to pull the knot into the casing...

...and Bob's your uncle! You've finished your see-though face mask! The ear loops are adjustable - just pull the knot out of the casing, untie and retie at the right length - or you can put in long straps to tie behind the neck and head if you prefer.
Washing instructions: hand wash with dish detergent, then place to dry in a sunny spot for extra disinfecting. Do NOT place in the microwave to disinfect!!!
Many thanks if you've managed to plug your way through this whole tutorial - I know it's long and picture heavy, but having not figured out the whole video thing yet (how do people do that without help????) it's the best way I could find to show you how I did it.
And have faith - you too can make this mask, just go slow and steady and don't be afraid to get up close and personal with your seam ripper if necessary. It will get easier with practice!

Once again, I'll remind you that you can find the base pattern for this mask at shop.chezvies.com - it's a little hard to find just by browsing, but if you type "trio" in the search field, it will come up.
So - - - can I get a whoop whoop?
*&*&*&*&*&*&*
And now it's your turn!
What's making you whoop it up this week?

What's making you do a little happy dance?
Share! We want to dance right along with you,
And it's always more fun to dance with friends!
The party will stay open until Sunday midnight.
Hope to see you there!
Hugs!
Sarah
PS if you see anything missing or truncated in this post, please email me (salliesue57 (at) gmail (dot) com) ASAP and I will try to fix it. New Blogger and I are having some issues....
Thank you so much for this tutorial. I have to make some masks soon. I don't find any linky button.
ReplyDeleteSo glad you found a wonderful solution to these intricate masks. Big thumbs-up for making these and for your dedication. You are amazing!!
ReplyDeleteCisco CCNP Service Provider Certification 300-515 Exam Dumps is in-demand certification of these days. Now pass your 300-515 Cisco - Implementing Cisco Service Provider VPN Services Braindumps at first attempt with Braindumps4IT exam dumps. Here we offer 300-515 Dumps Questions in PDFs and exam engine software formats. These 300-515 Exam Braindumps have all latest and verified questions.
ReplyDeleteThis is a great tutorial, I wish I had some vinyl. I may have to get some and revisit this post. Thank you for the linky party.
ReplyDeleteGreat tutorial, and a lot of work!
ReplyDeleteFantastic tutorial and thanks for working out all of the kinks for us ahead of time! I'm making some!
ReplyDeleteI'm impressed by the thorough tutorial! I have taken a break from mask-making and I know I need to start up again. I hope I can establish a steady pace rather than the frantic spurts I had in April and May.....Meanwhile: I dislike the new blogger.
ReplyDeleteThe shop name is mispelled at the end of this post-if you copy and paste like I tried-you get chevy parts! lol
ReplyDeleteThank you for this tutorial. Great help to see photos of the steps. What are you using for the window? Been starting to read that there is actually medically grade materials but don’t have the slightest idea where to source that!
ReplyDeleteVery nice tutorial! And I like your tips on the sizing.
ReplyDeleteYou are going to be helping a lot of people with this tutorial. Great instructions!
ReplyDeleteWhat a great service to provide a clear mask tutorial. I'm sure many will take advantage of it. I work in an Assisted Living facility and for those hard of hearing, let alone deaf, it really can be a game changer for communication. Thank you so much.
ReplyDeleteThank you for the tutorial. There is so much work that go into those masks.
ReplyDeleteYou can still return to the legacy version of Blogger, at least for now.
ReplyDeleteI tried New Blogger and found bugs which I reported and as far as I can tell, are still there.
SEW glad that you found a workable solution to the mask design challenge, Sarah! Thanks for posting your modifications for those who can benefit for such a mask. Many thanks to the designer!
ReplyDeleteWell you get two gold stars this week. First for creating the tutorial and second for tacking the new blogger for the first time with a very long post. Actually, I'll throw in a bonus star for respecting the original designer by sending people to her site to buy the pattern.
ReplyDeletePat
Sarah, I do want the pattern, you have my email and other info.
ReplyDeleteMany thanks.
Velia
Thank you so much for sharing the tutorial Sarah! I just had time to blog about this https://www.chezvies.com/2020/08/mask-pattern-hack-link-see-through-mask.html - xx
ReplyDelete