Welcome to the first post for this year's Hands2Help Quilt-Along! Some of you probably remember the Sweet Sixteen Quilt-Along from last year - six different sixteen-patch quilts to demonstrate some of the many ways you could use that versatile block. This year I'm doing something similar with the nine-patch block - a great block for scrap-busting and charity quilting! I hope you'll come join me as we spend the next six Sundays exploring some of the ways you can use a nine-patch block...
And here's this week's quilt! Bright and sunny, it makes me think of summer and picnics...
Of course, while it was beautifully sunny today, it was hard to get a decent picture....
...because the wind was blowing the quilt almost horizontal!
But it was very pretty against last weekend's snow, even if I did get it hung up sideways!
While it may not look like your typical nine-patch quilt, I assure you that it is. Setting the nine-patch blocks on point can really change the look of your quilt. So without further ado, here's a tutorial for this quilt, which I'm calling Lattice Play!
*&*&*&*&*&*&*
Nifty Nines Quilt-Along
Lattice Play
Size - Approx. 62” x 67”
Fabric Requirements:
Background fabric - 2 1/4 yards. This can be all one fabric, or a mix of low volume fabrics if preferred. Cut 533 2 1/2" squares for background.
Darker scraps or a mix of fabrics totaling approximately 2 1/4 yards. Cut 516 2 1/2" squares from print fabrics.
Block Construction:
This is an nine-patch quilt, but what I call an “engineered” nine-patch. There are two basic blocks, put together in a very specific way, that form the body of the quilt.
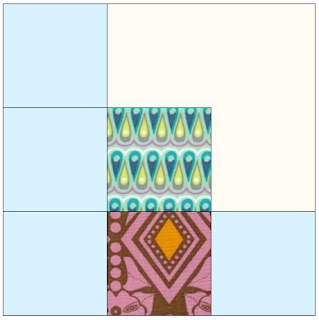
Block A looks like this:
Block A is a simple 9-patch, with the background colors in the corners. Make 52.
Block B looks like this:
Block B is also a simple 9-patch, but the background colors form an L on two edges and another single background block in the corner. Make 39.
Then there are three other blocks, also put together in a very specific way, that after trimming will form the straight edges of the quilt. These are made in such a way that they conserve fabric, rather than making more of the two basic blocks and trimming away half of the block.
Block C looks like this:
Make 21 of Block C.
Block D looks like this:
Block D (right facing)
Block D (left facing)
(ignore the white corners - your D blocks will only have 6 pieces in each, and an irregular shaped edge.)
Block E looks like this:
(Once again, ignore the white portions - your E blocks will only have 4 pieces in each, and an irregular shaped edge.)
These are for the upper corners. Make 2 of Block E.
Quilt Construction
This quilt is put together “on-point” so you may find it useful to have a design wall or floor. Personally, I find it hard to keep my design in the proper order without one! But it is possible,
with a picture of the finished quilt in front of you. Do whatever works best for you! Here is a blow-out of the way the quilt is laid out.
Lay out all of your blocks, and begin assembling on the diagonal. I assembled my entire upper left corner first - sewing one C block to each side of an A block, and an E block to the top of the A block. Then I constructed my rows, joining each row to the assembled corner of the quilt. You may find this gets quite bulky, and you can choose to assemble half the quilt from the top left corner, then the other half from the bottom right corner and then join the two pieces together in a final grand finale!
Here is a complete picture of the quilt layout for your reference…
You can see in this picture what your quilt top’s edges will look like at this point.
To straighten the edges of your quilt, place your long ruler with the 1/4 inch line running along the patchwork blocks like this…
 |
| I've already trimmed this edge, but you can see where the 1/4" line lies against the corners of the blocks. |
...and trim all around the quilt. This will (hopefully) allow your blocks along the side to be whole and not cut off after binding. Be careful - those edges are on the bias and can stretch. You may also want to stitch around the edges of your quilt, about 1/8 of an inch in, just to keep them from stretching out of shape. Quilt as desired, bind, and you are done!
*&*&*&*&*&*&*
I hope you've enjoyed this, the first of six tutorials to come over six weeks. Some will be easier than this one, but all will be beautiful quilts perfect if you need an idea for your Hands2Help quilt! Of course, they'll also make beautiful gifts and family quilts, too - feel free to make as many as you want. I hope you'll post pictures of anything you make using the Nifty Nines tutorials - it will be great to see your own variations. You can post them in the Nifty Nines Quilt Along group on Flickr - just click on the group name to be taken there!
Hugs!
Sarah
PS - If you'd like a PDF of this quilt pattern, click the green button below and save to your device or print for your records!


